… for Apple Final Cut Pro X

Tip #075: Display a Custom Search (Part 1)

Larry Jordan – https://LarryJordan.com

This insignificant little icon opens a wealth of ways to find exactly the clip you need.

Tip Screen Shot

Topic $TipTopic

The magnifying glass in the top right corner of the Browser highlights the Search box. This allows us to find clips based upon text in their file name, or, if you’ve entered anything, the Notes field. (This Search box does not search Event names.)

NOTE: I’ve found that trying to enter Notes in the Browser often doesn’t work. Instead, use the Info Inspector to enter Notes. This works more reliably and can be searched just like file names.

However, there is a much more powerful search option just to the right of the Search box. Its the icon indicated by the red arrow in this screen shot.

It’s called the Search Filter window and over the next three tips, I’ll explain how it works.


Please rate the helpfulness of this tip.

Click on a star to rate it!

… for Apple Final Cut Pro X

Tip #024: Trim Clips Without the Mouse

Larry Jordan – https://LarryJordan.com

The faster you trim, the faster you edit.

Tip Screen Shot

Topic $TipTopic

Trimming by using the mouse to drag the edges of clips is easy. But there’s another way that I find is both faster and more accurate: using the keyboard.

OPTION 1

Using the Arrow tool, select either the In or the Out of clip. (Or use the Trim tool to select both In and Out.)

  • Comma trims the selected edit point one frame left
  • Shift + comma trims the selected edit point ten frames left
  •  

  • Period trims the selected edit point one frame right
  • Shift + period trims the selected edit point ten frames right

OPTION 2

Again, select either the In, Out or both.

Using either the numeric keypad or the numbers on your keyboard, type the number of frames you want the edit point to move.

Type [plus] followed by a number to shift the edit point right. Type [minus] followed by a number to shift the edit point left.

OPTION 3

You can use this same keyboard technique to move entire clips, but you first need to select the Position tool.


Please rate the helpfulness of this tip.

Click on a star to rate it!

… for Random Weirdness

Tip #061: When To Choose JPG, PNG or TIFF?

Larry Jordan – https://LarryJordan.com

Different codecs are best for different uses.

Tip Screen Shot

Topic $TipTopic

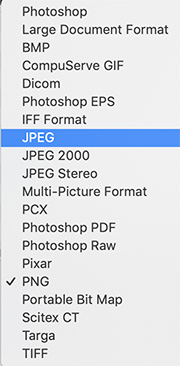
While there are a LOT of image codecs, there are only four that you’ll need to choose from most of the time: PSD, JPG or JPEG, PNG, and TIFF. So, which should you choose?

Here are some tips.

PSD

This is the native Photoshop format.

Use this when you need to retain the ability to edit the elements of an image or when you want to enable, or disable, specific layers within the image.

NOTE: For best results, always embed media into the Photoshop file.

JPG or JPEG

This is a highly-compressed file best used for final distribution. Good image quality in a very small file size.

Part of compressing a JPEG file involves throwing away color data and reducing some of the image quality. While this is almost always OK for images destined for the web, it is not a good idea for any image that you want to edit.

NOTE: Compressing an already compressed file will materially damage quality.

PNG

This is a modestly compressed image format. Excellent image quality with a large file size.

This is a more modern format than TIFF and is the best choice for outputting finished images at high quality. While you can’t reedit a PNG image the way you can a PSD, this provides excellent image quality. PNGs, unlike JPEG, supports an alpha channel for transparent image elements.

The biggest limitation of PNG is that it is only supports 8-bit color.

TIFF

This is a lightly compressed image format, providing excellent image and color quality with a large file size.

TIFF is my go-to still image format. Supporting up to 10-bit color, alpha channels and essentially lossless images, it has been around for a long, long time.

The biggest limitation of TIFF is that, unlike PSD, you can’t edit elements within the image.


Please rate the helpfulness of this tip.

Click on a star to rate it!

… for Random Weirdness

Tip #038: Magic Maintenance: Do a Safe Boot

Larry Jordan – https://LarryJordan.com

Three steps for smooth operations.

Tip Screen Shot

Topic $TipTopic

Keeping our systems running their best requires periodic maintenance. A Safe Boot is something you can do yourself and, for best results, I recommend you do this every couple of weeks. This will not affect the data or applications stored on your system.

  • Start, or restart, your computer while holding the Shift key down. Continue holding the Shift key for 30 seconds after you see the start-up thermometer appear.
  • Log into your computer. You know you held the Shift key down long enough if the words “Safe Boot” appear in the upper right corner of your screen. If they don’t, restart your system and press the Shift key until the log-in screen appears.
  • After login, go to Utilities > Disk Utility, select the name of your boot drive (generally, “Macintosh HD”) from the sidebar on the left then choose First Aid.
  • When repair is complete, restart your Mac and, this time, don’t hold any keys down.

BONUS

Sometimes, your system will act strange and Safe Boot won’t fix it. Here’s a more thorough repair process:

  • Restart your computer and press Cmd + R during restart. This will take a LOT longer than normal. This launches your computer from a hidden partition with a “recovery version” of macOS on it. This allows much deeper repair of the boot disk.
  • After a bit, a menu will appear allowing you to choose between four options. Choose Disk Utility.
  • Again, select your boot drive and click First Aid. When repair is complete, restart your computer.

Following these procedures should minimize the amount of time you spend trying to fix problems with your system.


Please rate the helpfulness of this tip.

Click on a star to rate it!

… for Random Weirdness

Tip #029: Which Files Should Be Copied From a Camera Card?

Larry Jordan – https://LarryJordan.com

“Pick-and-Choose” is the wrong option for best results.

Tip Screen Shot

Topic $TipTopic

All of them.

Select the entire contents of the card, even the folders and files that you don’t recognize, and copy the entire contents of the card into its own folder on your hard disk.

One folder per camera card. Always.

Why? Because, depending upon the codec, different parts of your media are stored in different folders on the card; especially metadata. Copying everything from the card into its own folder on your local storage means that whichever NLE you use for editing is able to assemble all the pieces and track all your data without any problems.


Please rate the helpfulness of this tip.

Click on a star to rate it!

… for Adobe Premiere Pro CC

Tip #046: Create a Custom Workspace

Larry Jordan – https://LarryJordan.com

Premiere allow you to create a custom interface called a “workspace.”

Tip Screen Shot

Topic $TipTopic

A workspace is a collection of panels optimized for a specific task; for example, editing. Premiere ships with eight pre-built workspaces:

  • Learning
  • Assembly
  • Editing
  • Color
  • Effects
  • Audio
  • Graphics
  • Libraries

Naturally, I didn’t like any of these, so I created my own, called: “Buzz Edit,” which you can see in the screenshot.

The easiest way to create a custom workspace is to drag panels around (see Tip #47) and resize things until you are happy.

Then, select Window > Workspaces > Save as New Workspace.

Give it a name and – Poof! – it instantly shows up in the Window > Workspaces menu (with it’s own keyboard shortcut) AND at the far right of the workspaces bar at the top of Premiere.


Please rate the helpfulness of this tip.

Click on a star to rate it!

… for Adobe Premiere Pro CC

Tip #044: Optimize Premiere Preferences for Cache Files

Larry Jordan – https://LarryJordan.com

Cache files help Premiere work faster.

Tip Screen Shot

Topic $TipTopic

The Media Cache preferences have a significant impact on overall system performance because this determines where all your media work files will be stored.

Media Cache files and databases are work and temporary files that Premiere uses during editing – for example, audio waveforms and thumbnails – and when sharing media between applications. For best results, these should be stored somewhere other than where media files are stored, though that is not required.

The default settings store these on the boot drive in the Library inside your Home directory, but you can re-point these to any folder on any drive – provided the storage is fast enough. Cache files need to be on fast drive.

  • Media Cache Files. These are the data files themselves. Click the Browse button to store these to a different location. However, changing the location does not move any files that are already stored in the original location.
  • Delete unused media cache files. It is a good idea to delete these if your drive starts to fill up, just regain storage space. This option only deletes cache file that are not being used. Media and project files are not affected.
  • Media Cache Management. This allows you to schedule to automatically delete older cache files. I tend to delete files based upon age, rather than size.

If, by accident, you delete cache files that are being used, or new cache files are needed, Premiere will re-create them automatically.


Please rate the helpfulness of this tip.

Click on a star to rate it!

… for Adobe Premiere Pro CC

Tip #021: A Fast Way to Export Part of a Sequence – or Clip

Larry Jordan – https://LarryJordan.com

Need to export only part of something in Premiere? It’s easy.

Tip Screen Shot

Topic $TipTopic

With a movie in the Timeline, select File > Export > Media.

When the Export window opens, look in the lower left. Change the menu at the bottom left to Custom (see screen shot). Then, drag the In and Out markers to isolate the section you want to export.

Once that’s done, choose Queue (to export in the background) or Export (to export immediately).

NOTE: You can only have one In and Out in the Timeline or export window.

PLAN B

Here’s a hidden way to export files from the Project panel.

Using Hover Scrub, mark an In and Out (shortcut: I and O) in the clip in the Project panel.

This time, and this is an important step, rather than use the File menu, right-click the clip itself and choose Export Media.

The Export window opens, but this time the clip is loaded into it. Note the menu at the bottom left now says “Clip In/Out” with the range for the clip already marked.

Then, choose Queue or Export as usual.


Please rate the helpfulness of this tip.

Click on a star to rate it!

… for Apple Final Cut Pro X

Tip #068: Remove Specific Effects Fast!

Larry Jordan – https://LarryJordan.com

This trick makes it easy to remove specific effects from one or more selected clips.

Tip Screen Shot

Topic $TipTopic

There are two ways we can remove effects from one or more clips in Final Cut: we can remove all the effects applied to a clip or just selected effects.

Here’s how.

REMOVE ALL EFFECTS

  • Select the clip, or clips, that have the effect you want to remove.
  • Choose Edit > Remove Effects.

This deletes all the effects applied to the selected clips.

NOTE: This is a really fast way to reset a batch of clips back to their native state.

REMOVE SPECIFIC EFFECTS

To remove selected effects from a clip:

  • Select the clip(s) containing the effects you want to remove.
  • Choose Edit > Remove Attributes.
  • Uncheck any blue check-box to remove that specific effect from the selected clips.

The nice part about this technique is that you have the flexibility to remove specific effects without altering the effects you want to keep.


Please rate the helpfulness of this tip.

Click on a star to rate it!

… for Apple Final Cut Pro X

Tip #057: Move Between Projects Faster

Larry Jordan – https://LarryJordan.com

Timeline History: Hard to see – Fast results!

Tip Screen Shot

Topic $TipTopic

If you look carefully at the center-top of the timeline, to the left and right of the project name, you’ll see two tiny arrows; one pointing left and the other pointing right.

These are the Timeline History arrows.

They allow you to move back (left) to earlier projects that you opened in the timeline. Or, forward (right) to projects that you opened after the current project. Simply click the arrow pointing in the direction you want to move.

NOTE: If you hold an arrow down, you’ll see a list of all the projects that you’ve opened into the timeline. Select the one you want and it will immediately open.

While there is no limit to the number of projects you can move between, these arrows will only display projects that were opened into the timeline. Unopened projects still in the Browser are ignored.


Please rate the helpfulness of this tip.

Click on a star to rate it!