… for Adobe Premiere Pro CC

Tip #050: Don’t Repeat Yourself: Use a Template

Larry Jordan – https://LarryJordan.com

Project templates save time by saving settings in a reusable form.

Tip Screen Shot

Topic Icon

Templates, especially for complex repetitive projects, can be a huge time-saver. The only problem is that Premiere does not create them.

But, there’s a very cool workaround: use the Finder!

Here’s how.

  • Create a new project and modify it as needed for your work. This includes track counts, custom buttons, bins, even media clips that get reused from one project to another.
  • Save the project, then close it so it is no longer open in Premiere. (However, you don’t need to quit Premiere.)
  • Switch to the Finder and select the project you just saved.
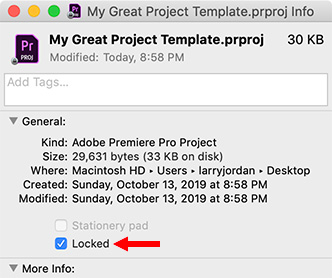
  • Choose File > Get Info (shortcut: Cmd + I).
  • Check the Locked check-box- this makes the file read-only.

The next time you open this in Premiere, all your customization will be retained and Premiere will require you to save it using a different name.

This is a very easy way to create an unlimited number of templates.


Please rate the helpfulness of this tip.

Click on a star to rate it!

… for Adobe Premiere Pro CC

Tip #037: Fixing Dropped Frame Errors

Larry Jordan – https://LarryJordan.com

Dropped frame errors generally mean hard disk or CPU problems.

Tip Screen Shot

Topic Icon

Tip #35 showed how to display the Dropped Frame Indicator. Green indicates that your system is fast enough to play the current media in real-time without dropping any frames, which causes stuttery or stopped playback.

However, when this glows yellow, you’ve got problems. Here’s what could be causing the issue:

Dropped frame errors are generally caused by one or more of these factors:

  • A hard disk that’s too slow to keep up with the video format you are editing
  • A boot disk with insufficient free space
  • A media disk (external drive) with insufficient free space
  • A hard disk that’s overly fragmented, or with confused disk directories
  • An effect that’s too complex for the CPU to calculate in real time
  • Insufficient RAM for the size of the project
  • A video format (such as HEVC) that’s too complex for the CPU to decode in real-time

Demanding more data from your storage than it is capable of delivering in real-time is the most frequent cause of dropped frames.

In general, try to maintain at least 20% free space on all storage devices. And, to make sure you aren’t running into problems, make sure the dropped frame indicator is turned on.


Please rate the helpfulness of this tip.

Click on a star to rate it!

… for Adobe Premiere Pro CC

Tip #004: Little-Known Secrets of the Font Menu

Larry Jordan – https://LarryJordan.com

Three Tips To Make Using Fonts Faster

Tip Screen Shot

Topic Icon Here are three secrets you may not know about the Font menu in Premiere:

  • All the fonts you have used recently are listed at the top of the menu, above the thin gray line.
  • Click a star to flag a font as a Favorite. Then, click the Star icon at the top of the menu to display all Favorite fonts. (To remove a Favorite flag, deselect the star next to the font name.)
  • A fast way to find a font is to type the first few letters of its name in the Font menu. All font names containing those letters will be displayed. Click to choose the one you want.

These tips, plus the ability to see what a font looks like BEFORE you apply it, makes the new Font menu a lot more powerful – and faster to use.


BONUS

  • Click the Creative Cloud icon at the top left of the menu to see all Adobe fonts.
  • Click the red Creative Cloud icon at the top right of the menu to add more TypeKit fonts.

Please rate the helpfulness of this tip.

Click on a star to rate it!

… for Apple Final Cut Pro X

Tip #052: A Better Way to Preview an Effect

Larry Jordan – https://LarryJordan.com

Here’s how to see an effect without applying that effect.

Tip Screen Shot

Topic Icon

In the Timeline, put the playhead in the middle of a clip to which you want to add an effect.

This displays the clip in the Viewer.

Next, open the Effects Browser (shortcut: Cmd + 5) and find the effect you want to apply.

Instantly, the effect – at its default settings – is displayed in the Viewer as though it was applied to the clip, but it isn’t… yet.

Even better, press the Option key. Now as you hover and drag over an effect in the Effects browser you’ll see the effect applied to the clip and, as you drag, the principle setting – for example, the amount of a Gaussian blur – changes allowing you to see how altering the setting will alter the effect.

If you like the results, double-click the effect to apply it.


Please rate the helpfulness of this tip.

Click on a star to rate it!

… for Apple Final Cut Pro X

Tip #025: Let Final Cut Do the Math

Larry Jordan – https://LarryJordan.com

Final Cut can handle duration arithmetic automatically.

Tip Screen Shot

Topic Icon

An earlier tip (#24) showed how to move edit points and clips using timecode. But, did you know that Final Cut can do that timecode math for you? This is especially useful when you are working with different frame rates and need to make changes that don’t translate to whole seconds.

Here’s how.

NOTE: To move a clip, or selected group of clips, you first need to select the Position tool. You don’t need to use the Position tool to move edit points.

With an edit point, points, clip or clips selected in the timeline:

  • Press + [plus] to switch the timecode display into “data entry” mode and tell FCP X you intend to move the selection to the right.
  • Press [minus] to switch the timecode display into “data entry” mode and tell FCP X you intend to move the selection to the left.
  • Then, type the number of frames, seconds or minutes you want the selected objects to move.
  • Finally, press Enter to apply the shift.

For example:

  • Type +10 ENTER to move the selection 10 frames to the right
  • Type -20 ENTER to move the selection 20 frames to the left

Now it gets interesting…

    • Type +48 and, depending upon the frame rate of your project, FCP X will convert this into seconds and frames then move the selection.
    • Type 99, or -120, or 300, or -12345 and watch as FCP X converts the number you type into minutes, seconds and frames – based upon the frame rate of your project.

    Cool.


Please rate the helpfulness of this tip.

Click on a star to rate it!

… for Apple Final Cut Pro X

Tip #006: One Click to Better Color!

Larry Jordan – https://LarryJordan.com

One click and – poof! – a color cast is gone.

Tip Screen Shot

Topic Icon

With the 10.4 update to Final Cut Pro X, Apple made one small change to the Balance Color feature that converted it from useless to magical.

  • Put the playhead in the clip you want to color correct in the Timeline.
  • Select Modify > Balance Color.
  • In the Video Inspector, enable Balance Color and change it from Automatic to White Balance.
  • Using the resulting eye-dropper, click something in the image that’s supposed to be gray.

Poof! FCP X removes the errant color cast and your image looks great!

You can do more with the color wheels to create a look, but nothing is faster at fixing a color cast than this.


Please rate the helpfulness of this tip.

Click on a star to rate it!

… for Apple Final Cut Pro X

Tip #2: 10 Keyboard Shortcuts To Make You Faster

Larry Jordan – https://LarryJordan.com

These ten shortcuts will help you instantly edit faster.

Tip Screen Shot

Topic Icon

When you start doing the same tasks over and over, keyboard shortcuts can make you more efficient. Here are the keyboard shortcuts I use virtually everyday when editing in Final Cut:

  • Control + Cmd + 1 — Toggle Library and Browser display on/off.
  • Shift + Z — Fit image into Viewer or project into Timeline.
  • Cmd + 7 — Show/Hide video scopes.
  • Shift + I — Jump the playhead to the In.
  • Option + X — Delete both the marked In and Out.
  • V — Toggle clip visibility off or on.
  • E — Perform a standard append edit at the end of the timeline.
  • W — Perform a standard insert edit at the position of the skimmer/playhead.
  • Option + W — Insert a gap into the Timeline at the position of the skimmer/playhead.
  • Cmd + B — Cut all selected clip(s) at the position of the skimmer/playhead.

BONUS

  • Shift + comma/period — Move selected edit point or connected clip ten frames left/right.
  • S — Toggle skimming on or off.

Please rate the helpfulness of this tip.

Click on a star to rate it!

… for Adobe Premiere Pro CC

Tip #036: Changing Monitor Resolution Means Faster Previews

Larry Jordan – https://LarryJordan.com

Changing display resolution does not fix dropped frame problems.

Tip Screen Shot

Topic Icon

You probably know that changing the screen resolution in either the Program or Source Monitors from Full (highest quality) to 1/2 or 1/4 reduces the amount of time that you spend rendering because Premiere only needs to display 50 or 25 present of the total pixels in each frame of video.

While this decreases the load on the CPU and allows it to play more effects in real-time without rendering, it does not decrease the amount of data that’s required between your storage and your computer.

For example, this won’t fix dropped frame errors – which are almost always caused by storage that’s too slow to support the video format being played. Regardless of the display resolution, Premiere still needs to transfer the complete media file in real-time or faster.

Setting the screen playback resolution to 1/2 effectively quarters the number of pixels that need to be computed for each frame. This will reduce dropped frames caused by a slow CPU, but not by slow storage.


Please rate the helpfulness of this tip.

Click on a star to rate it!

… for Apple Final Cut Pro X

Tip #013: Adjust Spacing Between Two Letters

Larry Jordan – https://LarryJordan.com

Tweaking letter spacing can make titles easier to read.

Tip Screen Shot

Topic Icon

To adjust the spacing between two characters, put your cursor between the letters you want to kern, press Cmd + Option and the left or right square bracket keys to move the two letters on either side of the playhead closer or further apart.

While using the arrow keys won’t work, to kern characters, once you position the cursor, you can step through the text with the arrow keys to move the cursor to a different pair of letters.

NOTE: Most of the time, you won’t need to adjust body text, but adjusting the letter-spacing of titles will often help readability a lot.


Please rate the helpfulness of this tip.

Click on a star to rate it!

… for Apple Final Cut Pro X

Tip #5: A Fast Way to Fix Color Problems

Larry Jordan – https://LarryJordan.com

This one tip can solve really tricky color problems.

Tip Screen Shot

Topic Icon

This one tip has solved more color problems for me than any other: “If something is supposed to be gray, it must appear as a small dot in the center of the Vectorscope.”

Use the Crop > Trim tool to isolate something in the frame that’s supposed to be gray (remember, black and white are also “gray”).

Next, using the Master color wheel in the Color Inspector, adjust the colors so that the dot is centered in the middle of the Vectorscope.

Then, undo the Crop by clicking the curved arrow next to Crop in the Inspector to see the full image.

EXTRA CREDIT

You have more control using the individual color wheels, starting with mid-tones, but it will take longer.


Please rate the helpfulness of this tip.

Click on a star to rate it!