… for Apple Final Cut Pro X

Tip #186: Download Your Free Stuff!

Larry Jordan – https://LarryJordan.com

All content is free and availably for any project without royalties.

Tip Screen Shot

Topic $TipTopic

You may not know that Final Cut Pro X ships with a ton… well, at least a big bunch, of free media and other files. However, these are not installed with Final Cut itself.

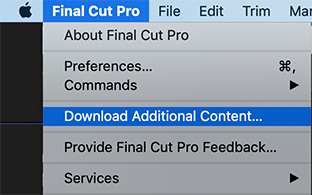
To access these free files, choose Final Cut Pro > Download Additional Content.

This opens System Preferences > Software Update where you can easily download and install these files. All files shipped with Final Cut can be used royalty-free on any project.


Please rate the helpfulness of this tip.

Click on a star to rate it!

… for Random Weirdness

Tip #145: Three Tips to Focus Your Editing

Larry Jordan – https://LarryJordan.com

It is easy to get overwhelmed when editing non-scripted material.

Tip Screen Shot

Topic $TipTopic

Editing a documentary, or even a simple interview, can quickly get overwhelming with all the different sound bites and B-roll you need to deal with. Especially if the story is still evolving as you edit.

Here are three tips to help you focus:

  • Prioritize your media. As you review your media make notes on which clips have the most interesting material. Put them in their own bin, or flag them as a favorite.
  • Get your media organized. Sketch out your edit on paper. Tag clips using metadata. Use colors, keywords, favorites or any other organizational tool your NLE supports. The key is to get a sense of where you are going before you make your first edit. Once you get buried in the timeline, it is hard to take a step back and see the whole picture.
  • Edit one sequence at a time. Break your project into scenes, then work on one scene at a time. Otherwise, it is easy to get overwhelmed and frustrated.

Feel free to share your own tips in the comments.


Please rate the helpfulness of this tip.

Click on a star to rate it!

… for Random Weirdness

Tip #019: Pick the Right CPU for Video Editing

Larry Jordan – https://LarryJordan.com

All CPUs are not created equal.

Tip Screen Shot

Topic $TipTopic

Much of technology has become very opaque. CPUs now range from i3 to i9. GPUs range from 560 to Vega whatever. Is an editor’s life over if they get an AMD 570 instead of a 575X? Is an i5 really THAT bad?

NOTHING IS PERFECT

No matter how fast your computer, you can easily design a project in any NLE that will bring it to its knees. No computer can play every possible codec, frame size, frame rate, bit depth and effect perfectly in real-time. None. At some point, rendering or proxies will become necessary.

CPUs

  • There is no noticeable performance difference between a CPU running at 3.0 GHz or 3.5 GHz for the same class of chip (i3 vs. i3, i5 vs i5, i7 vs. i7).
  • CPU speed is less important than support for multiple cores and hyper-threading.
  • More cores makes for a faster CPU.
  • As video bit depth increases, i7 and i9 CPUs become mandatory.
  • An i5 CPU will feel slower than an i7, but an i5 will be fine for smaller, shorter, or HD, projects.
  • Import, edit, trim, playback, and speed changes rely principally on the CPU.
  • Video compression and transcoding also benefit from faster CPUs

GPUs

  • Effects, color grading, rendering and export rely principally on the GPU.
  • Faster GPUs do not provide higher quality, only faster render times.
  • Apple Final Cut Pro X uses the GPU more than Adobe Premiere Pro CC. However, Adobe is actively working to use more GPU resources in future releases.

Please rate the helpfulness of this tip.

Click on a star to rate it!

… for Random Weirdness

Tip #012: Easy vs. Hard Frame Rate Conversions

Larry Jordan – https://LarryJordan.com

Changing frame size is easy. Changing frame rate is not.

Tip Screen Shot

Topic $TipTopic

The basic rule of frame rates is: “Shoot the frame rate you need to deliver.”

Why? Because changing frame rates is non-trivial. Some frame rate conversions are easy, others will add jitter or stutter to the playback. The faster the frame rate, the more “real” the image will seem. Slower frame rates tend to have a lot of motion blur.

The good news is that if your project is bound for the web or computer playback, you can use any frame rate. The web is very flexible. Braodcast, cable and digital cinema are much less forgiving.

In general, it is easy to convert frame rates that are multiples of each other:

  • 24 to/from 48
  • 25 to/from 50
  • 29.97 to/from 59.94
  • 30 to/from 60

What’s hard is when frame rates don’t divide evenly. Now, the computer needs to play games creating false frames to get things to work out, or change the speed of playback, which is what we do to get from 24 to 25 or 25 to 24.

Tricky conversions are between 24 and 30 or 25 and 30 in either direction. These tend to cause jittery playback.

BONUS

If you are shooting high-frame rate video for slomo, keep your project frame rate slower to provide the best results when slowing your media. So, a project at 30 fps provides better slomo than a project at 60 fps.

Please rate the helpfulness of this tip.

Click on a star to rate it!

… for Apple Motion

Tip #152: Motion Templates Speed New Projects

Larry Jordan – https://LarryJordan.com

A template is a master file with elements and animation already in place.

Tip Screen Shot

Topic $TipTopic

Let’s say you need to create a new open every week for a program. While each open has the same elements, a few things change. While you could simply copy and reuse an existing project, templates are a better way to work.

Why? Because they store all the elements you need and prevent you from accidentally saving a revised project with the wrong name, thus erasing the older project.

Here’s how this works.

  • Create a new project or work with an existing project.

NOTE: While you can change project settings in Motion at any time, it is always best to set the duration before adding any elements. Changing the duration after elements are added is surprisingly tricky.

  • Modify the project as necessary.
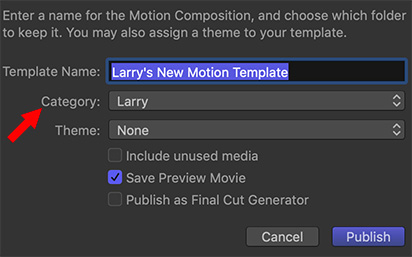
  • When you are done creating, save your work. This is the critical step, choose File > Publish Template. NEVER simply save a template, that only creates a Motion project.
  • Give the template a name, then, if the category you want does not exist, click New Category. (A category is essentially a folder which is displayed in the Project Browser sidebar.)
  • Finally, click Publish. That’s it. You’ve created a new Motion template.

NOTE: You can store multiple templates in the same category. You only need to create a category once.

To access a template, look in the Compositions section of the Project Browser when you create a new project for Motion. Double-click the template you want to use.

Done.


Please rate the helpfulness of this tip.

Click on a star to rate it!

… for Adobe Premiere Pro CC

Tip #146: Secrets of Freeform View

Larry Jordan – https://LarryJordan.com

Freeform view lets you arrange clips however you want

Tip Screen Shot

Topic $TipTopic

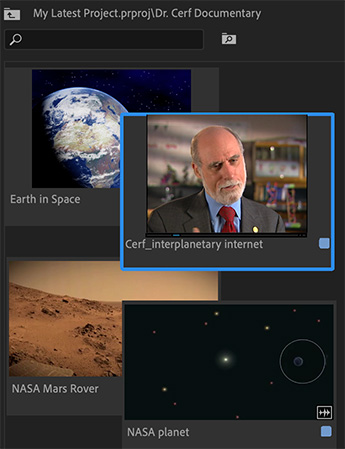
The Project panel has three different ways to view clips: list, thumbnail and Freeform. Freeform is new and, as you’ll discover, there are multiple things you can do in Freeform view. For example:

Zoom in and out of clips

  • Hold down Opt/Alt while scrolling the mouse wheel
  • – or – Pinch zoom on a trackpad
  • – or – Use the + and keyboard shortcuts

Snap the edges of a clip to another

  • Press Alt (on Win) or Opt (on macOS) and drag the clip so that its edge snaps to the edge of another clip

Align all or selected clips to grid

  • Select clips, right-click and choose Align to Grid from the context menu.

Adjust the size of clips

  • Select clips, right click, select Clip Size and choose a size option. The default clip size is Medium.

Hoverscrub the clips

  • Move your mouse pointer to the left and right to scrub the clip. Press I and O keys to mark the In point and Out point.

Customize the displayed metadata in Freeform view

  • You can specify the type of metadata displayed on line 1 and 2 of the Freeform view thumbnail. The label color swatch and thumbnail badges can also be toggled on and off.
  • Click the Project panel hamburger menu, and select Freeform View Options.

BONUS

See Tip #139 for more information on the Project panel.


Please rate the helpfulness of this tip.

Click on a star to rate it!

… for Adobe Premiere Pro CC

Tip #143: What Do These Audio Track Header Icons Do?

Larry Jordan – https://LarryJordan.com

Track Headers provide more control when editing a sequence

Tip Screen Shot

Topic $TipTopic

(See Tip #134 for an explanation of the video track headers.)

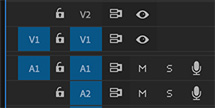
Looking at the audio track headers (located on the extreme left side of the timeline), here’s what each of these icons mean:

  • Blue A1 (far left). This icon indicates the “active track.” When you edit a clip into the timeline using a keyboard shortcut, the audio goes into the track at the position of the playhead with the blue highlight. (Adobe calls this “Source Patching.”)
  • Lock. This locks a track so you can’t make changes. However, be careful with this because if you lock the audio, but don’t lock the video (or vice-versa) you can easily move the unlocked track out of sync.
  • Blue V1 (middle). When you copy a clip, the clip will paste into the LOWEST NUMBERED track with a blue highlight. Drag the blue to change track location, click it to turn it on or off. (Adobe calls this “Track Targeting.”)
  • Sync lock. Normally, when doing an insert edit, you want everything to shift down with the inserted media. This is the default setting. However, turning sync locks off means that when you insert a clip, any clips on tracks where sync lock is turned off will not move. This can be a powerful feature when you want to insert a video clip, but not break the audio tracks.
  • Mute. When clicked it makes all audio clips on this track inaudible.
  • Solo. When clicked, it makes all audio clips on all non-soloed tracks inaudible.
  • Microphone (far right). This instantly enables a track for voice over recording and begins recording according to the current voice over settings. (See Tip #136).

BONUS

Watch what happens when you click one of these controls while pressing Shift, Option or Cmd. These modifier keys allow you to control groups of these switches.


Please rate the helpfulness of this tip.

Click on a star to rate it!

… for Adobe Premiere Pro CC

Tip #136: Hidden Voice-Over Settings

Larry Jordan – https://LarryJordan.com

Premiere can help you record voice-overs.

Tip Screen Shot

Topic $TipTopic

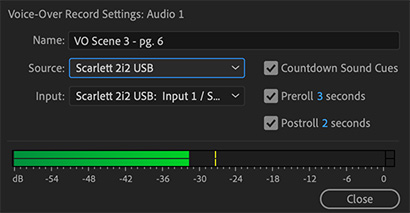
Control-click the microphone icon in a Track Header and choose Voice Over Settings.

This opens a dialog that allows you to name the recording, as you’d name any other clip, set the audio source you want to use for recording, and select the input audio channel; as well as three other options:

  • Countdown Sound Cues. When checked, this will display a countdown and beep every second to alert you to when the recording will start. The default is three seconds prior.

While you can start a voice-over recording anywhere you place the playhead, the best method is to set an In and Out to precisely determine the duration of the recording. When you do, the following two options become relevant:

  • Preroll. This determines how far before the recording starts the playhead will be positioned. Most often, this preroll allows talent to get a sense of the pace and content just prior to their recording.
  • Postroll. This determines how many seconds after the Out playback will continue.

The recording itself only exists between the In and Out.

NOTE: For other audio options in the Track Header, see Tip #143.


Please rate the helpfulness of this tip.

Click on a star to rate it!

… for Apple Motion

Tip #093: Create Better Gradients

Larry Jordan – https://LarryJordan.com

Motion creates very poor gradients.

Tip Screen Shot

Topic $TipTopic

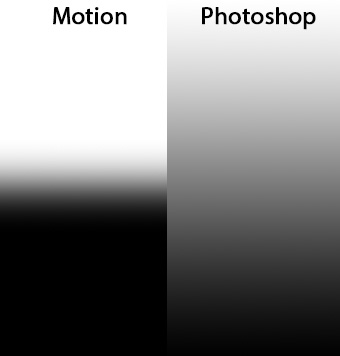
The left image is a continuous gradient created by Motion. The right image is a gradient created in Photoshop. Clearly, the Photoshop gradient is MUCH smoother.

If you need smooth gradients, for example, for blend modes, you are far better off creating them in Photoshop, saving them as a PNG or TIFF, and importing them into Motion.

Most of the time I use TIFFs, but PNGs should work equally well.


Please rate the helpfulness of this tip.

Click on a star to rate it!

… for Apple Motion

Tip #091: A Faster Way to Fine Tune

Larry Jordan – https://LarryJordan.com

This is a great option when you need to make small adjustments.

Tip Screen Shot

Topic $TipTopic

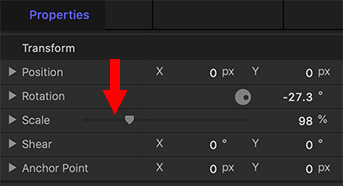
Every slider in Motion has a track that it slides in.

Press the Option key while clicking on the track and you’ll change the value of the setting by one unit.

Click left of the slider to decrease the value, click right of the slider to increase the value.

Not all sliders support this, but most of them do.


Please rate the helpfulness of this tip.

Click on a star to rate it!