… for Apple Final Cut Pro X

Tip #109: Solve the “Missing Camera” Alert

Larry Jordan – https://LarryJordan.com

Using a consistent workflow is important.

Tip Screen Shot

Topic $TipTopic

Bill Rabkin writes:

Recently, when I opened a library that I’ve been editing for a while and selected “Clip #1” in the Browser, FCP X displayed its red “Missing Camera!” warning. Apparently it still thinks Clip #1 resides in a camera card, despite my deleting Preferences and not having the DCIM, MISC, or PRIVATE folders on my external drive.

When I spoke to an editor at Access Framingham, our city’s Public Access Station for whom I do most of my videos, he suggested that I select Clip #1 in the Browser and then choose File > Import > Reimport from Camera/Archive.

I had never used this command before, never even knew it existed.

It worked! FCP X no longer complains when I try to share either a Master File or Current Frame.

I think the problem likely was caused because the SDHC card with the AVCHD file was the last camera card that I had copied to my external hard drive, and I don’t think I had ejected the SDHC card before I imported all of the raw footage into my FCP X Library from the hard disk sub-folders. The presence of the mounted SDHC card must have confused FCP X.

From now on, you can bet that I won’t create a new Library until all of the SDHC cards are back in their case!


Please rate the helpfulness of this tip.

Click on a star to rate it!

… for Adobe Premiere Pro CC

Tip #133: Open Sequences Between Projects

Larry Jordan – https://LarryJordan.com

Premiere supports opening unlimited sequences from any project!

Tip Screen Shot

Topic $TipTopic

Premiere allows you to open (more accurately, “import””) one or more sequences from different projects. This makes it easy to share work between projects. Here’s how:

  • Open, or create, the project into which you want to import a sequence.
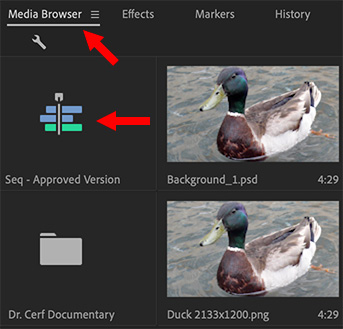
  • Open the Media Browser.
  • Navigate to the project file that contains the sequence you want to open. Then, double-click it.
  • A message appears saying that Premiere is starting the Dynamic Link database. This technology allows different Adobe apps to share data between apps.
  • After a few more seconds, all the sequences, bins and clips in that project are displayed in the Media Browser.
  • Right-click the sequence you want and choose Import.

Virtually instantly, this project will appear in the Program panel.

NOTE: This simply imports a sequence, it doesn’t link them. Any changes you make are not reflected back to the original project.


Please rate the helpfulness of this tip.

Click on a star to rate it!

… for Adobe Premiere Pro CC

Tip #122: What is Auto Save Actually Saving?

Larry Jordan – https://LarryJordan.com

Auto Save can protect you from catastrophe.

Tip Screen Shot

Topic $TipTopic

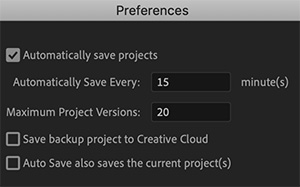
By default, Auto Save saves a copy of your Project file every 15 minutes in the same location as your project.

NOTE: You can change the Auto Save location in Project Settings > Scratch Disks.

However, by default, Auto Save does NOT save your current project or media. Think of Auto Save as a backup file in case something really bad happens to your main project file. As well, if you don’t make any changes to your project for 15 minutes, it does not create a new Auto Save file.

Also, by default, it saves up to 20 versions. When it saves the 21st version, the oldest version is deleted. This means that it only keeps the 20 most recent versions of your project file to avoid filling your hard disk with backups.

You can have Premiere automatically save the project you are working on by checking the Auto Save also saves the current project(s) checkbox in Preferences > Auto Save.

I tend to leave this option off because I want to decide when to save my project – in case I’m experimenting and don’t want all those changes saved… yet.

But, automatically saving a project file can decrease your stress if you are someone who tends to forget to save frequenty.

Also, if you have a fast enough Internet connection, you can backup your project files, but NOT your media, to the Creative Cloud. My Internet connection is far to slow to make this viable.


Please rate the helpfulness of this tip.

Click on a star to rate it!

… for Codecs & Media

Tip #100: Optimize Media for YouTube

Larry Jordan – https://LarryJordan.com

Uploading a video isn’t enough.

Tip Screen Shot

Topic $TipTopic

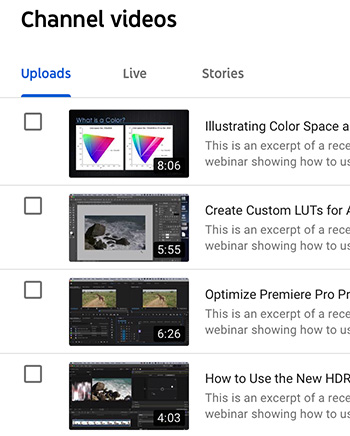
I was reading a blog recently by Richard Tiland about posting videos to YouTube. In it, he wrote: “Uploading your video to YouTube isn’t enough. You need to include metadata so that the site understands what your video is all about.”

His points included:

  • Optimize the title with keywords. Keep it short, but searchable.
  • Add a detailed and accurate description. Length is less important here.
  • Include a transcript to help viewers take in your content without turning up the sound.
  • Organize content using playlists. This helps both viewers and YouTube’s search algorithms.
  • Create a cohesive look to improve branding. Make your videos look like they are coming from the same creative source.
  • Finally, don’t forget the Call to Action. This is the explicit behavior you want the audience to take after watching your video.

Metadata always seems intimidating somehow. But, really, all we are doing is enabling viewers to find our media faster and easier. And that is always a good thing.


Please rate the helpfulness of this tip.

Click on a star to rate it!

… for Codecs & Media

Tip #086: How to Create Custom Poster Frames

Larry Jordan – https://LarryJordan.com

Poster frames illustrate the contents of a movie clip in the Finder

Tip Screen Shot

Topic $TipTopic

Ian Brown suggested this tip.

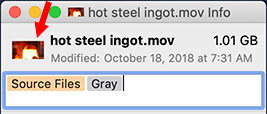
There’s a very fast way to create a poster frame for a QuickTime movie. (Poster frames appear in the Finder, and other locations, to illustrate the contents of a clip.)

  • Open the video in QuickTime Player
  • Move the playhead to the frame you want to use as a poster frame
  • Choose Edit > Copy (shortcut: Cmd + C)
  • Close the video
  • Select the file icon in the Finder
  • Choose File > Get Info (shortcut: Cmd + I)
  • Select the small icon in the top left corner
  • Choose Edit > Paste (shortcut: Cmd + V)

Done.

EXTRA CREDIT

Actually, anything you paste into that top left box will become the poster frame. It doesn’t need to be a still from your video – though it can’t be a video itself.


Please rate the helpfulness of this tip.

Click on a star to rate it!

… for Adobe Premiere Pro CC

Tip #022: 2 Export Options You Don’t Need

Larry Jordan – https://LarryJordan.com

These options have been puzzling editors for years.

Tip Screen Shot

Topic $TipTopic

You are ready to export your final project, when you come face-to-face with two inscrutable checkboxes. Ever wonder how to set these options in the Export window of Premiere? We’ve got the answer.

  • Maximum Bit Depth. If you have a GPU, Maximum Bit Depth is irrelevant as you’re already getting that performance from the GPU, if it is applicable to your media. Turn this off.
  • Maximum Render Quality. If you have a GPU, this, too can be turned off. The only reason to turn it on is if you are scaling your images – up or down – and see jagged edges on clearly defined diagonal lines. As of this time, scaling is still CPU-based, and only effects calculated using the CPU are affected by this setting.

Now you know.

As you can probably guess, as Adobe migrates from CPU-based effects to GPU-based effects both of these options will become unnecessary and probably disappear.


Please rate the helpfulness of this tip.

Click on a star to rate it!

… for Codecs & Media

Tip #104: Why Is a Smooth Audio Fade Called +3 dB?

Larry Jordan – https://LarryJordan.com

Audio is a Strange Beast

Tip Screen Shot

Topic $TipTopic

Unlike video, audio levels are logarithmic. For example, whenever the audio level increases (or decreases) by around 10 dB, the perceived volume is doubled (or cut in half). These log values also have an impact in cross-fading between clips.

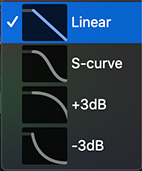
A +3 dB transition adds a 3 dB increase in volume to both clips in the middle of a cross-fade. If the software did not, the audio would sound like it is getting fainter in the middle of a transition, then louder at the end.

When fading to or from black, a straight-line (linear) transition is best. When cross-fading between two clips, both of which have audio, a +3 dB transition is best.

EXTRA CREDIT

Some software allows you to change the shape of the curve manually. These rules still apply, but manual adjustments allow much greater control over how the transition sounds.

The general rule is: Whatever sounds the best to you IS the best.


Please rate the helpfulness of this tip.

Click on a star to rate it!

… for Apple Final Cut Pro X

Tip #125: Edit Vertical Video – Fast

Larry Jordan – https://LarryJordan.com

Edit vertical video the easy way in FCP X.

Tip Screen Shot

Topic $TipTopic

In spite of all our hopes, vertical video is here to stay. Not to worry, Final Cut makes editing vertical video easy. When the time comes to edit, transfer the video to your editing computer, then:

  • Choose File > Import Media (Shortcut: Cmd + I) and navigate to the footage. (You can transfer media directly from your iPhone if it is connected.)
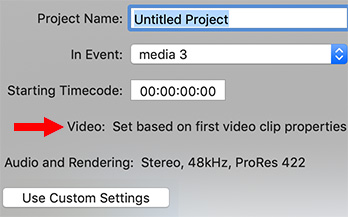
  • Next, create a new project and use the Automatic settings. (This is the screen where the button in the lower left reads: Use Custom Settings.)
  • MOST IMPORTANT: don’t change any project settings. Make sure that the text: Video: Set based upon first video clip properties is visible. This is what makes configuring vertical video easy.
  • Next, edit a vertical clip into the empty, new project. This is important, even if this isn’t the first clip you want the audience to see, because FCP X uses this clip to configure the project settings.
  • When that first, non-standard video clip is edited into the timeline, a dialog appears asking if you want to change the project settings to match the video.
  • Click YES and FCP X will automatically configure the timeline to match your media. After you edit a couple more clips into the timeline, you can delete that first clip that you used to set Project settings.

After that, edit as normal.

When it comes time to export the final project, choose: File > Share > Master file to create a high-quality master file for compression later.

NOTE: Make sure that the aspect ratio of your final export matches the aspect ratio of the original media. Both 1080 x 1920 and 608 x 1080 match for aspect ratios.


Please rate the helpfulness of this tip.

Click on a star to rate it!

… for Apple Final Cut Pro X

Tip #103: Add an Audio Fade Without Using Keyframes

Larry Jordan – https://LarryJordan.com

This is a fast way to add fades.

Tip Screen Shot

Topic $TipTopic

In the Timeline, select an audio clip. Then, look very carefully at the edges.

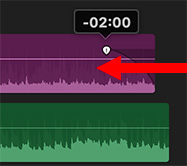
Just above the volume control line you’ll see a small dot at each edge. This is the Audio Fade dot.

Drag the Dot to add a fade to the beginning or end of each clip.

To change the duration of the fade, simply slide the position of the dot left or right.


Please rate the helpfulness of this tip.

Click on a star to rate it!

… for Apple Final Cut Pro X

Tip #090: A Faster Way to Create Audio Fades

Larry Jordan – https://LarryJordan.com

Apply fades using a keyboard shortcut.

Tip Screen Shot

Topic $TipTopic

You probably know that you can add an audio fade to either the beginning or the end of an audio clip by dragging the small white “audio fade dot” at the edges of an audio clip.

What you may NOT know, though, is that there is a much faster way to add fades, but it isn’t enabled by default.

Here’s how:

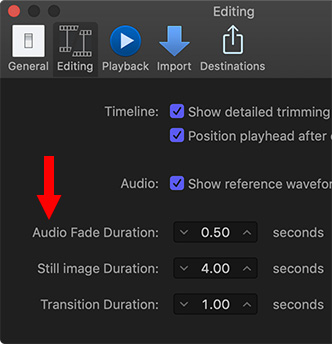
  • Go to Preferences > Editing and enter the Audio Fade Duration you want to use as a default setting.
  • Next, go to Commands > Customize, make sure you are in the Default command set (upper left corner), then  search for “Audio Fades”
  • Set Apply Audio Fades to the shortcut you want to use. (In my case, I set this to Option + A.)

Now, whenever you want to quickly apply an audio fade, select the clips you want to apply the fade to, then type Option + A. Poof! – fades appear at the end of all selected clips.

EXTRA CREDIT

These fades are fully adjustable by dragging the fade dot. All you are doing with this shortcut is applying a standard audio fade quickly.


Please rate the helpfulness of this tip.

Click on a star to rate it!