… for Apple Final Cut Pro X

Tip #085: Narrow Your Search (Part 3)

Larry Jordan – https://LarryJordan.com

Boolean selection simplify finding that needle in a haystack.

Tip Screen Shot

Topic $TipTopic

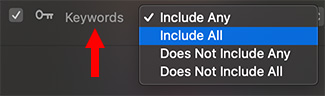
A “Boolean Selection” is a search based upon logical criteria. Specifically, “any,” “and,” and “not.” These are most often applied to searches using keywords, but you can find these options in a variety of places in Final Cut.

Here’s how these work. Let’s say you are searching the media in your project. These clips have some combination of the following keywords applied to each clip: “Red,” “Green,” and “Blue.”

  • Any. This will find clips that contain even one (“any”) of the keywords you are searching for. If a clip contains Red – or – Green – or – Blue, it will appear in the results of your search.
  • All. This will find clips that contain all of the keywords you are searching for. Only clips that contain Red – and – Green – and – Blue will appear.
  • Does Not Include Any. This lists only those clips that do not hold any of the keywords you are searching for. For example, searching for Red and Blue and enabling this option means only clips that do not contain either Red or Blue will appear.
  • Does Not Include All. This lists only those clips that do not hold all of the keywords you are searching on. For example, searching for Red and Blue and enabling this option, will show clips with Red – or – Blue, but not both.

I like keywords a lot. What I like even more is how, using Boolean selection, we can really narrow our searches to find exactly the media we need next for our project.


Please rate the helpfulness of this tip.

Click on a star to rate it!

… for Random Weirdness

Tip #071: An Editing Workflow to Boost Efficiency

Larry Jordan – https://LarryJordan.com

Eleven steps to boost your productivity.

Tip Screen Shot

Topic $TipTopic

Workflows exist to help you accomplish a task efficiently. These eleven steps were developed to help editors focus on what needs to be done now – as opposed to what you want to do now.

  1. Plan. The more time you spend planning, the faster the actual edit will go. Specifically think about what you need to deliver, then work everything backward from that.
  2. Gather. Gather all the media you need and put it where you can access it. Once you start editing, try not to move media.
  3. Import & Label. Import media into your project then label it so you can find it.
  4. Build the story. The most time-consuming part is figuring out what order of clips best tells your story.
  5. Organize and trim the story. Once you have the story roughly told, organize your clips to tell it better. Then, trim the edit points so the story flows smoothly from one shot to the next.
  6. Add transitions. Only after you have the story built and organized should you spend time adding transitions.
  7. Add text and effects. Now that the story is complete, polish it with text and effects. This will take all the available time between now and your deadline, which is why you need to build your story first.
  8. Mix the Audio. When the story is told and pictures are locked, its time to mix the audio.
  9. Color grade the story. While the audio mix is going on, color grade the images to create the look you want.
  10. Output the project. When everything is done, create the final version.
  11. Archive the project. Archiving is critical in today’s digital world. We are ALWAYS re-purposing assets. What do you need to keep for the long-term, where are you going to store it and how are you going to pay for it to be stored there?

All too often, we jump right into the sexy part of editing with transitions and effects, only to lose sight of the fact that, first, we need to tell a compelling story.


Please rate the helpfulness of this tip.

Click on a star to rate it!

… for Random Weirdness

Tip #053: Safe Zones

Larry Jordan – https://LarryJordan.com

Don’t let key text or graphics get cut off.

Tip Screen Shot

Topic $TipTopic

Back in the old days, when TV’s had picture tubes, producers discovered that when a program was broadcast, text which was easily readable in the control room was cut off on most home TV sets.

This was caused by the fact that images back then were generated by scanning a high-voltage electron beam across the inside glass of the picture tube, causing the phosphors that coated the picture tube to glow.

The problem was that the manufacture of these picture tubes was not precise, meaning that edges of the image would be cut off, but it could be a different edge for each picture tube.

So, to solve this problem, directors and graphics designers created two boundaries within the image. While we still need to compose a complete frame, when adding text or other essential graphics we need to pay attention to these two boundaries to make sure all the essential elements safely make it to the home viewer.

  • Action Safe is 5% in from all edges. All essential actors and action need to be contained inside the outer rectangle.
  • Title Safe is 10% in from all edges. All essential text, logos and graphics need to be contained inside the inner rectangle.

Even today, programs destined for broadcast or cable must follow these guidelines. However, for the web, where media is displayed digitally, my recommendation is to keep all essential text and logos inside Action Safe (the outer rectangle).

Why? Two reasons:

  • We are all used to watching this framing on all professionally produced programs. Adopting the same looks says that we are professional, too.
  • You really don’t have any control over where your digital media files will play, Even today, using rear screen or front projection, images get cut off.

There’s no reason to risk losing that critical phone number or URL simply because you put your text too close to the edge.


Please rate the helpfulness of this tip.

Click on a star to rate it!

… for Random Weirdness

Tip #030: What Do RAID “Levels” Mean?

Larry Jordan – https://LarryJordan.com

Enhance RAID performance by picking the right level.

Tip Screen Shot

Topic $TipTopic

RAIDs (Redundant Array of Independent Disks/Drives/Devices) consist of a number of hard drives or SSDs grouped together into a single unit so that they appear to the computer as a single device. Because there is more than one hard drive in a RAID, they offer greater performance and storage.

There are different levels of RAIDs, identified by numbers:

  • RAID 0 – Fast, inexpensive, no data redundancy. Requires a minimum of two hard drives inside the RAID enclosure. The more drives you add, the faster the performance, as performance and storage capacity are the sum of all drives in the RAID. However, if you lose one drive, you’ve lost ALL your data. Most often used when speed combined with low cost are paramount.
  • RAID 1 – Complete data redundancy. Generally only uses two hard drives inside the RAID enclosure. Often called “mirroring,” each drive is a complete copy of the other. Most often used for backing up servers or when on-set for DIT media work. Has the speed and capacity of the slowest single drive in the system.
  • RAID 3 – Medium-fast, data redundancy. Requires a minimum of three drives, as one drive is reserved solely for parity data. Should one drive die, your data is safe. This technology is no longer in common use, replaced by the faster performance of RAID 4 or 5 systems.
  • RAID 4 – Very-fast, data redundancy. Similar to RAID 3, requires a minimum of three drives, as one drive is reserved solely for parity data. Should one drive die, your data is safe. This is the preferred RAID format for SSD drives because of how the data is stored on the drives. When compared to a RAID 5, RAID 4 with SSDs is about 25% faster on reads.
  • RAID 5 – Very fast, data redundancy. Requires a minimum of three drives and shares parity data across all drives. Most often found with four or more drives inside. If one drive goes down, your data is safe. This is the preferred choice for RAIDs containing spinning media (traditional hard disks). Used for both locally-attached storage and servers.
  • RAID 6 – Fast, extra data redundancy. Requires a minimum of four drives. This version protects your data in the event two hard drives die at the same time. More expensive than RAID 5, but, generally, the same physical size. Like the RAID 5 this is most often used connected to just one computer. Not as fast as a RAID 5.
  • RAID 10 (or 1+0) – VERY fast, totally redundant. Requires a minimum of four drives, but is more often created by combining two matched RAID 0’s into a RAID 1. This provides the speed equivalent of a RAID 0, with the data redundancy of RAID 1. As RAIDs continue to drop in price, this can be a less-expensive way to create systems that rival the performance of a RAID 50.
  • RAID 50 – VERY fast, data redundancy. Generally the domain of very large RAIDs, this format combines the speed of RAID 0 with the redundancy of RAID 5 by dividing the RAID into sections, where you can lose a drive in each section without losing data. These systems generally cost more than $10,000 and contain at least twelve drives. Generally used in network and server situations where multiple users need to access the same data.
  • RAID 60 – VERY fast, extra data redundancy. Generally the domain of very large RAIDs, this format combines the speed of RAID 0 with the redundancy of RAID 6 by dividing the RAID into sections, where you can lose two drives in each section without losing data. These systems generally cost more than $10,000 and contain at least twelve drives. Generally used in network and server situations where multiple users need to access the same data.

Please rate the helpfulness of this tip.

Click on a star to rate it!