… for Adobe Premiere Pro CC

Tip #219: The Coolness of the J-K-L Keys

Larry Jordan – https://LarryJordan.com

Shortcuts that speed playback.

Topic $TipTopic

Most of us are total mouse junkies. But, there are things you can do with the keyboard that are hard to do with a mouse. One of these involves timeline playback.

Since probably the first Avid, we’ve been able to playback clips on the timeline using the J – K – L keys. The benefit to using these keys is that they are conveniently grouped to match the fingers of one hand.

Here are some shortcuts you may not know:

  • J. Plays backward in real-time
  • K. Stops playback (the same as pressing Spacebar)
  • L. Plays forward in real time (the same as pressing Spacebar)
  •  

  • Tap J multiple times. Each time you tap, speed increases by 1X, up to a maximum of 6X
  • Tap L multiple times. Each time you tap, speed increases by 1X, up to a maximum of 6X
  •  

  • Press K & J. Slow-motion backward
  • Press K & L. Slow-motion forward
  •  

  • Press Shift + J. Starts slow, then ramps to high-speed backward
  • Press Shift + L. Starts slow, then ramps to high-speed forward

Please rate the helpfulness of this tip.

Click on a star to rate it!

… for Adobe Premiere Pro CC

Tip #218: Shortcuts that Move Titles

Larry Jordan – https://LarryJordan.com

These shortcuts give your text direction.

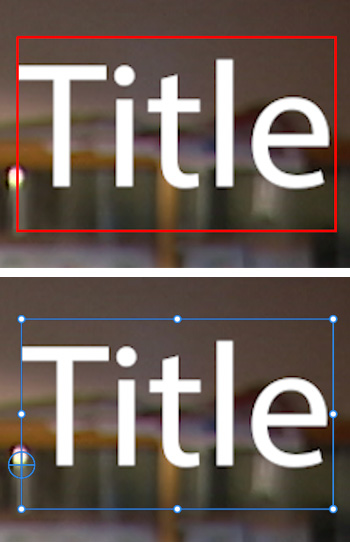
Text box colors indicate status of text in Premiere.
Red means you can edit text. Blue means you can move text.

Topic $TipTopic

The new Title tool in Premiere is really great, when it isn’t also driving me nuts. The problem is that I can never remember when I can edit the text and when I can move it.

Here’s the secret:

  • Select the text clip with the Text tool and the box turns red. Red means you can edit the text with the text tool.
  • Select the text clip with the Selection tool and the box turns blue. Blue means you can move the text box.

EXTRA CREDIT

There are helpful keyboard shortcuts that can help you move text boxes, once you’ve selected them in the Effect Controls.

Shortcut What It Does
Cmd – [arrow key] Moves the selected text box one pixel in the direction of the arrow.
Shift – Cmd – [arrow key] Moves the selected text box five pixels in the direction of the arrow.

Please rate the helpfulness of this tip.

Click on a star to rate it!

… for Adobe Premiere Pro CC

Tip #216: Determining “Indeterminate”

Larry Jordan – https://LarryJordan.com

The unknown is not unknowable.

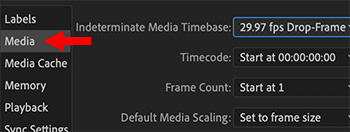
The Premiere Pro CC Media preference panel.
The Media preference panel sets the timebase for still images.

Topic $TipTopic

“Indeterminate” sounds pretty squishy. But, when it comes to Premiere, it is a fancy word for still images, or any other file that doesn’t have a definite duration. Hence – “indeterminate.”

Go to Premiere Pro > Preferences > Media (Windows: Edit > Preferences > Media).

At the top of this panel, you can specify the timebase of all imported still images, the starting timecode for each still image clip, and whether the frame count should start at 0 or 1.

Since still images are timecode-free, my recommendations are:

  • Set the timecode to match the timecode of your sequence.
  • Set the timecode to start at 00:00:00:00
  • Set the frame count to start at 1

Please rate the helpfulness of this tip.

Click on a star to rate it!

… for Codecs & Media

Tip #126: Set a Default Location in Adobe Media Encoder

Larry Jordan – https://LarryJordan.com

Default locations make finding files easy.

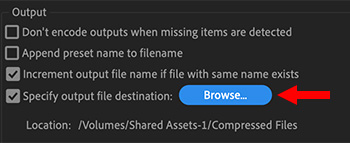
Set default compression location in preferences.
Set a default compression location using this preference checkbox.

Topic $TipTopic

By default, Adobe Media Encoder (AME) stores compressed media in the same folder as the source media. Which just confuses me. How am I supposed to remember where I stored all my source media?

To solve this problem of not knowing where AME hid my compressed files, I created a folder on my external storage called “Compressed Files.” Then, I make sure that ALL the files I compress go into that folder.

How? By setting it up as an automatic destination.

  • Create the folder you want to use as your destination using the Finder.
  • Start Adobe Media Encoder and go to Media Encoder > Preferences > General.
  • About 2/3s the way down, in the Output section, check Specify output file destination.
  • Click Browse and navigate to the Compressed Files folder you just created and click Choose.

Now, every time you import a file into AME, the compressed version will automatically appear in the Compressed Files folder.

Great! One less thing to worry about.


Please rate the helpfulness of this tip.

Click on a star to rate it!

… for Codecs & Media

Tip #110: Set a Default Location in Apple Compressor

Larry Jordan – https://LarryJordan.com

Set a default location for all your compressed files.

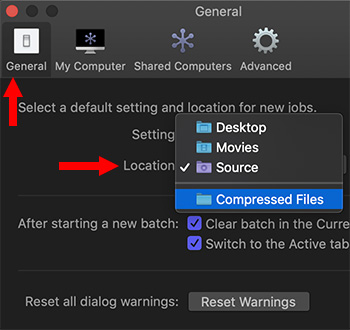
Use Compressor preferences to set default location.
Set a default compression location in Compressor preferences.

Topic $TipTopic

By default, Apple Compressor stores compressed media in the same folder as the source media. Which just confuses the heck out of me, because I can’t ever remember which folder I used for which source media file.

To solve this problem of not knowing where my compressed files are stored, I create a folder on my external storage called “Compressed Files.” Then, I make sure that ALL the files I compress go into that folder.

How? By setting it up as an automatic Location.

  • Create the folder you want to use as your destination using the Finder.
  • Start Compressor and switch to the Locations panel on the left.
  • Click the small plus icon in the lower left corner. Then, navigate to the Compressed Files folder you just created and select it. You’ve now created a custom location for Compressor.
  • Finally, go to Compressor > Preferences > General and select the custom Location you just created in the Location menu.

Now, every time you import a file into Compressor, the compressed version will automatically appear in the Compressed Files folder.

Great! One less thing to worry about.


Please rate the helpfulness of this tip.

Click on a star to rate it!

… for Codecs & Media

Tip #108: Speed Test: i5 vs. i7 CPUs for Video Compression

Larry Jordan – https://LarryJordan.com

Conventional Wisdom says bet on the i7

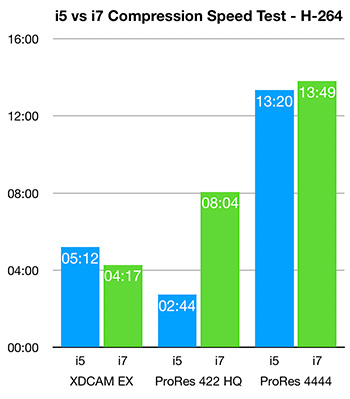
A chart comparing i5 vs. i7 CPU speeds for video compression
Speed comparison of i5 vs. i7 CPUs running Apple Compressor.

Topic $TipTopic

In a series of tests that I ran comparing the speed of Apple Compressor 4.4.5 running on a 3.8 GHz i5 vs. a 3.2 GHz i7, I discovered that you can’t predict which processor will be faster.

Testing involved XDCAM EX, ProRes 422 HQ and ProRes 4444 media and compressing it into H.264, 8-bit HEVC and 10-bit HEVC. (The three test files had different durations, so we can’t compare speed between formats.)

H.264 and HEVC 8-bit are hardware-accelerated. HEVC 10-bit is not. I used the same compression settings for each test.

  • When compressing media for H.264, the i7 is faster 33% of the time (2 out of 6).
  • When compressing media for HEVC 8-bit, the i7 is faster 66% of the time (4 out of 6).
  • Both CPUs running Apple Compressor were unable to successfully compress a ProRes 4444 file into 10-bit HEVC.

Based upon these tests with the latest version of Compressor, I would say the speed is a wash. Some tasks are faster, some are slower.

However, if you are doing any HEVC compression – 8-bit or 10-bit – based on my full suite of tests, Adobe Media Encoder is consistently and significantly faster than Apple Compressor.

EXTRA CREDIT

Here’s the full report.


Please rate the helpfulness of this tip.

Click on a star to rate it!

… for Apple Final Cut Pro X

Tip #198: A Faster Way to Edit Audio – or, um, not

Larry Jordan – https://LarryJordan.com

Edit only audio, only video or both from a clip.

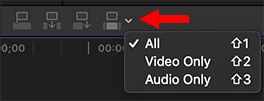
A menu option in Apple Final Cut Pro X allowing editing audio, video or both.
This menu is accessible, but these shortcuts are MUCH faster.

Topic $TipTopic

In addition to HOW you edit, you can also control WHAT you edit. To access this menu, click the small downward-pointing arrow next to the editing icons above the timeline.

Or, use these keyboard shortcuts:

Shortcut What It Does
Shift + 1 Edit both audio and video into the timeline
Shift + 2 Edit video-only into the Timeline
Shift + 3 Edit audio-only into the Timeline

NOTE: These options need to be enabled before making the edit.


Please rate the helpfulness of this tip.

Click on a star to rate it!

… for Apple Final Cut Pro X

Tip #197: Much Faster Ways to Trim Tops and Tails

Larry Jordan – https://LarryJordan.com

Yes, you can trim by dragging. But, why waste the time?

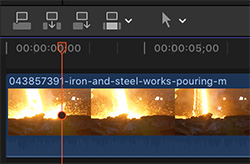
A video clip in the Apple Final Cut Pro X timeline.
Trimming the top or tail of a clip starts by properly positioning the playhead.

Topic $TipTopic

Trimming the start (top) and end (tail) of a clip is something that we need to do SO OFTEN, that this tip alone can save you hours. These shortcuts ONLY work in the Timeline.

Shortcut What It Does
Option + [ Trims the start of a clip to the position of the playhead/skimmer
Option + ] Trims the end of a clip to the position of the playhead/skimmer
Option + Trims a clip to its selected range


Please rate the helpfulness of this tip.

Click on a star to rate it!

… for Apple Final Cut Pro X

Tip #196: Library Properties Give You Control

Larry Jordan – https://LarryJordan.com

Library Properties allow you to determine where all essential library elements are stored.

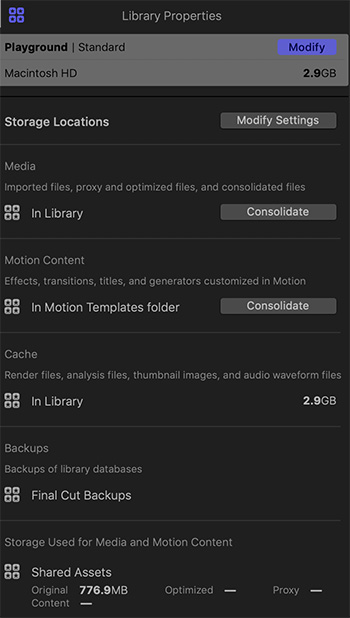
The Library Properties window in Apple Final Cut Pro X.
A typical Library Properties window in Final Cut Pro X.

Topic $TipTopic

Library Properties, in Final Cut Pro X, allow you to control where almost all media and work files are stored for each library. Best of all, these settings can vary by library.

To display these, select an open Library in the Browser, then, open the Inspector. You’ll see a screen shot similar to this one.

  • Storage Locations. Allows you to determine where media, customized motion content, work and cache files and library backups are stored.

NOTE: Backups are only for the databases that FCP uses, media needs to be backed up separately.

  • Media. This allows you to consolidate media from external locations into the library. This can be effective when moving libraries between editors, however, it will make the library file potentially very large.
  • Motion Content. This allows you to consolidate customize Motion files stored in multiple locations into a single location. This does not move any of the original Apple Motion templates.
  • Cache. This displays where cache files are currently stored and how much space they take.
  • Backups. This displays where library backups are currently stored.

NOTE: Backups are saved with the time and date in the filename. To open a backup from a specific time and date and add it to the Libraries sidebar in Final Cut Pro, choose File > Open Library > From Backup.

  • Storage Used. This displays on which volume media is currently stored and how much space is used for camera native (original), optimized, proxy and content files. (This is media that was previously imported or generated for the selected library.)

NOTE: Existing source media and backup files remain in their original locations. If you changed the cache storage location, you’re asked if you want to move your existing active render files to the new location.


Please rate the helpfulness of this tip.

Click on a star to rate it!