… for Random Weirdness

Tip #163: Measure GPU Performance on Your Mac

Larry Jordan – LarryJordan.com

Hidden in Activity Monitor is the ability to monitor GPU performance.

Topic $TipTopic

We’ve already seen (Tip 156) how to use Activity Monitor to measure the performance of the CPU. However, hidden in a menu is also the ability to display GPU (Graphics Processing Unit) performance in real-time!

  • Type Shift + Cmd + U to open the Utilities folder. Double-click Activity Monitor to start the app.
  • Choose Window > GPU History.

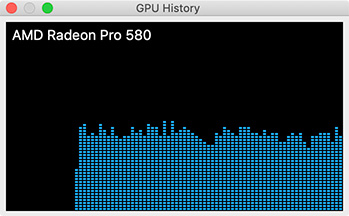
As you can see in this screen shot, this displays current GPU performance with a new column every 5 seconds.

NOTE: The higher the bar, the harder the GPU is working. Bars that fill the screen represent 100% of total GPU output.

Energy usage related to GPU activity is incorporated into the energy-impact measurements in the Energy tab of Activity Monitor.


Please rate the helpfulness of this tip.

Click on a star to rate it!

… for Random Weirdness

Tip #160: Measure Mac Network Performance

Larry Jordan – LarryJordan.com

Discover what your REAL network speeds are.

Topic $TipTopic

Hidden in Applications > Utilities is a powerful measurement tool called: Activity Monitor.

  • Type Shift + Cmd + U to open the Utilities folder. Double-click Activity Monitor to start the app.

Activity Monitor allows us to measure current activity in five key areas:

  • CPU
  • Memory (RAM)
  • Energy
  • Disk (local storage)
  • Network (both Internet and other network-connected devices)

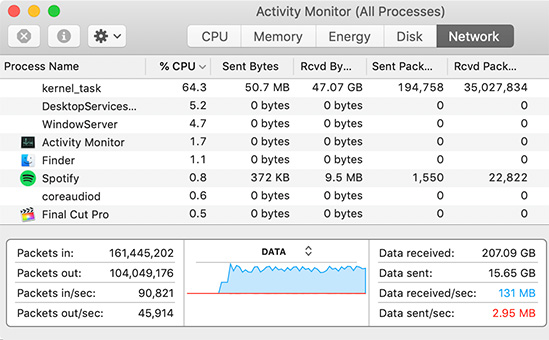
Click the Network tab at the top. The Network pane shows how much data your Mac is sending or receiving over your network. You can use this information to identify which processes are sending or receiving the most data.

The information at the bottom of the Network pane shows total network activity across all apps. The graph moves from right to left and updates at the intervals set in View > Update Frequency. While the graph also includes a pop-up menu to switch between showing packets or data as a unit of measurement, I tend to display data, because it is the most relevant statistic when working with media. (Database users generally monitor I/O operations.)

Blue shows either the number of packets received per second or the amount of data received per second. Red shows either the number of packets sent per second or the amount of data sent per second.

In this screen shot, the computer is receiving (reading) 131 MB/second of data and sending (writing) 2.95 MB/second.


Please rate the helpfulness of this tip.

Click on a star to rate it!

… for Apple Motion

Tip #313: Animate a Generator with a Behavior

Larry Jordan – LarryJordan.com

Generators provide animation without keyframes.

Almost every parameter in Apple Motion can be animated.
Applying a behavior to a specific parameter in Motion.

Topic $TipTopic

The big benefit to using behaviors to create movement in Motion is that they can be applied without also using keyframes. Behaviors are fast, easy and flexible. Keyframes, though, are more precise.

Generators are elements which are combined with other elements to create visual effects. For example, Cellular is a randomly animated series of dots which can be colorized as needed. Or add Noise to provide texture to text. Or Caustics to simulate light bouncing off rippling water.

Another intriguing feature of generators is that many of them are already animated. So, adding a Behavior simply adds to the visual interest.

There are two ways to add a Behavior to a generator:

  • Apply it to the entire generator. For example, adding Basic Motion > Spin to cause the generator to rotate.
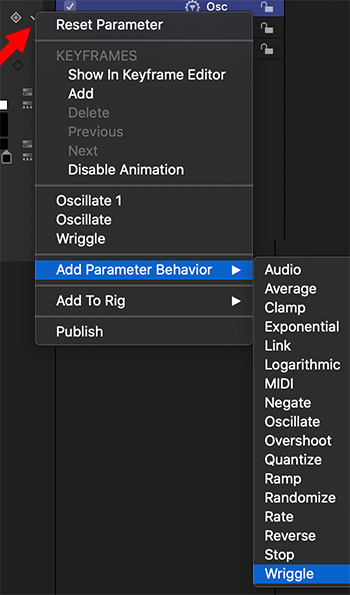
  • Apple the Behavior to a single setting of the generator. For example, to apply Oscillate to cause one setting – say size – to change size. This use is also called a “Parameter Behavior” and is illustrated by this screen shot.

As with all behaviors, once you’ve applied it, play the timeline, adjust a setting and watch what happens.

I find behaviors are a great way to explore the answer to the question: “What happens if I do this?”


Please rate the helpfulness of this tip.

Click on a star to rate it!

… for Apple Motion

Tip #307: Archive Active Versions of Motion

Larry Jordan – LarryJordan.com

Archives allow future access to earlier versions.

Apple Motion logo
The file icon for Apple Motion.

Topic $TipTopic

It is often necessary, especially if you are working with different clients, to have earlier versions of Motion available to you. However, only one version of Motion can be active on your system at a time. Recently, I read an Apple KnowledgeBase article that explained how to create archives.

NOTE: While this won’t get you access to earlier versions of Motion, it does mean that you’ll have access to all versions going forward.

To back up the currently installed Motion application:

  1. Create a new folder in the Applications folder, and name it after the application (for example, “Motion 5.4.5”). To check your version of Motion, open the application and choose About Motion from the Motion menu.
  2. Select the Motion application in the Applications folder. Choose File > Compress “Motion.” It will take a few minutes to compress.
  3. Move the resulting “Motion.zip” file into the folder you created in step 1.
  4. Move the folder containing the .zip file to a backup drive.

EXTRA CREDIT

These ZIP files can be stored anywhere, but I generally try to keep all my program archives in the same place. Remember, before you revert back to an earlier version, archive or delete the version of Motion currently stored in your Applications folder.

Also, if you revert to an earlier version of Motion, it may also require an earlier version of the macOS, so keep a note of which version of Motion uses which version of the macOS.


Please rate the helpfulness of this tip.

Click on a star to rate it!

… for Apple Motion

Tip #301: Stabilize a Shaky Clip in Motion

Larry Jordan – LarryJordan.com

There are multiple options to stabilize – or steady – a clip.

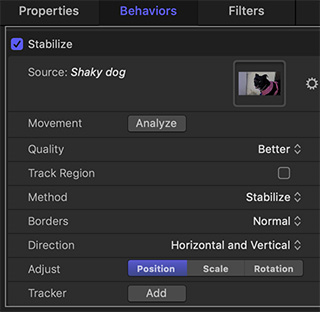
The Stabilize behavior settings in Apple Motion.
These are the parameters you can modify to choose between stabilizing or steadying a clip.

Topic $TipTopic This was first explained in this Apple KnowledgeBase article.

Use the Stabilize tracking behavior to smooth shaky motion in a movie or image sequence. Using the Stabilize behavior, there are three ways to analyze a clip:

  • Use the behavior’s default advanced motion analysis technique that evaluates the entire frame of a clip to extract movement data without using onscreen trackers.
  • Use onscreen trackers that analyze a reference pattern (a small group of pixels) in the canvas. These are the same trackers used by the Match Move and Analyze Motion behaviors.
  • Use a combination of the advanced motion analysis and onscreen trackers.

How to Stabilize a Clip

    • Select the layer containing the clip you want to stabilize.
    • Choose Behaviors > Motion Tracking > Stabilize.
    • Go to Inspector > Behaviors, then use the Direction pop-up menu to choose one of the following options:
      • Horizontal and Vertical: Applies the stabilize transformation to the X and Y dimensions.
      • Horizontal: Applies the stabilize transformation to the X dimension.
      • Vertical: Applies the stabilize transformation to the Y dimension.
    • Enable or disable the Adjust buttons, as follows:
      • Position: Enable this button to apply the analyzed position data to the clip. (The X and Y position changes in the footage are smoothed or stabilized.) To stabilize the X and Y position of the shot and leave scale or rotation changes intact, enable Position and disable Scale and Rotation.
      • Scale: Enable this button to apply any analyzed scale data to the clip. (Scale changes in the footage are smoothed or stabilized.) To stabilize or smooth changes in scale and leave position or rotation changes intact, enable Scale and disable Position and Rotation. (The Scale option is not related to the Zoom option in the Borders pop-up menu.)
      • Rotation: Enable this button to apply analyzed rotation data to the clip. (Changes in the rotation of the footage are smoothed or stabilized.) To stabilize or smooth changes in rotation in the shot and leave position or scale changes intact, enable Rotation and disable Position and Scale.
  • For the smoothest result, enable all three Adjust buttons (Position, Scale, and Rotation).

NOTE: You can change the Method, Borders, Direction, and Adjust parameters before or after the clip is analyzed.


Please rate the helpfulness of this tip.

Click on a star to rate it!

… for Visual Effects

Tip #316: Working with Vertical Phone Footage

Larry Jordan – LarryJordan.com

Tips to coping with a 9:16 aspect ratio.

A vertical video example based on the settings in this Tip.

Topic $TipTopic

A longer version of this article first appeared in PremiumBeat.com.

Shooting vertical phone footage is a cardinal sin in film-making. However, that doesn’t mean we won’t be working with it in post. Here’s how.

The easiest thing to do is create two layers, zoom the bottom layer so it fills the screen, add some blur, and be done with it. The problem is that this doesn’t make the footage look very good.

Here’s a better technique:

  • Stack two copies of the same clip one above the other.
  • Using the Scale settings in your NLE, stretch the Y value, but leave the X (height) value alone.
  • Apply a Gaussian Blur and increase the amount a lot: say 70-100.
  • Lower the Opacity from 100% to 40-50%.

When you follow these steps, you end up with a more pleasing image, such as you see in this screen shot.


Please rate the helpfulness of this tip.

Click on a star to rate it!

… for Visual Effects

Tip #314: Faking a Stop Motion Effect in Premiere

Larry Jordan – LarryJordan.com

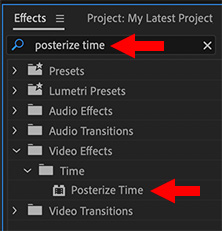
Stop Motion can be faked using Posterize Time.

Search for Posterize Time in the Effects panel.

Topic $TipTopic

A longer version of this article first appeared in RocketStock.com.

As you are probably aware, it takes a bit of time to set up, shoot, and edit a proper stop motion shot. But, what if the video is already shot? Can we create a similar effect in Premiere? Yes, and here’s how.

In Premiere, select the clip you want to work with, then:

  • Open the Effects panel and search for “Posterize Time.”
  • Apply this effect to your clips.
  • Adjust the frame rate to between 8 – 12 fps. Try 10 fps as a starting point.

Done.

EXTRA CREDIT

This effect can be used for much more. For example:

  • Emulate the look of very old film.
  • Apply it to existing motion graphics for a blockier, chunkier look.
  • Create flashbacks, dream sequences, even a “drunken sailor” look.

Please rate the helpfulness of this tip.

Click on a star to rate it!

… for Visual Effects

Tip #121: Quickly Create Tracking Masks in Mocha

Larry Jordan – LarryJordan.com

Mocha Pro 2020 makes tracking masks easy.

Topic $TipTopic

A mask isolates something so we can place the masked object over a different background (or hide it altogether.)

A tracking mask does the same thing, but to a moving object; say a car or person. What makes tracking masks tricky is if the moving object changes position or shape during the move; for example, as people do as they walk.

Mocha Pro 2020 has a new feature that makes creating tracking masks easy:

  • Select the Area brush tool in the toolbar
  • Draw over the area you’d like to motion track
  • Scale the brush by selecting the open/close brackets
  • Press Option on Mac (Alt on Windows) to change the Area brush tool to erase

This is a much easier way to create masks to motion track objects, without having to create several shapes to isolate the desired tracking object.

Learn more about Mocha Pro here.


Please rate the helpfulness of this tip.

Click on a star to rate it!

… for Codecs & Media

Tip #304: What is FFmpeg?

Larry Jordan – LarryJordan.com

An open source project supporting hundreds of media formats.

The FFmpeg logo, reflecting how many media files are compressed.

Topic $TipTopic

FFmpeg is a free and open-source project consisting of a vast software suite of libraries and programs for handling video, audio, and other multimedia files and streams. At its core is the FFmpeg program itself, designed for command-line-based processing of video and audio files, and widely used for format transcoding, basic editing (trimming and concatenation), video scaling, video post-production effects, and standards compliance.

FFmpeg is part of the workflow of hundreds of other software projects, and its libraries are a core part of software media players such as VLC, and has been included in core processing for YouTube and the iTunes inventory of files. Codecs for the encoding and/or decoding of most of all known audio and video file formats are included, making it highly useful for the transcoding of common and uncommon media files into a single common format.

The name of the project is inspired by the MPEG video standards group, together with “FF” for “fast forward”. The logo uses a zigzag pattern that shows how MPEG video codecs handle entropy encoding.

The FFmpeg project was started by Fabrice Bellard in 2000. Most non-programmers access the FFmpeg suite of programs using a “front-end.” This is software that puts a user interface on the FFmpeg engine. Examples include: Handbrake, ffWorks, MPEG Streamclip, and QWinFF.


Please rate the helpfulness of this tip.

Click on a star to rate it!

… for Codecs & Media

Tip #284: What is a Proxy File?

Larry Jordan – LarryJordan.com

Proxies save time, money and storage space.

Topic $TipTopic

A Proxy file, regardless of the codec that created it, is designed to meet three key objectives: save time, save money and use less expensive gear. Proxies meet these objectives because they:

  • Reduce required storage capacity
  • Reduce required storage bandwidth
  • Reduce the CPU load to process the file

It accomplishes these goals in two significant ways:

  • It converts all media into a very efficient intermediate codec that is easy to edit. For example, ProRes 422 or DNx.
  • It cuts the frame size by 50%. So, a UHD file, with a source frame size of 3840 x 2160, has a proxy size of 1920 x 1080. A 6K frame becomes 3K.

Proxies are best used for the initial editorial where you are reviewing footage, creating selects, building a rough cut and polishing the story. For most of us, that’s 80% of the time we spend editing any project. Proxy files can also be used for most client review exports, because they render and export faster and, at the early stage, clients aren’t looking for the final look.

Using proxies means we can use less powerful and much less expensive computers and storage for the vast majority of time spent on a project. Proxy files also allow us to get out of the edit suite and edit on more portable gear.

Switching out of proxy mode is necessary for polishing effects, color grading, final render and master export.

Many editors feel that it is a sign of weakness to edit proxies. This is nonsense. Back when we edited film, we used workprints – which is the film version of a proxy file – for everything. Somehow, great work was still turned out.

Avid, Adobe and Apple all support proxy workflows. Proxies are worth adding to your workflow.

Please rate the helpfulness of this tip.

Click on a star to rate it!