… for Codecs & Media

Tip #282: When to Use HEVC vs. H.264

Larry Jordan – LarryJordan.com

Which to choose and why?

Topic $TipTopic

As media creators, there’s a lot of confusion over whether we should use H.264 or HEVC to compress our files for distribution on the web. Here’s my current thinking.

The big benefit to HEVC is that it achieves the same image quality with a 30-40% savings in file size.

The big disadvantage is that HEVC takes a lot longer to compress and not all systems – especially older systems – can play it.

If you are sending files to broadcast, cable or digital cinema, they will want something much less compressed than either of these formats. So, for those outlets, this is not a relevant question.

For me, the over-riding reason to use H.264 instead of HEVC is that YouTube, Facebook, Twitter and most other social media sites recompress your video in order to create all the different formats needed to them to re-distribute it. (I read somewhere a while ago that YouTube creates 20 different versions of a single video.)

For this reason, spending extra time creating a high-quality HEVC file, when it will only get re-compressed, does not make any sense to me. Instead, create a high-bit-rate H.264 version so that when the file is recompressed, it won’t lose any image quality.

Where HEVC makes sense is when you are serving files directly to consumers via streaming on your website. And, even in those cases, HTTP Live Streaming will be a better option to support mobile devices.

HEVC is mostly a benefit to service providers and social media firms.


Please rate the helpfulness of this tip.

Click on a star to rate it!

… for Adobe Premiere Pro CC

Tip #255: Multiple Shortcuts for One Menu

Larry Jordan – LarryJordan.com

This technique is great when one shortcut just isn’t enough.

Detail from the keyboard shortcuts panel in Adobe Premiere Pro CC.
Here, I’ve assigned THREE! shortcuts to the same menu.

Topic $TipTopic

I use both Premiere and Final Cut on a regular basis. And if there’s one thing that drives me nuts it’s trying to remember which keyboard shortcuts apply to each program.

Premiere provides an amazingly elegant solution: You can assign more than one shortcut to the same menu item. In fact, you can assign more than SIX!!

  • Open Keyboard Preferences.
  • Find the shortcut you want to modify.
  • Click just to the right of any existing shortcuts, then add your new choice.

NOTE: I was able to do this six times, with six different shortcuts applied to the same menu choice!

  • To delete a shortcut, click the small “x” next to it.
  • To save your modified shortcuts, click OK in the bottom right corner of the Keyboard Shortcuts panel.

Very, very, VERY cool!


Please rate the helpfulness of this tip.

Click on a star to rate it!

… for Adobe Premiere Pro CC

Tip #254: Fix It Quick

Larry Jordan – LarryJordan.com

A keystroke to quickly fix a file.

Topic $TipTopic

You are in mid-edit, when you discover there’s a typo in a Photoshop image. Or, a missing keyframe in an After Effects comp. Or, a still image that needs a quick repair.

Here’s a keyboard shortcut that makes quick work of fixing a file:

Cmd + E (Mac) — Cntrl + E (Windows)

The file opens in the program that created it. Save it, and it’s instantly updated in Premiere.

Cool – and quick.


Please rate the helpfulness of this tip.

Click on a star to rate it!

… for Adobe Premiere Pro CC

Tip #253: What is Comparison View?


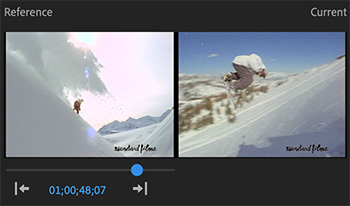
This is an easy way to compare two shots for color, composition or content.

Comparison View in Adobe Premiere Pro CC.
The image on the left is the Reference still frame. The Source sequence is on the right.

Topic $TipTopic

Comparison View is a relatively new feature in Premiere that allows you to compare two different frames in the same sequence at the same time. The image on the left is called the Reference, while the one on the right is called the Source.

Once this view is setup, you can play or pause the sequence, but the Reference is always a still frame.

To use it:

  • Put the playhead on the frame you want to compare.
  • Click the Comparison View icon on the far right of the Program Monitor button bar.
  • The Comparison View screen appears (see screen shot).
  • Drag the blue dot under the left image to display any other image in the same timeline. (Or, enter the timecode for the frame you want to use.) This displays a Reference image.
  • Change how images are displayed by clicking on of the three icons just above the time ruler; horizontal, vertical or side-by-side.
  • Click the Shot or Frame Comparison button to switch between a reference frame and the current clip in its previous state when adjusting visual effects.
  • Click the Swap Sides button (two stacked arrows) to switch current frame to the left or right.

EXTRA CREDIT

Split screen shot comparison works with the Lumetri Scopes Waveform, making it useful for matching brightness levels precisely.


Please rate the helpfulness of this tip.

Click on a star to rate it!

… for Apple Final Cut Pro X

Tip #312: New Export Options

Larry Jordan – LarryJordan.com

Exporting is both faster and easier.

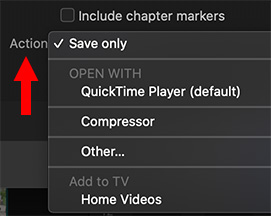
Detail from the Share Settings screen in Apple Final Cut Pro X.
The options in File > Share > Settings have changed … and simplified.

Topic $TipTopic

New with the 10.4.8 update to Final Cut Pro X are new, and simplified, export options. In the past, we had a confusing set to choose from, especially when all we wanted to do was save a master file.

Now, as indicated by the screen shot, the default option is to save the file at the location you specify. Other options, such as automatically sending a file to YouTube or Facebook, still exist as part of the Share menu, but creating a master file is now much more straight-forward.

Also, after a file is exported, you can have it automatically open in QuickTime Player, Compressor, or the application of your choice.

Even, if you want, store it in the new Apple TV application.

EXTRA CREDIT

The keyboard shortcut to export a master file remains the same: Cmd + E.


Please rate the helpfulness of this tip.

Click on a star to rate it!

… for Apple Final Cut Pro X

Tip #309: Export Multi-Channel Audio

Larry Jordan – LarryJordan.com

FCP X supports exporting multi-channel audio, provided you use Roles.

Topic $TipTopic

Normally, when we export a project from Final Cut Pro X, we are creating a master file, ready for distribution. But, sometimes, you need to export multiple channels of audio – either for an upcoming audio mix or to deliver stems to the distributor.

FCP X supports multichannel export, but it requires Roles.

The steps necessary are more complex than will fit in a tip, but I wanted to share a link with you if this is something you need to do. Here’s the link.

EXTRA CREDIT

If you need to export files for ProTools, you’ll need to export an XML file. Then, use an excellent utility called X2Pro to convert this into the AAF format that ProTools can read. Here’s the link.


Please rate the helpfulness of this tip.

Click on a star to rate it!

… for Apple Final Cut Pro X

Tip #285: Tips for Library Management

Larry Jordan – LarryJordan.com

The Library is the master container for all Final Cut projects.

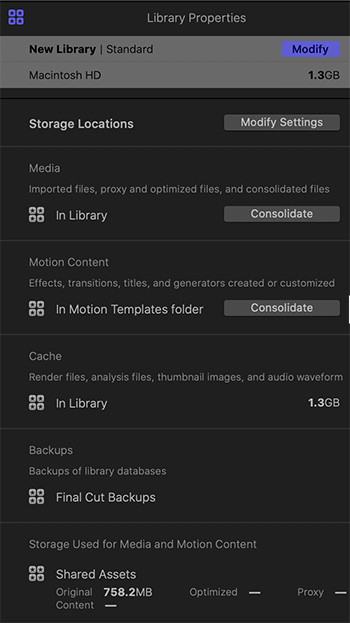
Final Cut Pro X Project Properties settings displayed in the Inspector.

Topic $TipTopic

The Library in Final Cut is the master container that holds everything related to a specific set of projects. However, what you may not know is that you have a lot of control over where FCP X actually stores files for that library – and many of them don’t even need to be in the Library!

To see your options, select a Library in the Library list on the left side of the interface. The Inspector then displays the image shown on this screen shot.

These options include:

  • Media Storage Locations. This allows you to specify where media, Motion templates, work files and Library backups are stored. All but backups can be stored in the Library, however, you can choose to store them wherever you want.
  • Motion Content. If you have Motion templates scattered across different locations, this allows you to consolidate them into the location specified in the Media Storage Location, above.

The next three segments are display only:

  • Cache files. The amount of space occupied by render, analysis and other work files.
  • Backups. Displays the location of Library backups.
  • Storage used. Displays the volumes where media for this project is stored and how much space is involved.

Overall, Library Properties provides you the control you need to know how much space your project takes, where files are stored and the ability to move them if needed.


Please rate the helpfulness of this tip.

Click on a star to rate it!

… for Random Weirdness

Tip #159: Monitor Local Storage Performance

Larry Jordan – LarryJordan.com

Monitor storage bandwidth and bottlenecks.

Topic $TipTopic

Hidden in Applications > Utilities is a powerful measurement tool called: Activity Monitor. Type Shift + Cmd + U to open the Utilities folder. Double-click Activity Monitor to start the app.

Activity Monitor allows us to measure current activity in five key areas:

  • CPU
  • Memory (RAM)
  • Energy
  • Disk (local storage)
  • Network (both Internet and other network-connected devices)

Click the Disk tab at the top.

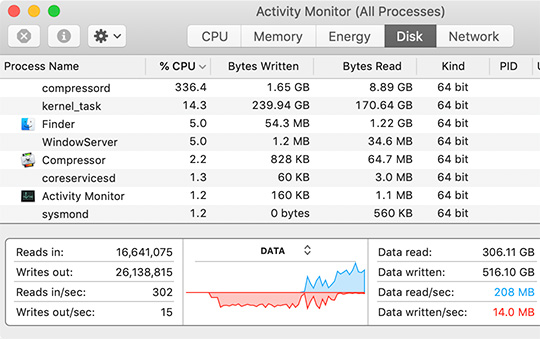
The Disk pane shows the amount of data that each process has read from your disk and written to your disk. It also shows “reads in” and “writes out” (I/O), which is the number of times that your Mac accesses the disk to read and write data.

The information at the bottom of the Disk pane shows total disk activity across all processes. The graph moves from right to left and updates at the intervals set in View > Update Frequency. While the graph includes a pop-up menu to switch between showing I/O or data as a unit of measurement, I always display Data, because it is more meaningful to media creators. (Database and small file operations often prefer monitoring I/O operations.)

Blue shows either the number of reads per second or the amount of data read per second. Red shows either the number of writes out per second or the amount of data written per second.

In this screen shot, local storage is reading 208 MB/second, and writing 14 MB/second.


Please rate the helpfulness of this tip.

Click on a star to rate it!

… for Random Weirdness

Tip #158: Monitor Energy Usage

Larry Jordan – LarryJordan.com

Use this to conserve energy when running on battery.

Topic $TipTopic

Hidden in Applications > Utilities is a powerful measurement tool called: Activity Monitor. Type Shift + Cmd + U to open the Utilities folder. Double-click Activity Monitor to start the app.

Activity Monitor allows us to measure current activity in five key areas:

  • CPU
  • Memory (RAM)
  • Energy
  • Disk (local storage)
  • Network (both Internet and other network-connected devices)

Most of the time, I’m running on AC power. However, for users running their laptops on battery, energy conservation is critical. Activity Monitor makes monitoring energy usage easy. Here’s how.

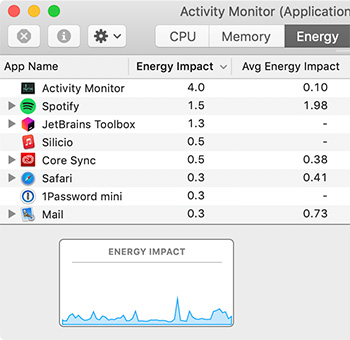
Click the Energy tab at the top. The Energy pane shows overall energy use and the energy used by each app:

  • Energy Impact: A relative measure of the current energy consumption of the app. Lower numbers are better. A triangle to the left of an app’s name means that the app consists of multiple processes. Click the triangle to see details about each process.
  • Avg Energy Impact: The average energy impact for the past 8 hours or since the Mac started up, whichever is shorter. Average energy impact is also shown for apps that were running during that time, but have since been quit. The names of those apps are dimmed.

BONUS

NOTE: If you run Activity Monitor on a laptop, you’ll see additional battery statistics at the bottom.

As energy use increases, the length of time that a Mac can operate on battery power decreases. If the battery life of your portable Mac is shorter than usual, you can use the Avg Energy Impact column to find apps that have been using the most energy recently. Quit those apps if you don’t need them, or contact the developer of the app if you notice that the app’s energy use remains high even when the app doesn’t appear to be doing anything.


Please rate the helpfulness of this tip.

Click on a star to rate it!

… for Random Weirdness

Tip #039: A Project Code System to Organize Media

Larry Jordan – LarryJordan.com

Here’s a system I borrowed from Hollywood

Topic $TipTopic

Years ago, when I was editing behind-the-scenes documentaries for Hollywood DVD releases, I noticed a consistent project and media naming system from one of the studios. While the studio version was more complex than necessary for independent or corporate work, I modified the system to share with my students.

If you have a system to help you track your media, great! If not, use mine until you can develop your own. ANY system is better than no system when it comes to tracking media. Because the worst thing for any editor is losing a shot that you were sure you had.

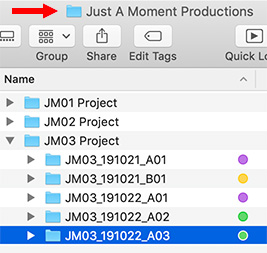
Here’s a sample folder name to explain how this system works:

JM03_191022_A03

Translation:

  • JM. A two-letter code that represents the name of the client. (For example: “Just a Moment Productions”)
  • 03. A two-number code that represents the project number for this client. (For example, this is the third project we’ve done for Just a Moment.)
  • 191022. The shoot date, in YearMonthDay format. Most often, scripts and other production notes will indicate when a particular scene was shot. This date ties the folder back to the script. Using this date format means all folders will sort in the correct date order.
  • A. The camera on a multi-camera shoot. (For example, “A” or primary camera, “B” or “C” cameras)
  • 03. The number of the camera card or hard disk shot by that camera for that day. (For example, this is the third camera card we shot that day.)

To implement this, on my media storage system, I start by creating a master folder for that client (i.e. “Just a Moment Productions”). Then, inside that Master folder, I create folders for each project for that client. Next, inside the Project folder I create a Media folder. Then, finally, inside the Media folder, I create a folder for each camera card that I shoot.

Most of the time, we can’t rename individual clips on the camera card because renamed files will break on import. So, I use this system to name the folders that I store the camera card media into rather than individual shots.

The good news is that, just by reading the folder name, you know the client, project, shoot date and camera angle of the media it contains.


Please rate the helpfulness of this tip.

Click on a star to rate it!