Tracking is easy, selecting the shape is the really hard part.
The Area Brush in action, selecting multiple portions of a moving image.
New to Mocha Pro 2020 is the Area Brush with Quick Mask. Area Brush is designed to speed up and simplify Mocha shape creation for planar tracking and masking projects with simple paint strokes.
The power of the Area Brush is the ability to quickly create multiple add or subtract shapes on the same Mocha layer for advanced tracking. Here are some tips to use it effectively.
Select the Area Brush and paint on-screen If you have a Wacom tablet, the brush will scale based on pressure sensitivity.
Click on the Quick Mask button OR any other tool to convert your paint to spline and begin tracking.
Keystroke/Shortcuts
[ – scale brush radius down
] – scale brush radius up
Subtract from the mask in Quick Mask Mode:
Alt + paint (Windows)
Option + paint (macOS)
Please rate the helpfulness of this tip.
Click on a star to rate it!
https://www.theinsidetips.com/wp-content/uploads/2019/09/Tips-Logo-700x150.jpg00Larry Jordanhttps://www.theinsidetips.com/wp-content/uploads/2019/09/Tips-Logo-700x150.jpgLarry Jordan2019-12-18 01:30:002019-12-18 01:30:00Tip #181: The New Area Brush in Mocha Pro 2020
It is impossible to over-state how important flat, even and well-exposed lighting is to creating a clean chroma-key. However, these three other tips also need to be considered.
Use separate lights for talent and background. The background needs to be bright and evenly lit top to bottom and side to side. The talent can be lit however your story requires. Never try to use the same light for both talent and background.
Avoid fly-away hair. Each strand catches green, which makes it flicker in the key. Bundle hair or put a hat on your talent.
Avoid wearing colors that match the background, unless you are looking for that “hollow body” look. Also, avoid clothing with closely arranged stripes or patterns. Herringbone and pinstripes are both no-nos.
MXF is an industry-workhorse because it is so flexible.
MXF (Material Exchange Format) was invented by SMPTE in 2004. MXF is a container that holds digital video and audio media. OP1a (Operational Pattern 1a) defines how the media inside it is stored.
MXF has full timecode and metadata support, and is intended as a platform-agnostic stable standard for professional video and audio applications.
MXF had a checkered beginning. In 2005, there were interoperability problems between Sony and Panasonic cameras. Both recorded “MXF” – but the two formats were incompatible. Other incompatibilities, such as randomly generating the links that connect files, were resolved in a 2009 redefinition of the spec.
MXF generally stores media in separate files. For example: video, audio, timecode and metadata are all separate. This means that a single MXF container actually supports a variety of different media codecs inside it.
Another benefit to MXF OP1a is that it supports “growing files.” These are files that can be edited while they are still being recorded. (Think sports highlights.)
Please rate the helpfulness of this tip.
Click on a star to rate it!
https://www.theinsidetips.com/wp-content/uploads/2019/09/Tips-Logo-700x150.jpg00Larry Jordanhttps://www.theinsidetips.com/wp-content/uploads/2019/09/Tips-Logo-700x150.jpgLarry Jordan2019-12-17 01:30:002019-12-15 13:11:13Tip #303: What is MXF OP1a?
This is a simple, but subtle trick that improves any product.
Give your product shots a new spin!
Every product shot is about making the product look great. But, what do you do when the product doesn’t move.
Sure, you can zoom in and pan around. But, well, that’s pretty boring.
Here’s the tip: Put the product on a turntable. This allows you to combine multiple moves into a single shot. Now your zoom not only pulls the eye into the shot, but it also reveals new visual information, which makes the shot all that more intriguing
Adding a Lazy Susan turntable to a product shot adds energy and it’s a cheap, totally believable way to increase production value.
Please rate the helpfulness of this tip.
Click on a star to rate it!
https://www.theinsidetips.com/wp-content/uploads/2019/09/Tips-Logo-700x150.jpg00Larry Jordanhttps://www.theinsidetips.com/wp-content/uploads/2019/09/Tips-Logo-700x150.jpgLarry Jordan2019-12-17 01:30:002019-12-15 13:14:18Tip #292: Cool Tip to Improve Product Shots
AAF is a great interchange format – but be aware of audio
A multichannel audio clip in the Premiere Pro CC timeline.
Recently, I was working with a production company that regularly exports 16 channel audio. While editing is done in Premiere, audio mixing is done in ProTools. The easiest and best way to move sequences from Premiere to ProTools, or Media Composer for that matter, is File > Export > AAF.
As we were working on this, though, we discovered a problem: The AAF process labels every exported audio clip using a number that references the sequence audio track, but those numbers are wrong.
For example:
Sequence Track 1 audio is labeled: File Name
Sequence Track 2 audio is labeled: File Name.01
Sequence Track 3 is blank
Sequence Track 4 audio is labeled: File Name.02
While the numbers are in order, the numbers don’t match track numbers and, if a track is empty, the numbers don’t reflect the empty track.
For editors and sound mixers working on fast-turnaround, tight deadlines, AAF audio track labeling can cause confusion. Now you know what to watch for.
EXTRA CREDIT
Audio track labeling is based on the audio tracks in the sequence, rather than tracks in the source audio clip. This, too, is confusing if you remap track assignments when editing clips from the Source Monitor to the Timeline.
Please rate the helpfulness of this tip.
Click on a star to rate it!
https://www.theinsidetips.com/wp-content/uploads/2019/09/Tips-Logo-700x150.jpg00Larry Jordanhttps://www.theinsidetips.com/wp-content/uploads/2019/09/Tips-Logo-700x150.jpgLarry Jordan2019-12-17 01:30:002019-12-14 15:07:41Tip #274: Caution When Using AAF to Export Multichannel Audio
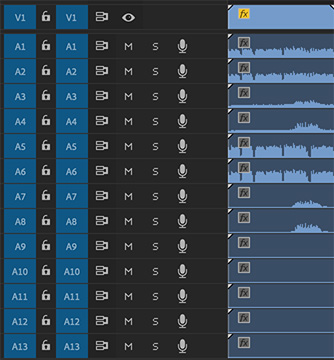
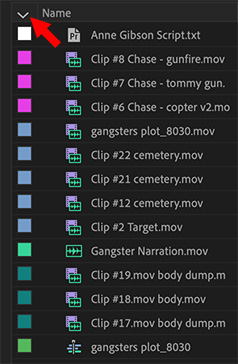
Assign and organize clips by color in the Project panel.
Hidden in plain sight in the Project panel is a very cool organizational tool – colors! Not only can we organize clips by bins and file names, but also by color. For example, color all talking heads magenta, while B-roll shots are blue and reaction shots orange. Or change colors by scene.
While the obvious benefit of using colors is that it provides another way of organizing clips, a hidden benefit is that those colors follow the clips into the Timeline, allowing you to see at a glance where all your talking heads, for example, are located.
Here’s how this works.
In the Project panel, switch to List view.
Select all the clips you want to assign to a specific color.
Right-click on a color chip and select Label.
Choose the color you want to apply to the selected clips.
Click the top of the color column, indicated by the red arrow, to group and sort colors; click a second time and the order is reversed.
Please rate the helpfulness of this tip.
Click on a star to rate it!
https://www.theinsidetips.com/wp-content/uploads/2019/09/Tips-Logo-700x150.jpg00Larry Jordanhttps://www.theinsidetips.com/wp-content/uploads/2019/09/Tips-Logo-700x150.jpgLarry Jordan2019-12-17 01:30:002019-12-14 15:04:43Tip #273: Organize Clips by Color
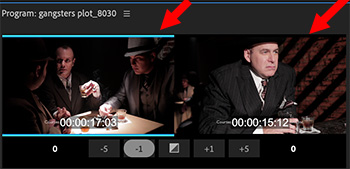
The out-going clip is highlighted in blue, allowing trimming via keyboard or mouse.
Hidden within the Premiere timeline is a powerful trimming tool: Dynamic Trim. This feature shows the last frame of the outgoing clip and the first frame of the incoming clip, allowing you to easily trim between them.
Here’s how it works.
Double-click an edit point to display the Dynamic Trim window.
Click the left image in the Trim window to ripple trim the outgoing clip. (The blue bars highlight the left side.)
Click the right image in the Trim window to ripple trim the incoming image. (The blue bars highlight the right side.)
Click the boundary between the two images in the Trim window to select both sides of the selected edit point. (The blue bars highlight both sides.)
Once you select which side, or sides, of the edit point you want to trim, either click the timecode numbers at the bottom or drag the image left and right.
Here’s the really cool part. Type J to move backward or L to move forward. Whenever you type K, the edit point is trimmed in real time to the position of the playhead. Press the spacebar to preview the edit point in real-time.
Close this window by clicking anywhere in the Timeline.
EXTRA CREDIT
Click the square in the center between the two sets of timecode numbers to apply the default video transition.
Please rate the helpfulness of this tip.
Click on a star to rate it!
https://www.theinsidetips.com/wp-content/uploads/2019/09/Tips-Logo-700x150.jpg00Larry Jordanhttps://www.theinsidetips.com/wp-content/uploads/2019/09/Tips-Logo-700x150.jpgLarry Jordan2019-12-17 01:30:002019-12-14 15:01:40Tip #272: Trim Faster with Dynamic Trim
If you, like me, go to the Mac App Store when you get an update alert, you are missing some key media updates.
Whenever Apple updates Final Cut Pro X, Motion or Compressor, they generally also update the Pro Video codecs. However, these do NOT update through the Mac App Store.
These are “system-level” codecs. This means that these codecs are valuable to all editors: Avid, Premiere and Final Cut. Any Mac-based editor can benefit.
https://www.theinsidetips.com/wp-content/uploads/2019/09/Tips-Logo-700x150.jpg00Larry Jordanhttps://www.theinsidetips.com/wp-content/uploads/2019/09/Tips-Logo-700x150.jpgLarry Jordan2019-12-17 01:30:002020-06-19 16:02:44Tip #112: How to Update Apple’s Pro Video Codecs
By default, when you import media clips (video, audio, or still images), Final Cut Pro analyzes existing clip metadata to assign one of five default roles to the video and audio components of each clip: Video, Titles, Dialogue, Music, or Effects. (Specifically, Final Cut Pro assigns a subrole of one of the default roles to each video or audio component.)
You can adjust the assignment of audio roles on import in two ways: by setting the role assignment manually or by having Final Cut Pro create custom roles automatically while importing media files with iXML metadata.
NOTE: iXML metadata is applied to clips by some high-end audio recording gear. For example, during production, a sound recordist might enter “Boom mic” and “Jessie lav mic” on the recording device to identify the audio channels of a recording. During import, Final Cut Pro can use the iXML names to create subroles named “Boom mic” and “Jessie lav mic” and assign them to the corresponding audio components in the imported clips.
For any given import session, you can override the automatic role assignment process so that every imported audio component is assigned a role of your choosing. You can specify one of the three default audio roles or a custom role that you create. When you import with this setting enabled, Final Cut Pro assigns a unique subrole (from the role you specify) to every component in each clip.
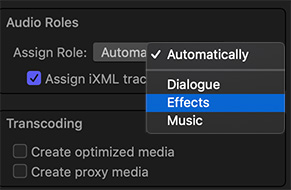
For example, imagine that you’ve recorded several hundred natural sound files for use as Foley sound effects in your video project. By default, Final Cut Pro assigns the Dialogue role to natural sound recordings (with no additional metadata). Instead, you could assign the more appropriate Effects role to every clip in the import session.
To open the Import pane of Final Cut Pro preferences, choose Final Cut Pro > Preferences (or press Command-Comma), then click Import.
In the Audio Roles section, click the Assign Role pop-up menu and choose a role.
NOTE: The Assign Role pop-up menu also appears in the Audio Roles section on the right side of the Media Import window. All default and custom audio roles appear in this pop-up menu.
Import the files.
The role you chose is assigned to the imported clips. (More precisely, components in the imported clips are assigned subroles of the role you chose.)
You can change this and any other import preferences using the settings in the Media Import window or the Import pane of Final Cut Pro > Preferences. To revert to the default setting, so that roles are assigned automatically when you import clips, click the Assign Role pop-up menu and choose Automatically.
Please rate the helpfulness of this tip.
Click on a star to rate it!
https://www.theinsidetips.com/wp-content/uploads/2019/09/Tips-Logo-700x150.jpg00Larry Jordanhttps://www.theinsidetips.com/wp-content/uploads/2019/09/Tips-Logo-700x150.jpgLarry Jordan2019-12-16 01:30:002019-12-16 01:30:00Tip #299: Set Custom Audio Roles During Import
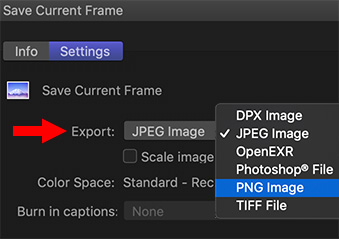
Video resolutions are high enough to create great stills.
JPEG images are small, PNGs and TIFFs are higher quality. I like PNGs, personally.
Apple Final Cut Pro X allows you to export six different image formats (see the screen shot). JPEGs are the smallest files, but PNG and TIFF are higher quality.
Exporting a JPEG is fine if you are in a hurry, but exporting a PNG provides higher quality. You can then bring those stills into Photoshop, or the image editing application of your choice, for further processing then create as many compressed versions as you need.
Here’s how.
Put your playhead on the frame you want to export.
Choose File > Share > Save Current Frame.
NOTE: If this option doesn’t exist, choose File > Share > Add Destination then drag Save Current Frame from the icons on the right into the sidebar on the left.
Select the setting option you need, then click Next to give it a name and location.
Done.
BONUS
Consider duplicating your project, then use markers to flag stills that want to export. First, this speeds finding the stills you want to export and, second, it allows you to quickly find the source image, if you ever need to re-export.
Please rate the helpfulness of this tip.
Click on a star to rate it!
https://www.theinsidetips.com/wp-content/uploads/2019/09/Tips-Logo-700x150.jpg00Larry Jordanhttps://www.theinsidetips.com/wp-content/uploads/2019/09/Tips-Logo-700x150.jpgLarry Jordan2019-12-16 01:30:002019-12-16 01:30:00Tip #293: Export Still Images
We may request cookies to be set on your device. We use cookies to let us know when you visit our websites, how you interact with us, to enrich your user experience, and to customize your relationship with our website.
Click on the different category headings to find out more. You can also change some of your preferences. Note that blocking some types of cookies may impact your experience on our websites and the services we are able to offer.
Essential Website Cookies
These cookies are strictly necessary to provide you with services available through our website and to use some of its features.
Because these cookies are strictly necessary to deliver the website, refuseing them will have impact how our site functions. You always can block or delete cookies by changing your browser settings and force blocking all cookies on this website. But this will always prompt you to accept/refuse cookies when revisiting our site.
We fully respect if you want to refuse cookies but to avoid asking you again and again kindly allow us to store a cookie for that. You are free to opt out any time or opt in for other cookies to get a better experience. If you refuse cookies we will remove all set cookies in our domain.
We provide you with a list of stored cookies on your computer in our domain so you can check what we stored. Due to security reasons we are not able to show or modify cookies from other domains. You can check these in your browser security settings.
Google Analytics Cookies
These cookies collect information that is used either in aggregate form to help us understand how our website is being used or how effective our marketing campaigns are, or to help us customize our website and application for you in order to enhance your experience.
If you do not want that we track your visit to our site you can disable tracking in your browser here:
Other external services
We also use different external services like Google Webfonts, Google Maps, and external Video providers. Since these providers may collect personal data like your IP address we allow you to block them here. Please be aware that this might heavily reduce the functionality and appearance of our site. Changes will take effect once you reload the page.
Google Webfont Settings:
Google Map Settings:
Google reCaptcha Settings:
Vimeo and Youtube video embeds:
Other cookies
The following cookies are also needed - You can choose if you want to allow them:
Privacy Policy
You can read about our cookies and privacy settings in detail on our Privacy Policy Page.