… for Adobe Premiere Pro CC

Tip #217: Growing Files Grow on You

Larry Jordan – https://LarryJordan.com

This is a highlight for sports editors.

Growing file options in Premiere's Media preferences.
For best performance, uncheck these options – unless you need them.

Topic $TipTopic

A Growing file is a file that has not yet finished recording. A classic example is capturing the video from a sports contest. You need to start editing highlights before the game is complete. So, you capture the sports video as a growing file, which Premiere allows you to edit while the capture is on-going.

Not all video formats support growing files. QuickTime, for instance, does not. However, OP1a MXF does, which is why broadcasters depend upon this format.

The growing files preference setting (in the Media panel) allows you to import files that are not yet complete. Additionally, depending upon your preference settings, Premiere will automatically refresh the Project panel and Source Monitor as new material is recorded.

NOTE: The second preference setting allows you to determine how often you want these files refreshed.

If you don’t use growing files, turn this option off, as it will improve Premiere’s performance.

However, if editing sports is in your future, growing files will make your life easier.


Please rate the helpfulness of this tip.

Click on a star to rate it!

… for Apple Motion

Tip #187: Quickly Create Transparent Graphics

Larry Jordan – https://LarryJordan.com

Transparency is also called the “alpha channel.”

Properties panel in Motion 5 showing  transparent background setting.
Set project transparency using Inspector > Properties.

Topic $TipTopic 
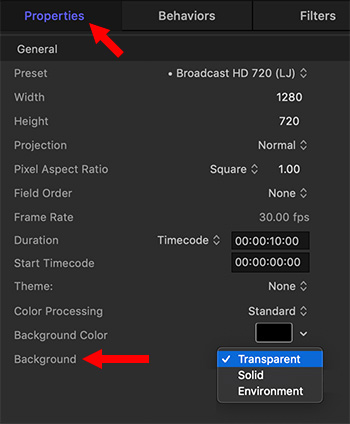
Like Photoshop, Motion makes creating images that contain transparency easy. In fact, transparent backgrounds are the default setting. But, if things go west, here’s how to create a transparent background.

  • Create a motion graphic as usual.
  • In the Layers panel, select the project.
  • Go to Inspector > Properties, then make sure that Background is set to transparent.

Now, when you export your movie or save it as a Final Cut Generator, it will include a transparent background.


Please rate the helpfulness of this tip.

Click on a star to rate it!

… for Apple Motion

Tip #153: The Inspector Adds Perspective

Larry Jordan – https://LarryJordan.com

Precise controls for manipulating elements.

The Inspector adds 3D rotation or position changes.
Use the Motion Inspector to add 3D rotation or position changes.

Topic $TipTopic

There are two ways to add perspective to any element in Motion:

  • The Inspector
  • The 3D Transform tool

To use the Inspector:

  • Select an element in the Layers panel.
  • On the left side of the Interface, click Inspector > Properties.
  • Twirl down Position to move the selected element horizontally (X), vertically (Y), or to or from the viewer/camera (Z).
  • Twirl down Rotation to rotate the selected element horizontally (X), vertically (Y), or to or from the viewer/camera (Z).

Personally, I find myself using Y rotation the most of all these settings.


Please rate the helpfulness of this tip.

Click on a star to rate it!

… for Apple Motion

Tip #151: Export a Transparent Effect from Motion

Larry Jordan – https://LarryJordan.com

Transparency can be displayed by any NLE.

Unchecked layers in Motion are transparent.
Uncheck a group or layer in Motion to make it transparent.

Topic $TipTopic

You have two options to export an effect from Motion:

  • Export the entire composited movie. This creates a stand-alone movie.
  • Export just a portion of the effect – for example, a motion-tracked object, then composite it in the NLE.

Since exporting only exports visible layers, to export just an animated element, uncheck any layers you don’t want to export to make them invisible.

NOTE: To export the entire composite, make sure all layers are visible (checked) in the Layers panel.

Now, when you choose Share > Export Movie and accept the default settings, Motion creates a ProRes 4444 movie with an alpha channel, which means it includes any transparency.

That ProRes 4444 movie can then be imported into any editing software on Mac or Windows and retain all its transparency.

Very cool.


Please rate the helpfulness of this tip.

Click on a star to rate it!

… for Apple Final Cut Pro X

Tip #214: Event Secrets

Larry Jordan – https://LarryJordan.com

Events are a fast way to organize media.

The Library List in Apple Final Cut Pro X.
Rename Events by selecting them, then pressing Return.

Topic $TipTopic

An Event, in Final Cut, is similar to a folder that can hold dozens, hundreds, or even thousands of video clips, audio clips, and still images, as well as projects. Each event in the library refers to media on your storage device, and a database file keeps track of where everything is.

  • Events are automatically named with the date they are created. To rename an Event, select it then press the Return key to “open” the file name for renaming. (See screen shot.)
  • Events are actual folders stored on your hard disk, inside the library package. For this reason, you need to use Event names that the macOS will support. (In other words, avoid most punctuation and special symbols.)
  • To create a new Event, type: Option – N – or choose File > New > Event.
  • You can not store an Event inside another Event; though it would be REALLY nice if we could.
  • There is no limit to the number of Events you can create in a single library.
  • A file can only exist in one Event in the same Library. However, you can easily move any clip from one Event to another by dragging.
  • When creating a new Event, you also have the option to create a new Project file. This is the same as using File > New > Project, only faster.

Events are an easy way to organize your media, though keywords provide more precision and search options.


Please rate the helpfulness of this tip.

Click on a star to rate it!

… for Apple Final Cut Pro X

Tip #212: The Best Way to Duplicate a Project

Larry Jordan – https://LarryJordan.com

There are two options – one is better.

This Browser pop-up menu lets you duplicate a project.
Control-click a project icon to reveal this menu.

Topic $TipTopic

Because Final Cut instantly and automatically saves your work, to preserve an edit from accidental changes you need to first duplicate a project. Final Cut Pro X provides two ways to do this. But, is one better?

To see your options, Control-click a project in the Browser. Two duplication options appear:

  • Duplicate (shortcut: Cmd + D)
  • Duplicate Project as Snapshot (shortcut: Shift + Cmd + D)

Both duplicate a project. But, if you use compound or multicam clips, choose Duplicate Project as Snapshot.

Why? Because this option creates a self-contained backup version of a project that includes referenced compound clips or multicam “parent” clips. Changes you make to other instances of the compound clips or multicam clips do not affect the versions in the duplicate, so your project is protected from accidental changes.

In other words, if you Duplicate a project, then change a compound or multicam clip in EITHER version, the change is rippled to both the original project and the duplicate.

If you use Duplicate Project as Snapshot, the two projects are independent.

My recommendation is, regardless of how simple or complex your project, always choose Duplicate Project as Snapshot. You’ll never need to worry about unexpected surprises.


Please rate the helpfulness of this tip.

Click on a star to rate it!

… for Apple Final Cut Pro X

Tip #199: 4 Keyboard Shortcuts That Save HOURS!

Larry Jordan – https://LarryJordan.com

These shortcuts work for whatever clips you have selected.

Clip editing icons for Apple Final Cut Pro X
Editing shortcut icons (L to R): Connected, Insert, Append, Overwrite.

Topic $TipTopic

I am SUCH a fan of keyboard shortcuts. Once you start using them, you’ll be amazed at how much time they save so you can concentrate on telling your story. These are shortcuts I use in every edit.

NOTE: A key point here is that these shortcuts work with one or more selected clips in the Browser!

Shortcut What It Does
E Appends (Edits) all selected Browser clips to the end of the timeline in the order they were selected
W Insert edits all selected Browser clips at the position of the playhead/skimmer
D Overwrite edits all selected Browser clips at the position of the playhead/skimmer
Q Edits all selected Browser clips on the first available layer above (video) or below (audio) the Primary Storyline

The key point to note is that ALL selected clips are edited, in the order you selected them. If you have a bunch of selects, select them in the order you want them to appear in the timeline, type E and, poof!, instantly, they are edited in order!

NOTE: Look at your keyboard. See how E – W – D – Q all fall easily under the fingers of the left hand. This allows right-handed editors to keep one hand on the mouse and the other on the keyboard to edit clips as fast as you can decide which clip to edit next.


Please rate the helpfulness of this tip.

Click on a star to rate it!

… for Visual Effects

Tip #173: 4 Tips to Better Chroma-Keys

Larry Jordan – https://LarryJordan.com

The first rule is great lighting. But, you also need more…

A green-screen example screen shot.
A good chroma-key requires more than perfect lighting.

Topic $TipTopic

This tip first appeared at NoFilmSchool.com.

The first rule of great keys is great lighting. But, there are other things you can do improve the quality of your keys. Here are four tips that can make your keys cleaner and easier.

  1. Choose the right background color. We pick green because it isn’t in skin tone and most of us don’t wear green clothes. But, when there’s green in the foreground, use blue. (Also, green is more reflective, which means it tends to contaminate your shots more.)
  2. Don’t overexpose the background. Both foreground and background need to be properly exposed.
  3. Avoid wrinkles and folds in the background. If you use fabric, iron it. If you use paint, paint on a very smooth surface. Both the background lighting and surface need to be flat.
  4. The less compressed the video codec, the better the key. Chroma-key looks for specific color values – and the first thing that gets compressed in any video format is the color information.

Ideally, when your lighting is flat and you follow these tips, you should be able to create a clean key with one click.


Please rate the helpfulness of this tip.

Click on a star to rate it!

… for Visual Effects

Tip #171: 7 Tips To Better Timelapse Shots

Larry Jordan – https://LarryJordan.com

The best timelapse requires practice and planning.

timelapse, video, motion images
The best time-lapse images require planning.

Topic $TipTopic

This tip first appeared in Digital Photography School.

Timelapse photography is a great way to capture motion, plus, it’s eye-catching! Here are seven tips that can help improve your next shoot.

  1. Don’t use auto settings. To avoid constant changes in your images or exposure, set your camera to Manual mode.
  2. Focus manually. Auto-focus will have the lens chasing whatever moves. Worse, auto-focus eats batteries.
  3. Shoot in lower resolution so you don’t fill storage too quickly. Videos don’t demand 24 megapixel images.
  4. Anticipate the changes in the landscape and compose accordingly.
  5. Don’t press the shutter with your finger. While an intervalometer is indispensable, if you don’t have one, use a remote shutter release to fire shots manually at the specified time interval.
  6. Music is as important to the final video as the images themselves.
  7. Practice shooting a simple timelapse, say in your backyard, before committing the time and gear to the real thing. Problems are easier to fix when all the gear is local.

Please rate the helpfulness of this tip.

Click on a star to rate it!

… for Visual Effects

Tip #117: Create a Custom HDR Effect

Larry Jordan – https://LarryJordan.com

Custom Effects Boost Efficiency

HDR plug-in from FCPeffects
This is the original FCPeffects plugin, with Dave’s custom version.

Topic $TipTopic

Dave Casselman writes:

I apply the HDR plug-in from FCPeffects.
from the Effects Browser to nearly every roping video I edit. But I always cut it back to about 40%.

That got me thinking that I maybe could find the setting in Motion to permanently make a copy that only worked at 40%. I opened a copy of HDR Tools in Motion and clicked around ’til I found the Overall Mix setting and moved the slider to 40%. Then I saved the copy with the new name of HDR 40% back into the Effects Browser along with the original. Then I made it the default shortcut. (See Tip #69)

Wow! I now have a really great shortcut.


Please rate the helpfulness of this tip.

Click on a star to rate it!