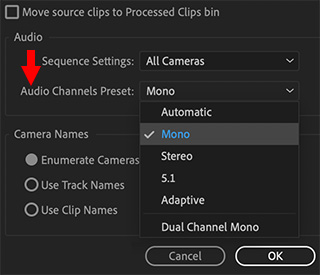
… for Codecs & Media
Tip #415: Everything Starts With an IFF
Larry Jordan – LarryJordan.com
All our media starts as a “chunk.”


Back in WWII, an “IFF” was a radar signal used for “identification friend or foe.” But, in the media world, IFF has an entirely different meaning – one that we use everyday.
The Interchange File Format (IFF) is a generic container file format, invented in 1985 by Jerry Morrison at Electronic Arts, along with engineers at Commodore, to simplify transferring data between computers.
Common IFF formats include:
- AIFF (Audio IFF file)
- TIFF (Tagged IFF file)
- PNG (a modified form of IFF)
- FourCC (a Windows media format)
- QuickTime also has IFF elements as part of its structure
An IFF file is built up from chunks, small pieces of data containing media and information about that media, similar to an Ethernet packet.
Each type of chunk typically has a different internal structure, which could be numerical, text or raw (unstructured) data.
The benefit to using IFF files is that it become easy to move files from one program or computer to another. An even better benefit is that IFF, like Ethernet, does not require us to understand how it works in order to use it.