… for Random Weirdness

Tip #368: 12 Tips for Better Locations

Larry Jordan – LarryJordan.com

Think About Your Location Before You Start Shooting

Image Courtesy of www.pexels.com.

Topic $TipTopic

This article, written by Lewis McGregor, first appeared in PremiumBeat. This is an excerpt.

Picking the right location can make all the difference for your film. Here is a list of 12 tips to consider, from The Guerrilla Film Makers Pocketbook, when trying to find the right location on a budget.

  1. Shooting on location can be a significant advantage, as you will have to do minimal set work, merely dressing.
  2. Space can be a major problem, as even the biggest of rooms will become sardine-like with a full crew.
  3. Shooting outdoors can be a problem, as there is no way to control the weather.
  4. Always try and get permission to shoot wherever you intend to be. Sometimes, if you do foresee problems, it is best to dash in, shoot, and get out as quick as possible. If someone turns up to find out what is happening, try and get them interested and involved, and claim complete ignorance.
  5. Getting to and from difficult locations can be very costly in terms of time. One-hour traveling is one hour less shooting.
  6. Use movement orders. This is a piece of paper with a photocopied map (the route picked out with highlighter pen), explicit directions, and mobile phone numbers for those who get lost.
  7. Facilities for the crew on location can be a problem. Your crew needs a place to eat and sit, as well as a toilet. You can’t ask your star to squat in the bushes.
  8. Closing down streets is difficult. The police will be as helpful as they can, but they have crimes to stop and don’t relish the thought of holding the hand of a new producer.
  9. When choosing a location, don’t forget the sound.
  10. Film crews trash locations. Clean up after yourself, leave muddy boots outside, ban smoking inside, etc.. Remember, you may need to return to the location if there is a problem.
  11. Think creatively. Many locations can double for several different parts of your story. This will minimize the time you waste moving between places.
  12. Beware of the cool location that is impossible to either light or get cameras into. Buildings with big windows cause lighting problems, turrets with narrow stairwells are tough for carrying kits, and anywhere in big cities will cost you in simply parking alone.

Please rate the helpfulness of this tip.

Click on a star to rate it!

… for Apple Motion

Tip #388: Garbage Masks in Motion

Larry Jordan – LarryJordan.com

Virtually all keys benefit from a garbage mask.

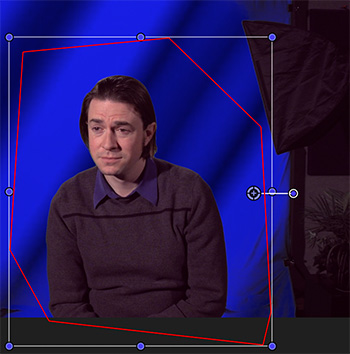
This is Drew in a really, really bad key.

Topic $TipTopic

This is an excerpt from the Apple Motion User Guide. Garbage masks are really useful because they help you, ah, get rid of the garbage. Here’s how it works

After you apply a key, you may need to crop unwanted background elements that can’t be keyed, such as the edge of a blue screen stage, lighting rigs, or tape that appears in the background. Using the Mask tool, you can create a garbage mask that removes unwanted elements.

NOTE: The Mask tool is not a filter, its a tool; located in the Toolbar at the bottom of the Motion interface.

There are five masking tools in Motion:

  • Rectangle Mask
  • Circle Mask
  • Freehand Mask
  • Beziér Mask
  • B-spline Mask

Create a Garbage Mask

In Motion, select the keyed layer and use a mask tool to draw a mask around the foreground subject.

NOTE: If the subject is moving, the garbage mask must be animated using keyframes.

By default, the Mask Blend Mode is set to Add, which crops everything outside the mask, while leaving the transparent areas in the mask alone. To crop out areas within masks, choose Subtract from the Mask Blend Mode pop-up menu.


Please rate the helpfulness of this tip.

Click on a star to rate it!

… for Apple Motion

Tip #387: Motion Tracking Strategies

Larry Jordan – LarryJordan.com

These tips from Apple can help improve your motion tracking.

Image courtesy of 2ReelGuys.com.

Topic $TipTopic

This is an excerpt from the Apple Motion User Guide. Motion tracking in Apple Motion isn’t always perfect. Here are some tips that can improve the quality of your tracks.

Find a Good Reference Pattern

In Motion, play the footage several times to locate a reference pattern that satisfies as many of the following rules as possible:

  • Contains perpendicular edges, such as dots, intersections, and corners. (Lines and straight boundaries should be avoided.)
  • Is a high-contrast pattern.
  • Contains smooth or even changes in brightness or color. An example of an uneven color or brightness change is a sharp-edged shadow that passes over your reference pattern.
  • Appears in every frame of the clip (does not move offscreen or become obscured by other objects).
  • Is distinct from other patterns in the same region in the clip.

Ask Motion for a Hint

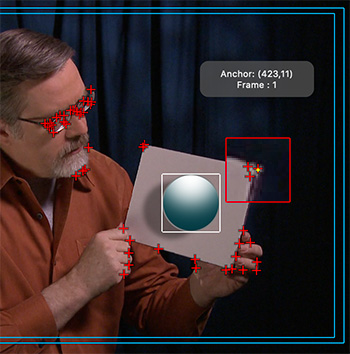
You can have Motion display suggested tracking points. You need at least one tracker in the Canvas to display suggested tracking reference points.

  • In Motion, press and hold the Option key, place the pointer over a tracker in the canvas, then press and hold the mouse button.
    The suggested reference points appear in the canvas and in the magnified inset as small red crosshairs.
  • When you move a tracker toward a suggested point, the tracker snaps to the point. The suggested points are not necessarily ideal tracking reference points for the feature you want to track in the clip. Motion merely picks locations in the current frame that meet the reference pattern criteria, such as an area of high contrast.

Other tips include:

  • Manually modify track points
  • Delete bad keyframes in the Keyframe Editor
  • Delete bad track points in the Canvas

Please rate the helpfulness of this tip.

Click on a star to rate it!

… for Apple Motion

Tip #386: Filters that Blur Alpha Channels

Larry Jordan – LarryJordan.com

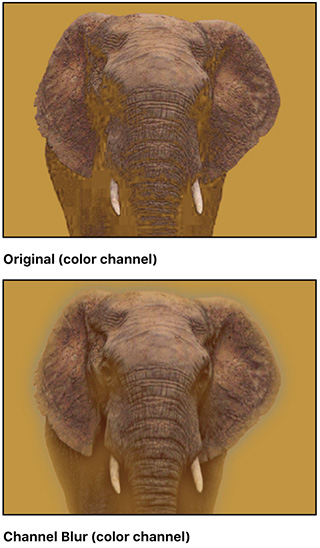
Blurring the alpha channel blurs a foreground image.

Image courtesy of Apple, Inc.

Topic $TipTopic

This is an excerpt from the Apple Motion user guide.

Blurring the alpha channel allows you to blur a foreground object into a background element. In fact, there are filters you can use to manipulate or even replace a layer’s alpha channel.

The process of improving a keying effect or of customizing an alpha channel created using shape or image masks may require the use of special filters. Although you can apply any filter to a shape or image mask to modify that mask’s effect, the filters described in this section modify a layer’s entire alpha channel, including the sum of all masks and other filters applied to that layer.

For example, if you’ve applied a keying filter, you can use the following filters to modify the resulting alpha channel even though no mask appears for that layer in the Layers list or Timeline:

  • Channel Blur: This filter, found in the Blur category of the Filters library, lets you selectively blur the alpha channel. You can set the amount of horizontal and vertical blur independently.
  • Matte Magic: This filter, found in the Keying subcategory of the Filters library, lets you manipulate various qualities of an alpha channel, shrinking, feathering, and eroding the alpha channel to fine-tune it.

Please rate the helpfulness of this tip.

Click on a star to rate it!

… for Visual Effects

Tip #396: Mask Your Microphone

Larry Jordan – LarryJordan.com

This is also called “clean-plate masking.”

Image courtesy of www.pexels.com.

Topic $TipTopic

This article first appeared in MotionArray. This is an excerpt.

You might know that one thing that’s essential to getting high-quality audio is to get your microphone as close to your subject as possible. This is one of the reasons that lavalier mics are such a great tool!

If you’ve only have a standard shotgun mic and you want to get it close to your subject, that can get tricky. What if you want a wide shot of your subject and you can’t get the mic close enough without it being in the picture? What do you do? Bring it into frame anyway and get it close to your subject.

Yes, really! As long as there’s distance at all times between the mic and the subject, and the background isn’t moving like crazy, you can mask out the mic in post-production. Make sure that at some point, you have the same shot minus the microphone to use as your clean plate. This will be important for editing the object out.

  1. Open your shot in your video editor.
  2. Take a sample of the clip without the microphone in it. Place it on the bottom layer of your timeline.
  3. Create a still frame from the clean background.
  4. Place your normal clip (the one with the mic visible) on the layer right above this one.
  5. Mask out your microphone on your main footage layer (this will allow the mic-less bottom layer to show through).
  6. Lastly, feather the edges just a tad.

Please rate the helpfulness of this tip.

Click on a star to rate it!

… for Visual Effects

Tip #391: Simulate Poor Streaming Connections

Larry Jordan – LarryJordan.com

Glitches make pristine video look, ah, less so…

Image courtesy: Red Giant.

Topic $TipTopic

This is an excerpt from a recent YouTube video posted by Red Giant. This features an effect called: Glitch, which is part of Red Giant Universe. This plug-in runs on all major NLEs.

  • Search “RG Universe Stylize” in the effects panel/browser
  • Apply the “uni.glitch” effect onto the desired clip in the timeline
  • In the effects panel or Inspector, in the uni.glitch effect, click “select preset” to browse a variety of preset glitch effects, both for video and text
  • If you’d like the effect to begin at a certain point, turn the “glitch frequency” to 0, turn on keyframe recording, and then move to the desired beginning glitch point, and type 100 for glitch frequency.
  • The same can be done with the compression, small glitch, and large glitch parameters in the effects panel

Please rate the helpfulness of this tip.

Click on a star to rate it!

… for Visual Effects

Tip #390: Super-slow Motion in DaVinci Resolve

Larry Jordan – LarryJordan.com

Super-slo-mo, without requiring a special camera.

Topic $TipTopic

This article, written by Rubidium Wu, first appeared in PremiumBeat. This is an excerpt.

Using some fancy new AI, DaVinci Resolve 16 can take your 60p footage and slow it down significantly by guessing what would be in-between the missing frames.

You need to first import for 60p footage into a 24p project. Before you drop it on the timeline, select Interpret Footage and tell Resolve to use it as 24p footage. Once you drop that part of your clip, you want to slow further. Select Change Speed from the contextual menu, and experiment with the settings. To get a 120 fps effect, reduce the speed by fifty percent.

The next step is to stay in the edit page and select the Speed and Timing tab. Instead of the default Project setting, set the retime process to Optical Flow and the Motion Estimation to Speed Warp.

You’ll need to reselect the part of the clip you want to slow down, since the retiming will tamper with the part that appears in the timeline. Once you’re happy with the selected area, render it out before doing any kind of color grade or editing. Unless you have a monster spec computer, it won’t play back in anything close to real time.

Once you’ve rendered the clip, import it back into Resolve, and you’ll have super-slow, smooth, 120p footage. This method works best when the movement itself isn’t too dramatic. If the object moves too fast, the optical flow will have a hard time guessing the missing pixels.


Please rate the helpfulness of this tip.

Click on a star to rate it!

… for Codecs & Media

Tip #399: Add Metadata to your Movies

Larry Jordan – LarryJordan.com

Annotations add information to the file itself.

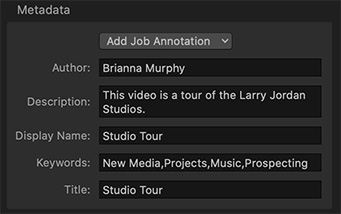
The Metadata panel in Apple Compressor.

Topic $TipTopic

You can embed metadata labels into files transcoded using the Apple Devices, Apple ProRes, MP3, MPEG-4, and QuickTime settings in Apple Compressor. Use metadata to annotate a media file with information that’s important for your workflow or for the person viewing your output file. You can add any of the annotation fields provided in Compressor, or import metadata that’s used in another media file (like a QuickTime movie).

Add Metadata Manually

  1. In the Compressor batch area, select the job that contains the media file you want to annotate.
    (Tip: To select the job, rather than an output row under the job, click the source filename at the top of the job area.)
  2. In the Metadata area of the Job inspector, click the Add Job Annotation pop-up menu, choose an annotation type, enter text in the field that appears, then press Return (or click in another metadata text field).
    (Note: If you don’t press Return or click in another metadata text field, your text won’t be saved.)
  3. Repeat step 2 for each annotation type you want to add.
  4. The annotations you added are shown in fields below the pop-up menu.

Import Metadata Automatically

You can import metadata annotations into Compressor from an external QuickTime movie or from an XML dictionary property list, a text file used in macOS, iOS, and iPadOS programming frameworks to store metadata categories and values (keys and strings).

View Annotations After Transcoding

After Compressor transcodes a media file that has metadata, there are several ways to see the annotations:

  • In the Finder, select the transcoded media file, choose File > Get Info, then in the info window click the disclosure triangle next to More Info.
  • Open the media file in QuickTime Player, then choose Window > Show Movie Inspector.
    QuickTime Player displays several (but not all) categories of Compressor metadata at the top of the inspector.
  • After importing the media file into Final Cut Pro, select the clip and open the Info inspector.

EXTRA CREDIT

You’ll find more information in the Compressor User Guide. Search for “metadata.”


Please rate the helpfulness of this tip.

Click on a star to rate it!

… for Codecs & Media

Tip #398: Use Watch Folders in AME for Automation

Larry Jordan – LarryJordan.com

Watch Folders automate media compression.

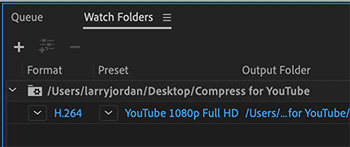
A sample Watch Folder in Adobe Media Encoder, with settings applied.

Topic $TipTopic

If you are creating lots of movies that always get the same compression settings or want to automatically compress and transfer files to social media – using Watch Folders in Adobe Media Encoder can make your life a lot easier.

A Watch Folder is a specific location on your computer – either on an internal, external or network drive – into which you drop files to be compressed.

As long as Adobe Media Encoder is running – and this won’t work if it isn’t – once a file is copied into a Watch Folder location you specify, AME will compress it based on the settings applied to that folder.

For example, in this screen shot, within a few seconds after a file is copied into a folder named: “Compress for YouTube,” AME will compress it using the “YouTube 1080p Full HD” preset compression settings.

When compression is complete, the master file will be moved to the Source folder inside this Watch folder, while the compressed file is moved to the Output folder.

Automatically

EXTRA CREDIT

You can apply multiple settings to the same Watch Folder, for example to create and transfer files to YouTube, Facebook and Vimeo. Each of these settings will automatically transfer the compressed file up to your account on each service.

I used Watch Folders a lot when the Digital Production Buzz covered NAB. We were regularly dropping 5-8 files an hour into this folder, then posting them as soon as they showed up in the Output folder. This saved us precious minutes for each show compared to compressing each file manually.


Please rate the helpfulness of this tip.

Click on a star to rate it!

… for Codecs & Media

Tip #397: What Do Compressor Frame Sizes Mean

Larry Jordan – LarryJordan.com

Don’t scale images larger than 100%

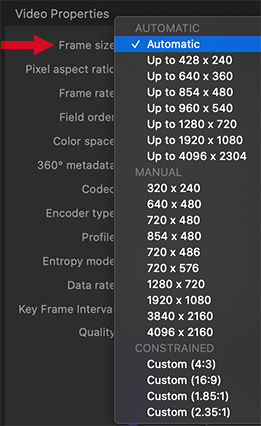
The Frame Size selector in Apple Compressor.

Topic $TipTopic

The Frame Size setting in Apple Compressor determines precisely how your images are scaled during compression. Here’s what the settings mean.

Automatic. This outputs a compressed file at the same frame size as the source file.

Category: Up to…

This creates a compressed frame size that is the same size as the source file UNLESS the source file is larger than the “Up to” amount.

For example, if Up to was set to 1280 x 720, a 480 x 270 clip would be scaled to 480 x 270, while a 1920 x 1080 clip would be scaled to 1280 x 720.

Category: Manual

This scales a compressed frame size to exactly this frame size, regardless of the frame size of the source file.

For example, if Manual was set to 1280 x 720, a 480 x 270 clip would be scaled to 1280 x 720, while a 1920 x 1080 clip would also be scaled to 1280 x 720.

Category: Constrained

This allows scaling a compressed file to any frame size, provided it remains within the defined aspect ratio.

For example, choosing Custom 16:9, would allow scaling any 16:9 master to any frame size, as long as it retains the 16:9 aspect ratio; say 960 x 540.


Please rate the helpfulness of this tip.

Click on a star to rate it!