If you need to assemble clips with different frame sizes, frame rates or codecs into the same multicam clip into Adobe Premiere Pro CC, here’s a fast way to create a multicam clip with exactly the format you need.
The secret?
When creating a multicam clip, the first clip you select in the Project panel will be the settings that Premiere uses to build a multicam clip.
So if you want to create a 4k multicam clip containing both 4K and 1080p HD media, be sure to select the 4K clip first.
This is a very fast way to trim edits in realtime.
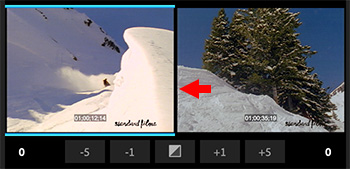
The blue bars indicate which edit point is selected. Drag to trim – or use J-K-L keys.
Hidden in the Premiere interface is the Dynamic Trim window, which provides the ability to trim an edit point in realtime. This is a great way to trim an action scene when you need to see it in realtime to figure out the best places to change shots.
Double-click any edit point to open the window. The out-going clip is on the left, the in-coming clip is on the right.
Click an image to select a clip. (Notice the blue bars bracketing the left window? This means the out-going clip is selected.)
Drag inside an image to trim the Out (left) or In (right.). Or, click the vertical border between the two images to trim both; again, by dragging the mouse.
NOTE: You can also use the buttons at the bottom of the window to trim in 1 or 5 frame increments.
But! The real magic comes when you use the J and L keys. J to play backward, L to play forward. Whenever you press K, the selected edit point is trimmed in realtime.
If you are editing on action, this can make your trims a whole lot faster while enabling you to trim while watching the scene in realtime.
Please rate the helpfulness of this tip.
Click on a star to rate it!
https://www.theinsidetips.com/wp-content/uploads/2019/09/Tips-Logo-700x150.jpg00Larry Jordanhttps://www.theinsidetips.com/wp-content/uploads/2019/09/Tips-Logo-700x150.jpgLarry Jordan2020-01-21 01:30:002020-01-21 01:30:00Tip #290: Dynamic Trim: Trim Clips in Real-Time
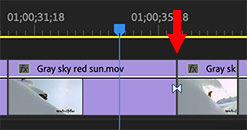
The red arrow indicates the start of a Hold frame in Premiere.
Hold frames are still images created in a clip in Premiere’s timeline that allow you to pause the action. There are two versions of a Hold frame – here’s how to create both.
In the Premiere timeline, put your playhead on the frame you want to freeze.
Control-click the clip and choose one of two options:
Add Frame Hold. This freezes the frame under the playhead until the end of the clip. Perfect for a dramatic freeze and a slow fade to black.
Insert Frame Hold Segment. Inserts a two-second freeze frame at the position of the playhead, then the action resumes.
In both cases, you can trim the end of the Hold frame to whatever duration you need. I use these a lot!
Please rate the helpfulness of this tip.
Click on a star to rate it!
https://www.theinsidetips.com/wp-content/uploads/2019/09/Tips-Logo-700x150.jpg00Larry Jordanhttps://www.theinsidetips.com/wp-content/uploads/2019/09/Tips-Logo-700x150.jpgLarry Jordan2020-01-21 01:30:002020-01-21 01:30:00Tip #289: Create a Hold Frame
Recently I re-opened a project that I had finished. When I played it on the timeline I got the “sorry I lost your media” red card warning. (I think it was pointing to a .PNG that I had created that was probably not imported correctly in the first place.)
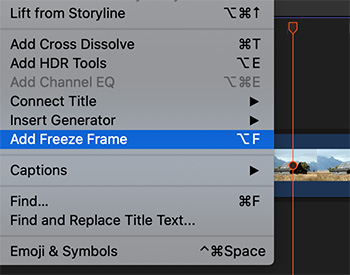
I was in a hurry to get this video re-posted so I chose not to do an extensive search to find the missing link. My solution was to choose Edit > Add Freeze Frame.
I clicked on the last frame of the video before the red area and created a freeze frame. I then trimmed the freeze frame to make sure the video was still the same length. There was sound under so I just made it look like an artistic choice and the problem was solved.
Fonts don’t need to be white. You have LOTS of options.
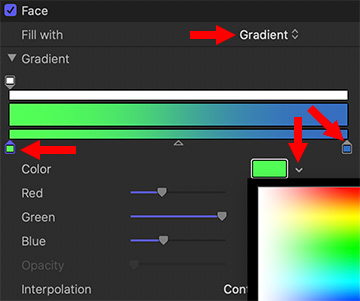
The gradient color picker for text in Apple Final Cut Pro X.
This Tip is an excerpt from a longer Apple KnowledgeBase discussion of gradients.
Normally, text in a title or generator has only one color – and the default is white. However, you can replace the solid color with a gradient, then change the colors of the gradient. We have LOTS of options. Here’s how.
Select the text clip.
Select the text you want to modify in either the Inspector or the Viewer.
In the Text Inspector, scroll down and show Face.
Change Fill with to Gradient.
Twirl down the arrow next to Gradient to reveal the gradient color picker.
The top white bar represents opacity over time. Generally, leave that alone.
Click one of the color squares at the bottom to select it.
Either click the color chip, or the arrow next to the color chip, to display a color picker (there are two different options, depending upon where you click).
To add another color to the gradient, click once in the thin horizontal color bar.
Drag a color square to change the gradient.
Once you start playing, you’ll discover all kinds of things you can do with this gradient color tool.
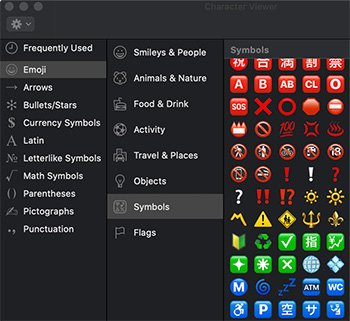
Emojis give an entirely different look to info-graphics and titles.
A portion of the emoji panel in Apple Final Cut Pro X.
It started with macOS Sierra, but for those who, like me, didn’t get the memo, we can now add emojis to titles in Final Cut Pro X. It couldn’t be easier – here’s how.
Place your cursor in a text clip where you want an emoji to appear.
Type Control + Cmd + Spacebar.
Double-click any emoji icon to add it to your title at the position of the cursor.
Very cool – and very easy.
Please rate the helpfulness of this tip.
Click on a star to rate it!
https://www.theinsidetips.com/wp-content/uploads/2019/09/Tips-Logo-700x150.jpg00Larry Jordanhttps://www.theinsidetips.com/wp-content/uploads/2019/09/Tips-Logo-700x150.jpgLarry Jordan2020-01-20 01:30:002020-01-17 17:15:12Tip #342: Uses for Emoji in Final Cut Pro X
Plan so you can “be in the moment” with your guest.
I’ve been doing interviews for decades. Based on that experience, here’s a summary of an article I wrote on how to ask better interview questions. Read the full article here.
Plan. Planning is not as sexy as production, but it is just as essential.
Handle Guests. Get all your tech checks done before the guest walks onto the set. Once the guest enters, direct your full attention to them.
Write Your Questions. Asking questions is part art and part science. The art is really listening to what your guest is saying. Write down your questions so you can focus on the guest, not on what you want to ask next.
The Interview. At this point, the interview dance begins. And I view it as a dance — I’m leading and they are following. For me, an interview has an emotional arc, the same as a drama. I always start with easy questions which I never expect to use, just to get the guest comfortable.
Questions to Use. WHAT, WHERE, and HOW questions. These cause the guest to describe specific problems, actions, behaviors. These set up a problem and what was done to solve it. I use these for the body of the interview. I also use “For example?” a lot during this section to drill down into specifics. Then, I wrap up with WHY questions. These always elicit emotional responses
Questions Not to Use. Questions that start with: could, should, do, can, or any other question that can be answered “yes,” or “no.”
Last Question. Just before calling “Cut!,” but when all my questions are done, I always ask the guest: “Is there a question I should have asked that I did not?” This gives them a chance to reflect to see if they want to add, or modify anything.
Finally, when things are done, thank the guest BEFORE you talk to the crew. Reassure them they did a good job – because they are worried you didn’t like what they did.
Then, talk to the crew.
There’s a lot more in the article, I recommend you read it before your next interview.
It takes a lot of work to make a soundbite sound natural.
This article, written by Jourdan Aldredge, first appeared in PremiumBeat.
Quality audio is the key to any interview. Yet, working with sound bites is always a challenge because they are filled with pauses, interruptions and awkward phrasing.
Look for the good stuff. Look for crisp, concise, and complete bites first. Then, go back and look for good bits that can be built into a complete sentence.
Remove ‘umms’ and pauses. Make sure you have B-roll to cover your edits, then delete the pauses, awkward beats and ripple edit everything back together.
Edit on valleys. When editing audio, always be sure to cut where the waveform is as small as possible.
Edit on similar syllables. If you must edit in a word, edit on similar syllables who’s waveform peaks are roughly the same level
Verify the soundbites. After the bites are edited, listen to them closely to make sure they still make sense and fit with the rest of the interview.
Planning and communication are the keys to success.
These first appeared in an article written by Caleb Ward for PremiumBeat as a list of 15 tips. I’ve selected my top 7 favorites from his list.
Shooting a video interview can be one of the most challenging aspects of the filmmaking process. Here are seven tips to take your interview skills to the next level and avoid nasty surprises on set.
Do your research and plan your questions carefully.
Scout the location.
Coordinate costume and logistics with your talent before the shoot.
Use a professional sound recordist.
Decide where you want the talent to look (their “eyeline”).
If possible, shoot with more than one camera to simplify editing.
Record B-roll and room tone before leaving the set.
The whole article is worth reading.
Please rate the helpfulness of this tip.
Click on a star to rate it!
https://www.theinsidetips.com/wp-content/uploads/2019/09/Tips-Logo-700x150.jpg00Larry Jordanhttps://www.theinsidetips.com/wp-content/uploads/2019/09/Tips-Logo-700x150.jpgLarry Jordan2020-01-17 01:30:002020-01-17 01:30:00Tip #324: Improve Your Video Interviews
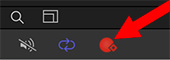
The Record Button simplifies adding keyframes to projects.
The Record Button in “add keyframe” mode.
This first appeared in an Apple KnowledgeBase article. There are two ways to apply keyframes in Motion: Automatically and manually. Here’s the automatic method – using the Record button.
Turn on the Record button (Shortcut: A), located at the bottom left of the Viewer, to create a new keyframe whenever you adjust any parameter. This method is useful when you want to create keyframes for multiple parameters in your project.
Here are the steps:
1. In Motion, do one of one following:
Click the Record button on the left side of the timing toolbar.
Press A.
Choose Mark > Record Animation.
The Record button is highlighted.
2. Select an object in the canvas, Layers list, or Timeline.
3. Drag the playhead to a new position in time.
4. Modify one or more parameters by doing any of the following:
Use the onscreen controls to move, scale, or manipulate objects.
Use the controls in the Inspector or HUD to move, scale or manipulate objects
NOTE:
Keyframes are added at the current playhead position for any parameters you modified.
5. Repeat steps 3 and 4 to add additional keyframes.
NOTE: As long as the Record button is enabled, any parameter modifications your make in your project are recorded as new keyframes. In the Inspector, all modifiable parameters are highlighted red to remind you that parameter changes are being recorded as keyframes.
Please rate the helpfulness of this tip.
Click on a star to rate it!
https://www.theinsidetips.com/wp-content/uploads/2019/09/Tips-Logo-700x150.jpg00Larry Jordanhttps://www.theinsidetips.com/wp-content/uploads/2019/09/Tips-Logo-700x150.jpgLarry Jordan2020-01-16 01:30:002020-01-11 07:23:30Tip #377: The Record Button Easily Adds Keyframes
We may request cookies to be set on your device. We use cookies to let us know when you visit our websites, how you interact with us, to enrich your user experience, and to customize your relationship with our website.
Click on the different category headings to find out more. You can also change some of your preferences. Note that blocking some types of cookies may impact your experience on our websites and the services we are able to offer.
Essential Website Cookies
These cookies are strictly necessary to provide you with services available through our website and to use some of its features.
Because these cookies are strictly necessary to deliver the website, refuseing them will have impact how our site functions. You always can block or delete cookies by changing your browser settings and force blocking all cookies on this website. But this will always prompt you to accept/refuse cookies when revisiting our site.
We fully respect if you want to refuse cookies but to avoid asking you again and again kindly allow us to store a cookie for that. You are free to opt out any time or opt in for other cookies to get a better experience. If you refuse cookies we will remove all set cookies in our domain.
We provide you with a list of stored cookies on your computer in our domain so you can check what we stored. Due to security reasons we are not able to show or modify cookies from other domains. You can check these in your browser security settings.
Google Analytics Cookies
These cookies collect information that is used either in aggregate form to help us understand how our website is being used or how effective our marketing campaigns are, or to help us customize our website and application for you in order to enhance your experience.
If you do not want that we track your visit to our site you can disable tracking in your browser here:
Other external services
We also use different external services like Google Webfonts, Google Maps, and external Video providers. Since these providers may collect personal data like your IP address we allow you to block them here. Please be aware that this might heavily reduce the functionality and appearance of our site. Changes will take effect once you reload the page.
Google Webfont Settings:
Google Map Settings:
Google reCaptcha Settings:
Vimeo and Youtube video embeds:
Other cookies
The following cookies are also needed - You can choose if you want to allow them:
Privacy Policy
You can read about our cookies and privacy settings in detail on our Privacy Policy Page.