… for Adobe Premiere Pro CC

Tip #283: AAF vs. EDL vs. OMF vs. XML Export

Larry Jordan – LarryJordan.com

Different applications require different export options.
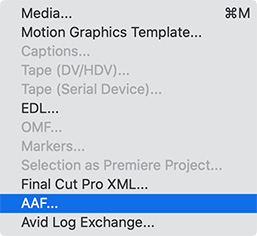
Export options in Adobe Premiere Pro CC.

Topic $TipTopic

Most of the time, when the time comes to export our finished project, we select File > Export > Media. Sometimes, though, we need to move our project to a different program, say for color correction or audio mixing. Which export option should we choose?

  • EDL. This is the oldest, and most limited, transfer format. It only supports 2 video tracks and 4 audio tracks. Unless you are working with VERY old software, this should not be your first choice.
  • OMF. This is an audio-only format. Unlike EDL, which simply points to your media, OMF includes all audio files in the OMF. This guarantees that your audio, along with your edits, will successfully transfer.
  • Final Cut Pro XML. This XML format is based on FCP 7. This is the best choice for moving projects to or from Final Cut Pro 7 or X; though FCP X requires conversion using a utility. Like EDL, this only points to your media. This is also the best choice for many 3rd-party media management systems.
  • AAF. This is the best choice for moving files from Premiere to Avid ProTools or Media Composer. An AAF contains links to audio and video files as well as editing decisions that are to be applied to the audio and video data.
  • Avid Log Exchange. This is the best format for moving Avid Media Composer bins into Premiere.

Please rate the helpfulness of this tip.

Click on a star to rate it!

… for Apple Final Cut Pro X

Tip #366: How to Create Proxy Files After Import

Larry Jordan – LarryJordan.com

Proxy files improve performance and save storage space.

Topic $TipTopic

Proxy files transcode camera native media into Apple ProRes 422 Proxy. These provide high-quality files useful for offline editing at the original frame rate and aspect ratio, but at one-half the resolution. This increases editing performance while using considerably less storage space than optimized files.

Here’s how to create them after you imported your media.

  1. Control-click one or more clips in the Final Cut Pro browser, then choose Transcode Media.
  2. In the window that appears, select the Create optimized media checkbox, the Create proxy media checkbox, or both, then click OK.

NOTE: If the original camera format can be edited with good performance, the “Create optimized media” option is dimmed. The transcoding process may take a while, depending on the options you select. You can see the status of all the background processes currently running in the Background Tasks window.

EXTRA CREDIT

Here’s an Apple KnowledgeBase article. that explains proxy and optimized file formats in more detail.


Please rate the helpfulness of this tip.

Click on a star to rate it!

… for Apple Final Cut Pro X

Tip #331: Export & Translate Subtitles

Larry Jordan – LarryJordan.com

The key is to work with your subtitles as plain text.

Topic $TipTopic

Carsten Ress sent this in:

I was looking for a way to export subtitles (in a closed captions format) from FCP X as text, send it to translation, then import it back again as subtitles. I found this workaround that saved me a lot of time.

  1. Export the subtitles as an SRT File
  2. Change the file extension from .SRT to .TXT (ignore the warning that appears). This gives you a text file with the timecode to position the subtitles
  3. The translator substitutes only the text lines within this document with his translation
  4. When translation is finished, change the file extension from .TXT to .SRT
  5. Then import the SRT file into a new language Role and you have all the subtitles translated and with the right timing.

You need to be careful with the TXT document as small changes in the format (for example, adding additional text) can result in error messages during the reimport of the subtitles.

Also, there is a great plugin called “X-Title Caption Convert” from Spherico that allows you to convert closed caption into FCP X titles. This is really helpful if you want to burn the subtitles into the video file and want to have more formatting options.

EXTRA CREDIT

This workaround is delicate. In my last project the translator used double quotations marks which are not supported in SRT files. This led to an error message during the import.

You have to make sure that no “unpermitted” characters are used or search for them and replace them in case you get some error messages while importing the SRT into final cut or if only a part of the subtitles are imported. But if it works, you can really save a lot of time.


Please rate the helpfulness of this tip.

Click on a star to rate it!

… for Apple Final Cut Pro X

Tip #320: Should You Copy or Link to Media?

Larry Jordan – LarryJordan.com

Copying is safer, linking is more flexible.

Media import options with Final Cut Pro X.

Topic $TipTopic

There are two options when importing media into Final Cut Pro X: “Copy to library” and “Leave files in place.” Which should you use? The short answer is that copying files is safer, while linking files is more flexible.

  • Copy files to library. This copies all media into the Library. This means that wherever you move the library, the media travels with it. There is no lost media and nothing gets unlinked.

I recommend this option for all new users. However, the downside is that the Library file becomes very big (which is not a problem in-and-of-itself) and that you are doubling the storage needed for all your media.

  • Leave files in place. This creates links in FCP X that point to where your media is stored. This keeps the library smaller, but if you move the library you also need to remember where all your media is stored and move it as well. If you don’t, links break and media in your project won’t play.

This option is preferred when media is shared between libraries, when storage capacity is limited, or when multiple editors are using the same media.

Personally, I use Leave files in place, but I am also VERY careful to keep track of where all my media is stored.


Please rate the helpfulness of this tip.

Click on a star to rate it!

… for Random Weirdness

Tip #323: Practical Tips to Avoid Film-making Stress

Larry Jordan – LarryJordan.com

Common sense saves time and reduces stress.

Topic $TipTopic

Lewis McGregor first reported this for PremiumBeat. I’ve summarized his key points here.

Often, stress during a project starts as a small thing that can be easily managed. Sure, these ideas might be common sense tips, but it’s the type of advice you don’t really think about until you find yourself in a particularly stressful situation.

  1. Set up as much as possible before you arrive on location
  2. Minimize the amount of “winging it”
  3. Store and label equipment like a grip truck, even if you drive a small hatchback
  4. Quash what-ifs with backups

Perhaps the causes of your stress are a little different than listed above. Regardless, you can minimize the general stress of shooting solo by focusing on setting up gear ahead of time and the organizing your equipment.


Please rate the helpfulness of this tip.

Click on a star to rate it!

… for Random Weirdness

Tip #271: Examples of USB Connectors

Larry Jordan – LarryJordan.com

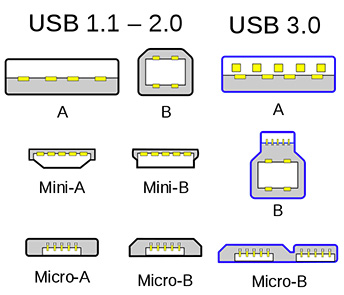
USB uses nine different connectors and five different speed settings.

The nine different connectors used by USB 1.1 through 3.0.

Topic $TipTopic

USB is known for all its different connectors. Recently, I was reading Wikipedia and discovered this illustration.

USB has nine different connectors and five different speeds. The addition of USB-C makes six different speeds.

The three sizes of USB connectors are the default or standard format intended for desktop or portable equipment, the mini intended for mobile equipment, and the thinner micro size, for low-profile mobile equipment such as mobile phones and tablets. There are five speeds for USB data transfer: Low Speed, Full Speed, High Speed (from version 2.0 of the specification), SuperSpeed (from version 3.0), and SuperSpeed+ (from version 3.1).

If you want to learn more, Wikipedia has a worthwhile article here.


Please rate the helpfulness of this tip.

Click on a star to rate it!

… for Random Weirdness

Tip #166: 8 Camera Hacks

Larry Jordan – LarryJordan.com

8 simple tricks to make still images more creative.

Topic $TipTopic

Peter McKinnon, writing in DigitalRev, shares eight different tips we can quickly use on set to create a different look or fix a problem:

  • Belt Sling – Attach and suspend your camera from a belt to produce stabilized camera steady shots
  • Coffee Hood – Add a coffee cup sleeve to your lens for a cheap hood
  • Dream Chap – Add chapstick to your lens for an easy blur effect (perhaps apply this to a lens protector instead!)
  • Cello-lens – Add cellophane over a lens to distort the image
  • Shade Blend – Snap through a pair of sunglasses for a natural Instagram filter
  • Knife Blade – Introduce reflections by placing a shiny knife beneath the lens
  • Flashlight Flare – Shine a light between the camera sensor and the lens to introduce a light leak effect
  • Smart Flare – You can even use your smartphone to create fancy effects while on the go

Please rate the helpfulness of this tip.

Click on a star to rate it!

… for Apple Motion

Tip #344: Copy a Motion Preset to Another Computer

Larry Jordan – LarryJordan.com

Presets are easy to move from one computer to the next.

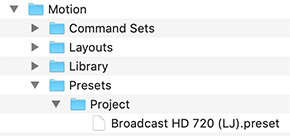
Motion presets are stored in the Library, not the Movies folder.

Topic $TipTopic

This first appeared as an Apple KnowledgeBase article.

Each custom project preset you create (such as Broadcast HD 720) is saved as a separate file in your computer’s /Users/username/Library/Application Support/Motion/Presets/ folder. If you create custom presets that you rely on, you can move them to other computers that have Motion installed.

  • In the Finder, open your custom preset files stored in: [ Home directory ]/Library/Application Support/Motion/Presets/.
  • Copy a custom preset file (which has a .preset filename extension) to the new computer and store it in: [ Home directory ]/Library/Application Support/Motion/Presets/.

NOTE: If the Library folder is hidden, switch to the Finder, press and hold the Option key, then choose Go > Library.


Please rate the helpfulness of this tip.

Click on a star to rate it!

… for Apple Motion

Tip #343: Move Motion Assets to a Different Computer

Larry Jordan – LarryJordan.com

Copy a Motion project file to another computer.

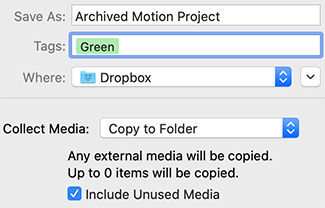
Collect media options in Apple Motion.

Topic $TipTopic

This first appeared as an Apple KnowledgeBase article.

To move a Motion project file to another computer, you must also move all media that the project uses, including all QuickTime, still image, and audio files. In addition, any third-party Motion plug-ins or nonstandard fonts used in the project must be installed on the new computer, or they’ll be unavailable to your project.

Similarly, when you finish a project and want to archive it, it’s a good idea to archive the project file and all media, graphics, fonts, custom behaviors, filters, and third-party add-ons used in the project. If you need to restore the project for later revisions, you’ll have everything you need to get started quickly.

  1. In Motion, save the project file using File > Save as, then choose the Collect Media option and collect all project media into a folder.
  2. Copy the folder containing the saved project file and all media used in the project to another computer or location.

As you can see in this screen shot, archived projects can be saved anywhere.

NOTE: If you move a project to another computer without selecting the Collect Media option, media can go offline (even if you’ve manually moved the media files) due to broken links.


Please rate the helpfulness of this tip.

Click on a star to rate it!

… for Apple Motion

Tip #325: Add a Widget and Parameter in One Step

Larry Jordan – LarryJordan.com

Rigs and Widgets are used to create templates in Motion for Final Cut Pro X.

Access this menu by clicking the downward pointing arrow next to any parameter, like Scale.

Topic $TipTopic

This was first reported in an Apple KnowledgeBase article.

Rigging is the process of creating effect controls in Motion that can be used in Final Cut. Normally, you create a rig, then add a widget (effect control), then add one or more snapshots (settings for the widget).

A rig in Motion has no effect until it contains a widget with assigned snapshots (parameter states).

As an alternative to creating a widget using the buttons in the Rig Inspector, you can create a rig and a widget and then apply a parameter to the widget in a single step.
In Motion, do one of the following:

  • In the Inspector, click a parameter’s Animation menu (the down arrow that appears when you position the pointer over the right side of a parameter row), choose Add To Rig, choose a rig, then choose a widget type from the submenu.
  • Drag a parameter row from any Inspector pane to a rig object in the Layers list.

    Dropping the parameter row immediately on the rig object creates a slider widget. Pausing briefly causes a drop menu to appear, allowing you to select the widget type you want to create.

A new widget appears in the Layers list, under its parent rig. In the Widget Inspector, the parameter you chose appears under the Edit Mode button, ready for snapshot assignment.


Please rate the helpfulness of this tip.

Click on a star to rate it!