… for Apple Final Cut Pro X

Tip #333: Favorites are Faster

Larry Jordan – LarryJordan.com

Favorites are a fast way to build a “selects” reel.

The Favorites menu in Apple Final Cut Pro X.
Favorites are a fast way to flag clips that you really like, or really don’t want.

Topic $TipTopic

Apple made a big deal of Favorites when Final Cut Pro X was first launched. Now, you need to know where to look to find them. But, they are absolutely worth learning, because they can make finding the right clip a lot faster. Here’s how.

Favorites allow you tag clips, or ranges within a clip, as either a Favorite, Deleted or unflagged.

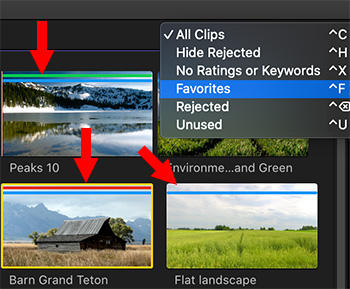
In the screen shot, here’s what the bars mean:

  • Green. The clip, or the range within a clip, is a Favorite (think of this as a select).
  • Red. The clip is flagged as deleted. Nothing is actually deleted, the clip is still in the Browser, but not displayed.
  • No bar. The clip is unflagged.
  • Dark blue. The clip has keywords assigned to it. (This isn’t a favorite, but I thought you’d like to know anyway.)

To apply a Favorite, select the clip(s), or range within a clip, in the Browser, and type:

  • F. This marks a Favorite
  • Delete. This marks a deleted clip. Be sure to use the big Delete key.
  • U. This removes any flags assigned with that clip; this resets both Favorite and deleted clips.

To see only clips that are Favorites or any other category, go to the Hide Rejected menu at the top of the Browser and select what you want to see.


Please rate the helpfulness of this tip.

Click on a star to rate it!

… for Apple Final Cut Pro X

Tip #332: How to Edit Export Tags

Larry Jordan – LarryJordan.com

Tags are useful, but almost never accurate.

Project metadata Inspector in Apple Final Cut Pro X
Project tags can be changed in the Info Inspector.

Topic $TipTopic

You know those project “tags” that appear on the Info screen when you Share a project? Well, not only are they displayed during export, but they are also embedded in the metadata for your movie on export.

However, in my case, these are almost never right. Here’s how to change them.

  • Select the Project you want to modify in the Browser.
  • Open the Inspector and click the Info button.
  • The tags are displayed allowing you to edit them. Feel free to add or modify this text as you want.
  • Clicking outside the Inspector updates the data stored with your project.

Please rate the helpfulness of this tip.

Click on a star to rate it!

… for Random Weirdness

Tip #227: Place Audio Before Video in Motion Graphics

Larry Jordan – LarryJordan.com

Motion graphics and animation need a different audio workflow.

Timecode - or frames - display in Apple Motion.
Click arrow to change between frames and timecode in Apple Motion.

Topic $TipTopic

When it comes to creating animation or a motion graphic video, the hardest thing for folks new to the art is to figure out the timing. How long should a scene last? Or a piece of text hold on screen? How fast are the transitions? Here are some thoughts that can help.

The short answer is that the audio track for anything animated is built BEFORE you create the video, while the audio track for a “normal” video is built after the video is edited.

You could determine timing by dividing a motion graphic video into specific scenes by the clock, then create a storyboard for each scene. But, the problem is that music is not based on the clock. If you are adding a music bed, you need to respect the rhythm of the music, as well as make sure the end of the music in the video is at the end of a musical phrase. This makes your motion graphic sound complete.

NOTE: It is far more important to focus on where music ends than where it begins; because audiences remember the end of something more than the beginning.

Once you start adding dialog or narration, you have two different rhythms working: music and voice. There’s no way you can animate that without carefully listening to and setting your timing based on the actual audio. Which means the audio needs to be complete before animation starts.

This is a key reason why animators prefer to work with frame counts, more than timecode. Frame counts provide a very specific reference that ties perfectly to the sound track. Timecode is better suited to watching video.


Please rate the helpfulness of this tip.

Click on a star to rate it!

… for Random Weirdness

Tip #175: Lighting Tricks with Your Cell Phone

Larry Jordan – LarryJordan.com

A lighting kit is better, but a cell phone can salvage a shoot.

Create low-key mood lighting with an iPhone.
An iPhone can create great mood lighting.

Topic $TipTopic These lighting tips first appeared in PremiumBeat. While you never want to rely on your cell phone as the primary light source, here are some ideas you can use in a pinch.

  1. Moody lighting. Make the room as dark as possible. Search for an image of a solid color on the web, say, the color blue. Save it to Photos, then display that image full screen (as a saved photo) on your phone. Ta-DAH! Instant blue light.
  2. Use your flashlight. Prop your phone on a desk or table. Turn on the flashlight. Works great as a backlight. Bounce it off a wall or white foam core as a fill light.
  3. Quick softbox. Find an image on the web that’s all white. Save it to Photos, then display it as a full-screen image. instant softlight. It won’t light a big area, but it can give you a key in a pinch.
  4. Gaffer tape the phone to the ceiling. Put some gel over it to give it a color.
  5. Shine your light through a bottle of mouthwash or any other clear glass container containing colored liquid.

EXTRA CREDIT

Just to state the obvious, be sure to pick a phone that won’t break your heart if it falls, gets taped or gets wet.


Please rate the helpfulness of this tip.

Click on a star to rate it!

… for Random Weirdness

Tip #147: 5 Tips for Handling & Storing Fiber Optic Cables

Larry Jordan – LarryJordan.com

Proper maintenance of fiber optic cables

Topic $TipTopic

Recently, Camplex Fiber Optic Solutions shared these tips to make sure your fiber optic cables provide years of reliable performance.

Tip #1. Keep Cable Connectors Clean & Dry

Connectors can easily be contaminated by dust, oils from hands, film residue condensed from air vapors, and coatings left after water and solvents evaporate. Moisture can also corrode cable terminations, so store cables in dry areas. Before using fiber optic cables, clean the connectors on the cable and on the cables or ports the cable is connected to.

Tip #2 Leave Dust Caps On Until Ready to Connect

Dust caps keep contaminants and moisture away from the connector and protect it from damage. After removing a dust cap, inspect and clean the ferrule before connecting to another cable or device. Only use cleaning products intended for fiber optic connectors.

Tip #3 Take it Easy

Fiber cables are extremely durable consisting of cladding, coatings, and jackets that protect the delicate glass strands and provide strength. Still, if mishandled, the glass strands can fracture which affects signal transmission.

Tip #4 Test for Failure Points

Exceeding the bend radius or crush resistance ratings of the cable can affect performance, so use a visual fault locator (VFL) to find any failure points or a power meter to determine if there is signal loss.

Tip #5 Avoid Tangled Cables

Coil fiber optic cables and secure connectors with hook and loop type fasteners. Since compressed cables could cause signal loss, avoid using plastic zip ties. When zip ties are the only solution, cinch the zip ties loosely.


Please rate the helpfulness of this tip.

Click on a star to rate it!

… for Apple Motion

Tip #330: What’s a Parameter Behavior?

Larry Jordan – LarryJordan.com

Animated settings, not just elements.

Settings for the Randomize parameter behavior applied to a color chip.

Topic $TipTopic

Parameter behaviors are a very intriguing part of Motion that allow you to animate a setting, not just an element. For example, rather than oscillate an object so it changes position randomly, you can randomize the colors applied to an element.

These provide unlimited creative potential and the best way to see what they can do is to play with them. While this effect can be applied to anything, including video clips, let’s keep this simple.

  • Create a new Motion project.
  • From Library > Shapes, drag a shape into the Viewer. (I used the Club Suit shape.)
  • Select the shape in the Layers panel.
  • Apply Filters > Color > Colorize to the selected shape. This changes the color of the shape based upon the color settings of Remap White to.
  • In Inspector > Filters, hover your mouse over Remap White to and look to the right side of the line. There will be a small downward pointing arrow. Click it.
  • From the pop-up menu, select Add Parameter Behavior > Randomize. This randomizes the colors of this filter.
  • Then, using the settings in this screen shot, slow everything down to prevent visual whiplash.

Now that you know how this technique works, experiment with other settings and other parameters.

NOTE: I show how to apply a parameter behavior to a behavior in Tip #326.

EXTRA CREDIT

To remove a setting, simply select it in the Layers panel and delete it.


Please rate the helpfulness of this tip.

Click on a star to rate it!

… for Apple Motion

Tip #326: Animate a Shape Using Behaviors

Larry Jordan – LarryJordan.com

Parameter Behaviors can be applied to any setting to create much more interesting movement.

The Oscillate parameter behavior settings applied to Noisiness in the Randomize behavior.

Topic $TipTopic

In another tip (#330), we learned how to apply a Parameter Behavior to a filter. In this tip, we’ll learn how to apply a parameter behavior to another behavior; and, along the way, we’ll create our own version of a friendly ghost. Here’s how.

  • Create a new Motion project.
  • From Library > Shapes, drag a shape into the Viewer. (I used the Club Suit shape.)
  • Select the shape in the Layers panel.
  • Apply Behaviors > Shape > Randomize. This causes the shape to wiggle. To make it more amorphously ghost-like, match my settings in the lower half of the screen shot.
  • Next, hover your mouse over Noisiness and click the small downward-pointing arrow on the right.
  • From the menu, select Oscillate. This causes the values in Noisiness to change over time.
  • Again, match my settings in the top half of the screen shot. Notice the different results you get by changing the wave shape.

NOTE: To remove a setting, select it in the Layers panel and delete it.

EXTRA CREDIT

To make this shape more “ghosty,” I also:

  • Changed Properties > Opacity to 25%
  • Changed the color to light blue using Filters > Color > Colorize
  • Softened the edges using Filters > Blur > Gaussian Blur

Have fun playing.


Please rate the helpfulness of this tip.

Click on a star to rate it!

… for Apple Motion

Tip #315: Use the Snap Alignment Behavior in Motion

Larry Jordan – LarryJordan.com

Keeps moving objects pointing in the direction of their movement.

The Behavior Inspector in Apple Motion.
Three motion behaviors applied to a moving object: Throw, Orbit Around & Snap Alignment to Motion.

Topic $TipTopic

The purpose of the “Snap Alignment to Motion” behavior is to keep moving objects, like arrows, pointing in the direction of their movement, regardless of how their position changes.

Here’s how this works.

  • Create an object, then apply behaviors to get it moving.

NOTE: In my case, I created an arrow, then applied a Throw behavior to get it to move, then Orbit Around to get it to circle another object.

  • Once you have the motion applied the way you want, apply Behaviors > Basic Motion > Snap Alignment to Motion.

Now, when you play the timeline, the arrow – or your object – should now point in the direction it moves.

EXTRA CREDIT

If your object, like mine, is stubbornly pointing 90° away from its line of motion, change the Axis setting from Horizontal to Vertical. Now, the object will track properly.


Please rate the helpfulness of this tip.

Click on a star to rate it!

… for Visual Effects

Tip #329: Blurs and Mosaics are No Longer Safe

Larry Jordan – LarryJordan.com

Blurs are no longer safeguards against protecting identity.

New graphics technology, combined with AI, recreates high-resolution images from blurry, low-res source files.

Topic $TipTopic

For years, editors have used mosaic and blur effects to hide the identity of on-screen talent. However, recent research has found a way to reverse-engineer a high-quality image of the speaker’s face from a low-resolution blur. Here’s what you need to know.

Research published in Sept. 2018, from universities in the US and China has revealed a technology that “learns to reconstruct realistic [image] results with clear structures and fine details.”

Using a low-resolution image (on the left), their technology creates a high-quality result using off-the-shelf computer hardware and nVidia GPUs. Using AI, the researchers discovered an algorithm “to directly restore a clear high- resolution image from a blurry low-resolution input.”

“Extensive experiments demonstrate that our method performs favorably against the state-of-the-art methods on both synthetic and real-world images at a lower computational cost.”

Here’s a link to their scientific paper. The text is highly technical, but the images are frightening, if you are a producer charged with protecting someone’s identity.

KEY TAKEAWAY

If you want to protect the identity of an on-camera speaker, don’t shoot their face. Today’s technology makes blurs, mosaics and low-res images completely ineffective.


Please rate the helpfulness of this tip.

Click on a star to rate it!

… for Visual Effects

Tip #328: Track & Blur Faces

Larry Jordan – LarryJordan.com

Blurs are a great way to hide faces.

A Gaussian Blur applied to a portion of an image to blur a face.

Topic $TipTopic

When you need to hide a logo or face, a blur is a great way to do so. While no longer a safe way to protect identity (Tip #329), all NLEs provide a way to apply a blur to a portion of the image. Premiere also provides an easy way to motion track it. Here’s how.

  • Select the clip you want to blur in your Premiere timeline.
  • Apply Blur > Gaussian Blur from the Effects panel.
  • In Effect Controls, select the name of the mask – Mask (1) in my case – in the Gaussian Blur effect to make its controls visible in the Program Monitor.
  • Drag the blur in the Program Monitor to reposition it, then using either the on-screen controls or the mask settings in the Effect Controls panel, size and rotate it till it matches the same in your image.
  • Add Feathering to soften the edges. (In this screen shot, Feather = 22.0)
  • Increase the Blurriness till the face loses recognizability. (In this screen shot, Blurriness = 18.0)

EXTRA CREDIT

If the face moves, motion track the effect to automatically move the blur as the face moves. Here’s how:

  • Position the playhead at the start of the clip. (If the object you want to track is not visible, read Premiere’s help files for the best way to create a track.)
  • In the Effect Controls panel, click the right-pointing arrow in Mask Path for the mask you just created.
  • After a few seconds of analysis, Premiere will be able to track the mask as the subject moves.

NOTE: If the track fails to work, read Premiere’s help files for guidance. Explaining the intricacies of motion tracking is too large for a tip.


Please rate the helpfulness of this tip.

Click on a star to rate it!