My 2015 MacBook Pro was no longer smoothly handling anything; its performance was a fraction of what it was. It felt hot and the fans were racing.
I investigated and followed all the advice, eventually reinstalling everything and resetting the rest. That seemed to help a bit but it never completely solved the problem.
Then, I had a brainwave! I carefully opened up the back and practically choked on the dust and fluff! A couple of minutes of carefully hoovering [vacuuming] the debris has completely taken care of the problem.
These render options allow us to avoid overloading the CPU.
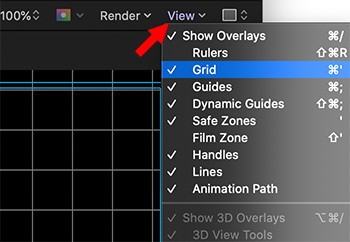
Render options in the Render menu of the Canvas.
(This is an excerpt from the Motion Help files.) Choose the render quality and resolution of the canvas display, and enable or disable features that can impact playback performance. When an option is active, a checkmark appears beside the menu item. If a complex project is causing your computer to play at a very low frame rate, you can make changes in this menu to reduce the strain on the processor.
The Render pop-up menu displays the following items:
Dynamic: Reduces the quality of the image displayed in the canvas during playback or scrubbing in the Timeline or mini-Timeline, allowing for faster feedback. Also reduces the quality of an image as it is modified in the canvas. When playback or scrubbing is stopped, or the modification is completed in the canvas, the image quality is restored (based on the Quality and Resolution settings for the project).
Full: Displays the canvas at full resolution (Shift-Q).
Half: Displays the canvas at half resolution.
Quarter: Displays the canvas at one-quarter resolution.
Draft: Renders objects in the canvas at a lower quality to allow optimal project interactivity. There’s no anti-aliasing.
Normal: Renders objects in the canvas at a medium quality. Shapes are anti-aliased, but 3D intersections are not. This is the default setting.
Best: Renders objects in the canvas at best quality, which includes higher-quality image resampling, anti-aliased intersections, anti-aliased particle edges, and sharper text.
Custom: Allows you to set additional controls to customize rendering quality. Choosing Custom opens the Advanced Quality Options dialog. For more information, see Advanced Quality settings.
Lighting: Turns the effect of lights in a project on or off. This setting does not turn off lights in the Layers list (or light scene icons), but it disables light shading effects in the canvas.
Shadows: Turns the effect of shadows in a project on or off.
Reflections: Turns the effect of reflections in a project on or off.
Depth of Field: Turns the effect of depth of field in a project on or off.
Motion Blur: Enables/disables the preview of motion blur in the canvas. Disabling motion blur may improve performance.
Note: When creating an effect, title, transition, or generator template for use in Final Cut Pro X, the Motion Blur item in the View pop-up menu controls whether motion blur is turned on when the project is applied in Final Cut Pro.
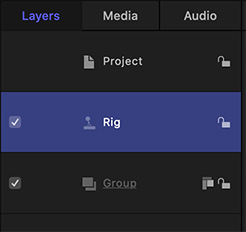
The grid is a very useful tool for aligning elements.
The View menu from inside Apple Motion.
Hidden in Motion is the ability to display a grid in the Viewer, which greatly simplifies aligning elements.
To reveal it, choose Grid from the View menu in the top right corner of the Canvas (Viewer).
EXTRA CREDIT
To adjust grid spacing and color, go to Preferences > Canvas.
Please rate the helpfulness of this tip.
Click on a star to rate it!
https://www.theinsidetips.com/wp-content/uploads/2019/09/Tips-Logo-700x150.jpg00Larry Jordanhttps://www.theinsidetips.com/wp-content/uploads/2019/09/Tips-Logo-700x150.jpgLarry Jordan2020-02-20 01:30:002020-02-20 01:30:00Tip #466: How to Display a Grid in Motion
Rigs are used to pass controls for Motion template effects from Motion to Final Cut Pro X. But they are also useful in Motion, itself, to simplify the control set of a complex project. Instead of making changes by manipulating individual parameters in various Inspectors, you can modify the Motion project using just a few widgets in a single rig.
NOTE: A “widget” is a single control contained in a rig.
A rig is especially helpful when you need to share a complex project with multiple users or when the project is designed to be updated each time it’s used. For example, you can create a basic project for an animated lower-third title that incorporates two text objects and a background replicator.
Each time the project is used, the size and position of the lower third (a replicator in this example) must change to match the length of the text, and the color must cycle through your project’s color scheme. By adding a rig to the project, you can create a small set of controls that modify only the parameters such changes require.
EXTRA CREDIT
To learn how to build a rig in Motion, open the Help files and search for “Build a Simple Rig?”
Please rate the helpfulness of this tip.
Click on a star to rate it!
https://www.theinsidetips.com/wp-content/uploads/2019/09/Tips-Logo-700x150.jpg00Larry Jordanhttps://www.theinsidetips.com/wp-content/uploads/2019/09/Tips-Logo-700x150.jpgLarry Jordan2020-02-20 01:30:002020-04-05 20:51:30Tip #465: What is a Rig?
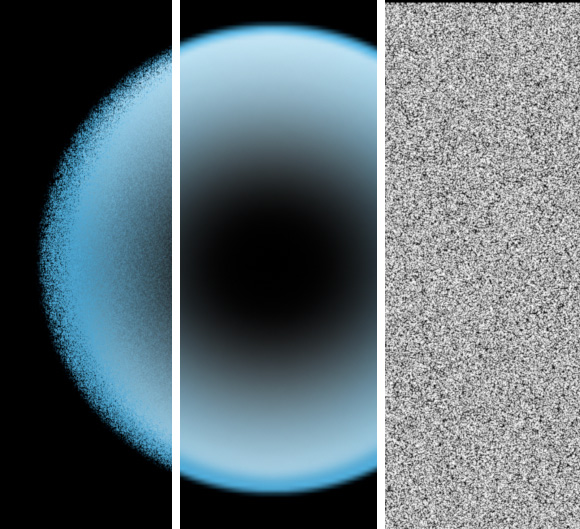
Bump maps provide texture to objects based on grayscale textures.
(From L to R) Bump-mapped image, source image, gray-scale texture.
Typically, bump maps are used to apply texture to a smooth object.
Bump maps are 8-bit grayscale images. This means that they only have 256 values between black and white. These gray-scale values are used to tell the effects software how to texture an object.
In this screen shot, a texture (right) is applied to a smooth image (center) using a bump map effect to give the final image (left) texture.
In this example, to create the source texture for a bump map, a high-amount of visual noise was applied to a mid-tone gray background using Photoshop.
Bump maps are highly useful in creating texture, but they don’t change the actual shape of an image. This means that if you are creating cast shadows, the shadow will mirror the source object, not the bump-mapped finished effect.
Please rate the helpfulness of this tip.
Click on a star to rate it!
https://www.theinsidetips.com/wp-content/uploads/2019/09/Tips-Logo-700x150.jpg00Larry Jordanhttps://www.theinsidetips.com/wp-content/uploads/2019/09/Tips-Logo-700x150.jpgLarry Jordan2020-02-19 01:30:002020-02-19 01:30:00Tip #469: What is a Bump Map?
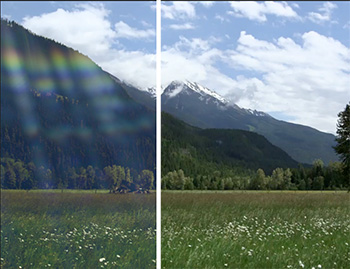
Lens flares occur when the sun, or a light, gets too close to the same level as a lens. In production, we try to avoid them because they can be unnecessarily distracting; and impossible to control. But, adding them later in post, where we can control them, adds life to an otherwise bland scene. The good news is that lens flares are easy to add, regardless of what editing software you are using.
There are two ways to create lens flares: using the computer, or shooting actual light with a camera. My preference is flares shot with a camera look more complex and believable.
Companies like Rampant Design Tools specialize in creating flares, fires and other visual effects in the camera. To add a flare:
Put the playhead in the background image.
Import and place the flare video on a layer above the background.
Select the flare clip and change the Blend mode to Screen.
That’s it. Use standard effects controls to rotate and position the effect to your liking. The screen shot illustrates a before-and-after example of a lens flare.
Please rate the helpfulness of this tip.
Click on a star to rate it!
https://www.theinsidetips.com/wp-content/uploads/2019/09/Tips-Logo-700x150.jpg00Larry Jordanhttps://www.theinsidetips.com/wp-content/uploads/2019/09/Tips-Logo-700x150.jpgLarry Jordan2020-02-19 01:30:002020-02-19 01:30:00Tip #468: How to Add Lens Flares
The more you think about your shots before you start production, the better your production will be.
Original concept art for “2001: A Space Odyssey;” courtesy of Dr. Robert McCall.
This article first appeared in RocketStock.com. This is an excerpt.
Pre-visualization is critical for any visual project. The script is your foundation, while the art for pre-production is the frame that rests upon that foundation. Previsualization, or Previs, is a process of visualizing the scenes of a film before production even begins.
Concept art enables the producer and director to think about the look of a scene, as well as use it early in pre-production as an asset for the pitch, which is the process of selling your idea to a production company.
Concept art is the overall look and feel. Storyboards provide a shot-by-shot breakdown. The great thing about storyboards is that you don’t have to be a master artist to create them. In fact, all you really need is enough visual information that makes sense to you as a director. There is a great interview from AFI with Steven Spielberg where he talks about the importance of storyboarding. He also discusses how he begins the process by using stick figures and cues and then gives this rough draft to his sketch artist, George Jensen, who fleshes out the final storyboards.
When developing concept art and storyboards, you aren’t just developing them for the director and production crew. You’re also developing them for the VFX team that will work to make things happen in post. In order to make sure you film everything correctly during production, sometimes you have to take those concepts or storyboards and run tests to see if it will all work.
The article in RocketStock is filled with examples and film excerpts. It is worth reading.
Please rate the helpfulness of this tip.
Click on a star to rate it!
https://www.theinsidetips.com/wp-content/uploads/2019/09/Tips-Logo-700x150.jpg00Larry Jordanhttps://www.theinsidetips.com/wp-content/uploads/2019/09/Tips-Logo-700x150.jpgLarry Jordan2020-02-19 01:30:002020-02-19 01:30:00Tip #459: Improve Your Visuals with Pre-Viz
Compensate during compression for social media recompressing your files by adjusting bit rates.
Social media compression defaults in Apple Compressor.
YouTube, and other social media services, always recompress your data. This is necessary to support all the different playback devices, software and codecs in the real world.
If you send YouTube a perfectly compressed file, it will still recompress it – because it has to convert it to all these different codecs. In doing so, because there is not enough data, it will damage the quality of your audio. To prevent this, we need to create a “mezzanine,” or middle, compression file so that when YouTube recompresses the file it has some bits it can throw away. H.264 is an excellent choice for this intermedia codec, provided you use a high-bit rate. Higher bit rates won’t hurt, they’ll just create larger files which will take longer to transfer.
NOTE: Both Apple Compressor and Adobe Media Encoder have default compression settings for social media. In most cases, their defaults should be fine.
Here are the settings:
Compressed Frame Size
Bit Rate
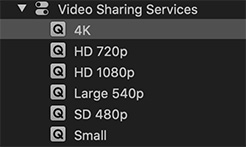
720p
At least 10,000 kbps / 10 mbps
1080p
At least 15,000 kbps / 15 mbps
4K
At least 20,000 kbps / 20 mbps
NOTE: These settings work for all frame rates up to 60 fps.
EXTRA CREDIT
Tip #455 explains audio compression settings for YouTube
Please rate the helpfulness of this tip.
Click on a star to rate it!
https://www.theinsidetips.com/wp-content/uploads/2019/09/Tips-Logo-700x150.jpg00Larry Jordanhttps://www.theinsidetips.com/wp-content/uploads/2019/09/Tips-Logo-700x150.jpgLarry Jordan2020-02-18 01:30:002020-04-05 20:59:25Tip #458: Video Compression Settings for YouTube
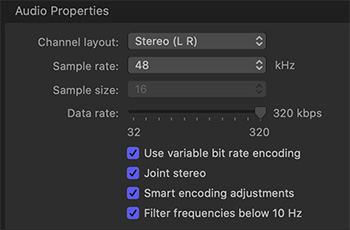
YouTube always recompresses media, so send it a larger-than-normal file.
Audio compression settings for a stereo MP3 file for YouTube.
Last week, in Tip #451, I presented compression settings for audio you were posting for a podcast. YouTube and other social media settings are different, however. Here’s what you need to know.
YouTube, and other social media services, always recompress your data. This is necessary to support all the different playback devices, software and codecs in the real world.
If you send YouTube a perfectly compressed file, it will still recompress it – because it has to convert it to all these different codecs. In doing so, because there is not enough data, it will damage the quality of your audio.
To prevent this, we need to create a “mezzanine,” or middle, compression file so that when YouTube recompresses the file it has some bits it can throw away. MP3 is an excellent choice for audio-only files. AAC, which is part of H.264 compression, is a good choice when you are compressing audio with video.
Here are the settings:
Setting
Mono
Stereo
Codec for audio-only
MP3
MP3
Codec for audio with video
AAC
AAC
Sample rate for audio-only
44.1 KHz
44.1k Khz
Sample rate for audio with video
48 KHz
48 Khz
Bit-depth
16-bits
16-bits
Data rate
160 kbps
320 kbps
EXTRA CREDIT
Tip #458 explains video compression settings for YouTube
According to Wikipedia, Ogg, like MXF and QuickTime, is a free, open container format maintained by the Xiph.Org Foundation, which is based in Massachusetts. The creators of the Ogg format state that it is unrestricted by software patents and is designed to provide for efficient streaming and manipulation of high-quality digital multimedia. Its name is derived from “ogging”, jargon from the computer game “Netrek.”
The Ogg container format can multiplex a number of independent streams for audio, video, text (such as subtitles), and metadata. Versions of it are supported on Windows, Mac and other platforms.
Because the format is free, and its reference implementation is not subject to restrictions associated with copyright, Ogg’s various codecs have been incorporated into a number of different free and proprietary media players, both commercial and non-commercial, as well as portable media players and GPS receivers from different manufacturers.
https://www.theinsidetips.com/wp-content/uploads/2019/09/Tips-Logo-700x150.jpg00Larry Jordanhttps://www.theinsidetips.com/wp-content/uploads/2019/09/Tips-Logo-700x150.jpgLarry Jordan2020-02-18 01:30:002020-04-05 20:56:50Tip #452: What is Ogg
We may request cookies to be set on your device. We use cookies to let us know when you visit our websites, how you interact with us, to enrich your user experience, and to customize your relationship with our website.
Click on the different category headings to find out more. You can also change some of your preferences. Note that blocking some types of cookies may impact your experience on our websites and the services we are able to offer.
Essential Website Cookies
These cookies are strictly necessary to provide you with services available through our website and to use some of its features.
Because these cookies are strictly necessary to deliver the website, refuseing them will have impact how our site functions. You always can block or delete cookies by changing your browser settings and force blocking all cookies on this website. But this will always prompt you to accept/refuse cookies when revisiting our site.
We fully respect if you want to refuse cookies but to avoid asking you again and again kindly allow us to store a cookie for that. You are free to opt out any time or opt in for other cookies to get a better experience. If you refuse cookies we will remove all set cookies in our domain.
We provide you with a list of stored cookies on your computer in our domain so you can check what we stored. Due to security reasons we are not able to show or modify cookies from other domains. You can check these in your browser security settings.
Google Analytics Cookies
These cookies collect information that is used either in aggregate form to help us understand how our website is being used or how effective our marketing campaigns are, or to help us customize our website and application for you in order to enhance your experience.
If you do not want that we track your visit to our site you can disable tracking in your browser here:
Other external services
We also use different external services like Google Webfonts, Google Maps, and external Video providers. Since these providers may collect personal data like your IP address we allow you to block them here. Please be aware that this might heavily reduce the functionality and appearance of our site. Changes will take effect once you reload the page.
Google Webfont Settings:
Google Map Settings:
Google reCaptcha Settings:
Vimeo and Youtube video embeds:
Other cookies
The following cookies are also needed - You can choose if you want to allow them:
Privacy Policy
You can read about our cookies and privacy settings in detail on our Privacy Policy Page.