… for Adobe Premiere Pro CC

Tip #404: 6 Tips to Crop Images More Effectively

Settings for the Crop tool in Premiere Pro CC.

Topic $TipTopic

This article, written by Logan Baker, first appeared in PremiumBeat.com. This is an excerpt.

The Crop tool is an important tool in the video editor’s toolkit. Here are six tips to help you get more out of it.

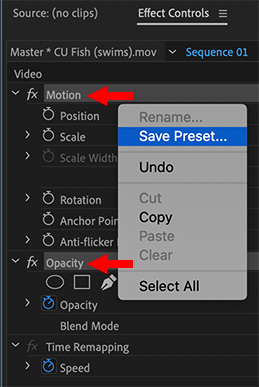
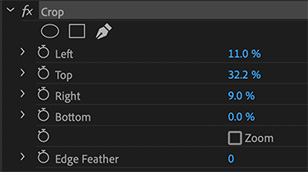
  • Add a Crop. The Crop tool is located in Effects > Video Effects > Transform > Crop – or just search for “crop”. Then, drag it from the Effects panel onto your clip. You can crop using the Left, Right, Top, and Bottom parameters. These parameters are also animatable using keyframes.

NOTE: You can also crop using Adjustment Layers.

  • Wide screen. Add classic wide screen bars to the top and bottom of your image. (An adjustment layer will do this to your entire sequence.)
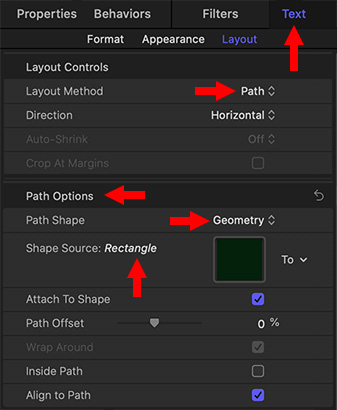
  • Text. Animate a crop to imaginatively reveal your text.
  • Create a split screen. Stack the clips you want to see, then apply the crop to the top clip.
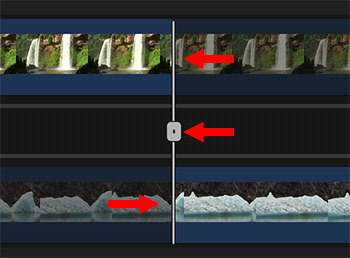
  • Create a spicy transition. First, make sure the upcoming clip is atop the tail end of your current clip. Then, add the crop effect to both clips. For the bottom clip, enable the zoom (in the crop effect), then raise the bottom by about fifteen percent, with your keyframes set toward the end of the clip. This’ll stretch out the video downwards. Then, for the top clip, animate the bottom from one-hundred percent to zero percent. This’ll bring the clip down, following the first clip.
  • Reveal effects. Apply effects to your clip, then nest them. Duplicate the nest and stack it above the clips with the effects. Remove the effects from the clips in the top nest. Then, wipe between the two nests.

Please rate the helpfulness of this tip.

Click on a star to rate it!

… for Adobe Premiere Pro CC

Tip #393: How to Create Effects Presets in Premiere

Larry Jordan – LarryJordan.com

Effects presets save time when you are reusing your effects.

Select effects categories, then Control-click to reveal Save Preset option.

Topic $TipTopic

Saving effects presets can save a lot of time, if you find yourself using the same effects settings over and over. But creating them isn’t obvious. Here’s what you need to know.

  • First, select a clip and make the effects changes you want to save into a preset.
  • Next, Cmd-click the category names containing the settings you want to save. (See the screen shot.) For example, if you changed the Position setting, then Cmd-click Motion.
  • Control-click one of the selected Categories to display the Save Preset option.
  • In the Preset dialog, name and describe the preset.
  • Scale applies the effect to the entire length of a clip.
  • Anchor to in point and Anchor to out point use the duration from the beginning or end of the clip when applying the preset to future clips
  • Click OK to save the preset.

EXTRA CREDIT

  • Presets are stored in Effects > Presets.
  • To delete a Preset, select it in the Effects panel, then Control-click and select Delete.

Please rate the helpfulness of this tip.

Click on a star to rate it!

… for Adobe Premiere Pro CC

Tip #389: Two Fast Ways to Configure a Sequence

Larry Jordan – LarryJordan.com

While you can customize your settings, these tips are faster.

The Change Sequence Settings dialog in Adobe Premiere Pro CC.

Topic $TipTopic

Premiere’s Sequence Settings panel is daunting. Even experienced editors scratch their heads over some of these options.

Fortunately, Premiere has two fast ways to configure a sequence – provided you have a clip that’s in the format you want to edit.

OPTION 1

Drag a clip from the Project panel on top of the New Item icon in the low right corner of the Project panel. This creates a new sequence, configures it to match the clip and edits the clip into the start of the sequence.

OPTION 2

Create a new sequence using any setting option. Then, DRAG a clip from the Project panel into the new sequence.

A dialog appears asking if you want to change the sequence to match the clip.

NOTE: If you use a keyboard shortcut to edit a clip into the sequence, the clip will match the sequence settings.

EXTRA CREDIT

Once a sequence has a clip in it, many of the Sequence settings can’t be changed.

For those situations where the first clip you want in your project does not match the sequence you want to create, edit a clip that does match into the sequence first. After you add a few more clips, which locks the settings, you can delete the first clip.

These two tricks are far faster than wrestling with the sequence settings themselves.


Please rate the helpfulness of this tip.

Click on a star to rate it!

… for Apple Final Cut Pro X

Tip #439: Tips on Using the Position Tool

Larry Jordan – LarryJordan.com

The Position tool allows you to move any clip anywhere – even to leave gaps.

The Tool palette in Final Cut Pro X.

Topic $TipTopic

When Final Cut Pro X was first released, editors were aghast that the Magnetic Timeline prevented them from leaving gaps in the timeline. Leaving aside the issue of why you might, or might not, want to leave gaps, the answer is that since the beginning, FCP X has had the ability to create gaps in the timeline. It just isn’t obvious. Here’s how.

To access the Position tool, click the small arrow to the right of the Arrow tool at the top center of the Timeline. You can also use the keyboard shortcut of P.

With the Position tool:

  • When you drag a clip, the clip doesn’t spring back. Instead a media block of black video, called a gap, is inserted between the end of the previous clip and the one you are moving.
  • When you trim clips, it leaves a gap.
  • When you drag one clip on top of another, the edge of the new clip overwrites the old clip.
  • When you move a clip, any opened space is filled with a gap. This means that using the Position tool does not change the overall duration of a project.

Over the years, as I work in both Final Cut and Premiere, I’ve learned that the Position tool emulates older editing interfaces where dragging creates gaps and one clip overwrites another.

Final Cut gives us the ability to choose how our clips behave when we move them.


Please rate the helpfulness of this tip.

Click on a star to rate it!

… for Apple Final Cut Pro X

Tip #438: Secrets of the Precision Editor

Larry Jordan – LarryJordan.com

The Precision Editor is a great way to learn about trimming clips.

The Apple Final Cut Pro X Precision Editor.
An edit point opened for trimming in the Precision Editor of Final Cut Pro X.

Topic $TipTopic

The Precision Editor in Final Cut Pro is an incredibly useful teaching tool in Final Cut Pro. If you haven’t played with it, you are missing a treat. Here’s what it does.

To access the Precision Editor, double-click any edit point in the timeline. The Out-going clip is displayed on top.

The darkened portions of each clip are the “handles,” extra media that we need for trimming and transitions. Trimming ends when we run out of handles.

  • To trim the Out, drag the top white line.
  • To trim the In, drag the bottom white line.
  • To roll trim both clips, drag the middle white line.

This is the best illustration of trimming I’ve ever seen, making it understandable even to people who are new to editing. I use it in every class.

To close the Precision Editor, press the ESC key.

EXTRA CREDIT

The reason I don’t use the Precision Editor for my own trimming is that it does not allow me to trim audio separately from video; which is a technique I use all the time.

Still, from a teaching point of view, the Precision Editor is unequaled.


Please rate the helpfulness of this tip.

Click on a star to rate it!

… for Apple Final Cut Pro X

Tip #437: Secrets of the Skimmer

Larry Jordan – LarryJordan.com

The skimmer has a hidden feature.

Type Control – Y to reveal the skimmer info panel.

Topic $TipTopic

The Skimmer in Final Cut Pro X allows us to quickly review clips in the Browser. But, did you know it has a hidden feature that’s just a keystroke away? It does.

Type Control – Y.

This displays the skimmer info panel, displaying the name of the clip and the timecode location of the skimmer. This makes controlling the skimmer much more precise.


Please rate the helpfulness of this tip.

Click on a star to rate it!

… for Random Weirdness

Tip #443: Shooting Night-time Car Scenes

Keep shots tight and the background murky.

Image courtesy of pexels.com.
Blurry, dark backgrounds can imply just about anything.

Topic $TipTopic

This article, written by Logan Baker, first appeared in PremiumBeat.com. This is an excerpt of a conversation with the Coen brothers.

Shooting night-time car scenes can be tricky when working with a micro-budget. Fortunately, there are a few key techniques that can help you pull it off without leaving the garage.

For dialogue between the two characters that takes place while driving a car at night, consider shooting in your garage. Keep your depth of field shallow — put the focus on the actors while having the background out of focus. By doing this, it allows you to keep a level of vagueness to what’s really going on behind-the-scenes.

To further mask the unwanted backdrop of your garage or driveway, have a friend point a hose towards the windshield to create “rain.”

Purchase some cheap individual accent lights from Home Depot and place them inside the car to eliminate the need to set up a complicated lighting rig around the exterior (a rig that might actually show reflections). Consider having a grip or production assistant sit in the back of the car, moving one of the small lights up and down on the actor’s side to give the appearance of streetlights passing by.


Please rate the helpfulness of this tip.

Click on a star to rate it!

… for Random Weirdness

Tip #442: Find the Funny

Larry Jordan – LarryJordan.com

Funny takes work.

(Image courtesy of Pexels.com.)

Topic $TipTopic

This article, written by Jourdan Aldredge, first appeared in PremiumBeat.com. This is an excerpt.

The art of the comedy short film is actually nothing new, and can be traced back to the earliest days of film and cinema with the works of Buster Keaton and Charlie Chaplin. Here are some tips to finding the funny and creating quality comedy shorts and videos.

The initial planning helps set the tone. The goal is to explore ideas. You can do free association with just yourself and a piece of paper. Ideally, once you’ve “found the funny,” you can start putting those ideas to paper by planning your outline, script, and shots.

A good way to work is to cover your bases and make sure you have every shot you’d need to put together an edit. Then, once the rigid work is done, loosen things up and do as many takes as you can stand.

Another simple trick that can help out in the edit is to shoot several reaction shots. Comedy very much lives in faces.

When is comes to editing, comedy lends itself to quick cuts, especially to reactions.


Please rate the helpfulness of this tip.

Click on a star to rate it!

… for Random Weirdness

Tip #441: Lighting for a Cinematic Look

Larry Jordan – LarryJordan.com

Less lighting, with more control, is the secret to “cinema lighting.”

When it comes to lighting, less is more.

Topic $TipTopic

This article, written by Zach Ramelan, first appeared in PremiumBeat.com. This is an excerpt.

A common misconception among aspiring or soon-to-be filmmakers is that you need a lot of huge, expensive lights to really pull of a professional, cinematic look. That was true once, but not anymore.

By taping dark household fabrics around an overhead light source you’re able to cone and channel the light so that it eliminates spill on the background.

NOTE: Be careful about excess heat burning your fabric.

If you want a realistic look chances are that’s actually with minimal light. Find one source that you can control and work around that.

A crucial key tip for cinematography is that direct light usually looks the worst. You can defuse it by pointing at a white wall or angle it so it makes a much more subtle glow on your subject. Unless it’s necessary to the style or story direct lighting looks unflattering and unnatural.


Please rate the helpfulness of this tip.

Click on a star to rate it!

… for Apple Motion

Tip #447: Move Text Along an Unusual Path

Larry Jordan – LarryJordan.com

Any shape can form a path for text to travel around the screen.

The Text Inspector in Apple Motion 5.x.
Change the Layout Method to Path, then lower down, change the Path Options.

Topic $TipTopic

This article is an excerpt from an Apple KnowledgeBase article.

Most of the time, we want text in Motion to travel in a straight line. But, when you want that text to take strange shapes, Motion makes it easy. Here’s how to use a shape as a path for text.

  1. In Motion, import or draw the shape you want to use as the path source.
  2. Select text in the Layers list, canvas, or Timeline.
  3. In the Layout pane of the Text Inspector, click the Layout Method pop-up menu, then choose Path.
  4. In the Path Options section of the Layout pane, click the Path Shape pop-up menu, then choose Geometry. The Shape Source well appears in the Inspector.
  5. From the Layers list, drag the shape into the Shape Source well.
  6. When the pointer becomes a curved arrow, release the mouse button.
  7. A thumbnail of the shape appears in the well and the shape is used as the source shape for the text path.

NOTE: You might want to disable (deselect) the original source shape in the Layers list so it’s not visible in your project.


Please rate the helpfulness of this tip.

Click on a star to rate it!