… for Apple Motion

Tip #446: Move Text on a Path

Larry Jordan – LarryJordan.com

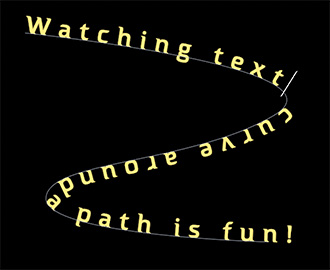
Text can move around paths or shapes.

Text following a path in Apple Motion.

Topic $TipTopic

This article is an excerpt from an Apple KnowledgeBase article.

The Path layout method lets you place text on a baseline path that you can warp to create curving or angular trails of text. After you create text on a path, you can modify or extend the path, add or remove control points, or animate text on the path.

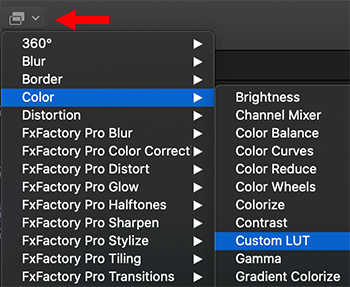
CREATE TEXT ON A PATH

  1. In Motion, select text in the canvas, Layers list, or Timeline.
  2. In the Layout pane of the Text Inspector, click the Layout Method pop-up menu, then choose Path.
    The Path Options controls become available, near the bottom of the Layout pane.
  3. In the canvas toolbar, select the Text tool (shortcut: T), then click the text in the canvas.

NOTE: Step 3 is important—the Text tool must be selected to view or edit the text path.

  • The path appears below the text. The default path shape is a straight line (an open spline) with three control points.

NOTE: To add a control point, Control-click the path and choose Add Point.

Read the rest of the article to learn how to adjust, extend or modify the path.


Please rate the helpfulness of this tip.

Click on a star to rate it!

… for Apple Motion

Tip #448: How to Use LUTs in Motion

Larry Jordan – LarryJordan.com

LUTs don’t require rendering, making them VERY fast!

The Filters menu in Apple Motion 5.x.

Topic $TipTopic

This article is an excerpt from an Apple KnowledgeBase article.

The Custom LUT filter in Motion applies stylized film and video “looks” (such as Summer, Old Timey, Sci-Fi, and so on), camera LUTs, or tone mapping (to convert footage from one color space to another).

To use LUTs in Motion, add the Custom LUT filter to a layer in your project, import third-party LUTs into the filter, then choose the LUT you want to apply to your footage.

Stylized LUT effects are available from a variety of third-party sources. Camera LUTs, used to convert “flat” or “log” footage from high-end cameras to standard color spaces, are available from many camera manufacturers and other sources.

NOTE: Because Motion stores third-party LUTs externally (outside of Motion projects), it’s inadvisable to use LUTs in templates created for Final Cut Pro X.


Please rate the helpfulness of this tip.

Click on a star to rate it!

… for Visual Effects

Tip #450: What Does Sharpening Do?

Larry Jordan – LarryJordan.com

Sharpening adjusts the apparent focus of a clip.

The top is unsharpened, the bottom is significantly sharpened.

Topic $TipTopic

Sharpening adjusts the apparent focus of a clip, without actually changing its focus.

Sharpening adjusts the contrast at the edges of objects in an image to improve their apparent focus. What our eye sees as “focus” is actually the sharpness of the edges between a foreground object and the background. If the edges are sharp, our eye considers the image in focus. If not, we consider the image – or that part of the image at least – blurry.

Unsharp Masking (which is the preferred method of sharpening) enhances the contrast between two adjacent edges. Our eye perceives that improved contrast as improved focus, though nothing about the focus of an image has changed.

When using Unsharp Mask, a little goes a long way. A Radius setting between 1.5 and 4 will yield perceptible results without making the image look like bad VHS tape.


Please rate the helpfulness of this tip.

Click on a star to rate it!

… for Visual Effects

Tip #394: Why Use Vignettes

Larry Jordan – LarryJordan.com

Vignettes conjure emotions of the “old times,” romance, and warmth.

A vignette applied to a wedding photo.

Topic $TipTopic

A vignette, in film, darkens the edges of the frame to focus the attention of the eye on the brighter portion of the image at the center.

In the old days, photographs created these automatically because the lens was not particularly good at passing the same amount of light across the entire exposure. The center was always brighter than the edges.

Since those early days, lenses have improved tremendously, which is why we associate vignettes with older images, romance, or something historical.

This screen shot illustrates a vignette – see the darkening from the center out to the edges of the image? It also illustrates a typical use – to subtly highlight the subject at the center, while lending a feeling of warmth and romance to the image.

To be most effective, a vignette should be subtle; it’s a darkening of the edges, not a spotlight on the center.


Please rate the helpfulness of this tip.

Click on a star to rate it!

… for Visual Effects

Tip #340: Quick Green Screen Lighting Tip

Larry Jordan – LarryJordan.com

The sun makes a great set light.

Using the sun as a set light is OK by me.

Topic $TipTopic

Looking for a fast way to evenly light a green-screen background?

Move outside.

Let the sun light both your talent and background. However, to avoid screaming at your screen during editing, make SURE your green – or blue – background is as smooth as possible. Wrinkles are almost impossible to key well.


Please rate the helpfulness of this tip.

Click on a star to rate it!

… for Codecs & Media

Tip #454: More Than You Need to Know – About Codecs

Larry Jordan – LarryJordan.com

20 different codecs – all easy to compare.

Topic $TipTopic

I was wandering around Wikipedia and discovered this comparison table of twenty popular media “containers,” their features and related codecs. This is fascinating to explore, simply due to the diversity.

Even if you don’t understand all of this – and I don’t – it is still fun to look at. Why? Because this puts key features of popular codecs all in one place, making them easy to review and compare.

Here’s a link to learn more.


Please rate the helpfulness of this tip.

Click on a star to rate it!

… for Codecs & Media

Tip #453: What is WebM?

WebM is supported by Mozilla, Firefox, Opera and Google Chrome.

Topic $TipTopic

Developed and owned by Google, WebM is an audiovisual media file format. It is primarily intended to offer a royalty-free alternative to use in the HTML5 video and the HTML5 audio elements. It has a sister project WebP for images. The development of the format is sponsored by Google, and the corresponding software is distributed under a BSD license. There is some dispute, however, if WebM is truly royalty-free.

According to Wikipedia, native WebM support by Mozilla Firefox, Opera, and Google Chrome was announced at the 2010 Google I/O conference. Internet Explorer 9 requires third-party WebM software. Safari for macOS which relied on QuickTime to play web media until Safari 12, still does not have native support for WebM.

VLC media player, MPlayer, K-Multimedia Player and JRiver Media Center have native support for playing WebM files Android also supports WebM.

Here’s a link to learn more.


Please rate the helpfulness of this tip.

Click on a star to rate it!

… for Codecs & Media

Tip #451: Audio Compression for Podcasts

Larry Jordan – LarryJordan.com

You can compress audio a lot, without damaging quality.

Topic $TipTopic

If you are compressing audio for podcasts, where it’s just a few people talking, you can make this a very small file by taking advantage of some key audio characteristics.

To set a baseline, an hour of 16-bit, 48k uncompressed stereo audio (WAV or AIF) is about 660 MB. (1 minute of stereo = 11 MB, 1 minute of mono = 5.5 MB).

If we are posting this to our own web site, streaming it live where bandwidth requirements make a difference, or posting it to service that charges for storage, we want to make our file as small as possible, without damaging quality. Here’s what you need to know.

Since people only have one mouth, if all they are doing is talking, not singing with a band, you don’t need stereo. Mono is fine.

This reduces file size by 50%.

NOTE: Mono sounds play evenly from both left and right speakers placing the sound of the audio in the middle between them.

According to the Nyquist Theorem, dividing sample rate by 2 determines maximum frequency response. Human speech maxes out below 10,000 Hz. This means that compressing at a 32K sample rate retains all the frequency characteristics of the human voice. (32 / 2 = 16K Hz, well above frequencies used for human speech.)

This reduces file size by another 33%.

Without doing any compression, our 660 MB one hour audio file is reduced to about 220 MB.

Finally, using your preferred compression software, set the compression data rate to 56 kbps. This creates about a 25 MB file for a one-hour show. (About 95% file size reduction from the original file.)

And for podcasts featuring all-talk, it will sound great.


Please rate the helpfulness of this tip.

Click on a star to rate it!

… for Adobe Premiere Pro CC

Tip #375: Tips for Better Auto-Reframing

Larry Jordan – LarryJordan.com

The Auto-Reframe dialog in Premiere Pro CC.

Topic $TipTopic

Auto Reframe intelligently identifies the actions in your video and reframes the clips for different aspect ratios. This feature is really handy for posting your video to different social media channels such as Instagram, YouTube, or Facebook.

You can use Auto Reframe to reframe sequences for square, vertical, and cinematic 16:9, or when cropping high-resolution content like 4K and beyond. Here are some best practice tips from Adobe:

  • Reframing can be adjusted: Auto-reframe applies Position keyframes to your video. Any of these can be changed, if Premiere guesses wrong on the framing.
  • Filming: Frame your videos with a little more space around the subjects so that you can repurpose the footage later for any medium.
  • Using text titles: Auto Reframe works best when titles are created using Premiere Pro.
  • Using still images: Auto Reframe does not work with still images. Reframe still images separately.
  • Apply Auto Reframe only once: Applying Auto Reframe multiple times (especially with nested clips) can cause unpredictable results – such as black bars on the sides of your videos. If you need to re-apply the Auto Reframe effect, make sure you apply it on the original clip.

EXTRA CREDIT

Here’s an Adobe support article that covers this feature in detail.


Please rate the helpfulness of this tip.

Click on a star to rate it!

… for Adobe Premiere Pro CC

Tip #337: Three Ways to Sync Audio to Video

Larry Jordan – LarryJordan.com

Double-system sound provides the best audio, but requires an extra step in post.

Recording a clapper slate is critical for all double-system audio syncing.

Topic $TipTopic

This article, written by Rachel Klein, first appeared in PremiumBeat. This is an excerpt.

Recording audio and video separately on set ensures you get the highest quality sound for your project. Using an external shotgun microphone and syncing your audio with a slate, snap, or a clap is essential.

Your three main options for syncing audio to video are Red Giant’s Plural Eyes software, Premiere Pro’s Merge or Synchronize options, or doing it manually.

  • Automatically. The best option by far (but with a price tag of $200) is Red Giant’s Plural Eyes. To synchronize, simply open Plural Eyes and click Add Media or drag your clips directly into the app. Next, hit the Synchronize button and watch the program do its thing. Successfully synced clips will show up in green, while clips with errors are red. If you get a red error, navigate to the Sync drop-down tab and make sure you’ve selected “Try Really Hard.”

    Once everything is synced, click Export Timeline and drag the exported project directly into Premiere Pro. As an added bonus, Plural Eyes also can help correct audio drift in your project.

  • Merge. To merge clips using Premiere, select the video and audio files you want to merge in the Project panel. Right-click the selected clips and choose “Merge Clips.”

    A menu will open up, allowing you to name your newly synchronized clip. Select “Audio” as your “Synchronize Point” and make sure to select “Remove Audio From AV Clip.” Hit OK and you’re all done.

  • Manually. Edit the audio and video clips into the timeline. Then, align the spike in the waveform of the clapper slate with the frame where the slate just closes.

Done.


Please rate the helpfulness of this tip.

Click on a star to rate it!