… for Apple Final Cut Pro X

Tip #425: Apply LUTs in Final Cut Pro X

Larry Jordan – LarryJordan.com

LUTs convert raw sensor data into pleasing images.

The Camera LUT menu, in the Info Inspector inside Final Cut Pro X.

Topic $TipTopic

A LUT (Look-Up Table) is a data table that converts raw camera sensor data into an attractive image. While we generally don’t use them for Rec. 709 HD footage, we use them all the time for RAW, Log, and other HDR media.

The reason LUTs exist is that most sensors capture more color and gray-scale data than our monitors can display. LUTs allow us to convert and optimize an image for a particular scene or display. Final Cut Pro X supports two types of LUTS:

  • Camera LUTs. These convert from camera log format to the working color space of the current library. Camera LUTs are created by camera manufacturers and shipped with their cameras.
  • Custom LUTs. These allow us to create, import, or share custom looks for our video clips or projects. Custom LUTs are created by DPs, colorists, anyone, in fact, that wants to tweak their images using 3rd-party LUT software.

To apply a LUT:

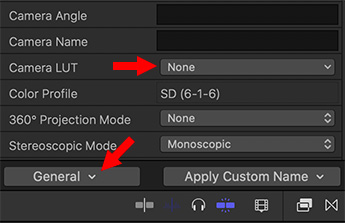
  • Open the Info Inspector.
  • At the bottom, switch from Basic to General.
  • Scroll about 1/3 the way down to Camera LUT, then, from the menu, select the one that matches your camera or your look.

With LUTs, you either like the look or your don’t; there’s nothing to adjust.

EXTRA CREDIT

There are hundreds of 3rd-party LUTs you can add to Final Cut. Look for those in the CUBE or MGA format.


Please rate the helpfulness of this tip.

Click on a star to rate it!

… for Apple Final Cut Pro X

Tip #411: What Do the Color Wheel Controls Do?

Larry Jordan – LarryJordan.com

Color can be controlled for the entire clip or isolated to shadows, mid-tones or highlights.

The four color controls in a Final Cut Pro X color wheel.

Topic $TipTopic

Each color wheel in Final Cut Pro X has four controls. These color controls can apply either to a selected clip, a group of clips, or a mask within a clip. As well, they can apply to the entire clip or isolated to shadows, mid-tones, or highlights.

From left to right, these are:

  • Saturation. This determines the amount of color in the selected clip or mask. Drag up to increase the amount, or down to decrease.
  • NOTE: As you drag the Hue puck, the color of the Saturation slider changes to reflect the change in hue.

  • Hue. Drag this dot out of the center to apply a color shift to the image. To add red, drag up left, drag right to add blue or down left to add green. The farther from the center this dot moves, the more intense the color.
  • NOTE: Press Option while dragging this puck to reduce the amount of change while dragging.

  • Luminance. Drag this triangle up to boost luminance, down to decrease it.
  • Hooked arrow. This resets all color values to their defaults, which makes no changes to an image.

EXTRA CREDIT

It is possible to alter these settings and exceed the legal range for the color space of your project. Always use the video scopes when making corrections.


Please rate the helpfulness of this tip.

Click on a star to rate it!