A Through Edit is a cut in the middle of clip with no changes on either side.
Use the timeline wrench to enable Through Edits, visible on the right.
There’s a hidden feature in Adobe Premiere that highlights unnecessary edits. But, it’s turned off by default. Here’s how to turn it on.
A Through Edit is a cut in a clip where there is no change on either side of the clip. Most of the time, they exist by mistake.
Still, it is good practice to get ride of them, if, for no other reason, than to avoid confusion over what’s a “real” edit and what’s a mistake.
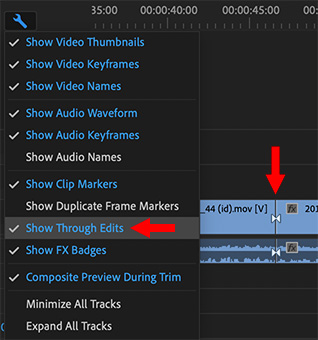
To see them, click the Wrench icon at the top left of the timeline and enable Show Through Edits.
All Through Edits in the timeline now display a pair of white triangles, as shown under the red arrow in the screen shot.
To remove a Through Edit and rejoin the two sides of the clip, right-click the Through Edit and choose Join Through Edits.
Please rate the helpfulness of this tip.
Click on a star to rate it!
https://www.theinsidetips.com/wp-content/uploads/2019/09/Tips-Logo-700x150.jpg00Larry Jordanhttps://www.theinsidetips.com/wp-content/uploads/2019/09/Tips-Logo-700x150.jpgLarry Jordan2020-03-24 01:30:002020-04-05 18:34:21Tip #563: What’s a Through Edit?
There’s a lot of configuration options in this one menu.
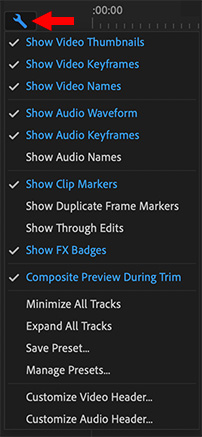
The Wrench configuration menu for Premiere’s Timeline. Blue indicates enabled features.
In the top-left corner of the Timeline is a wrench icon. This contains a wide variety of configuration settings to enable the timeline to look the way you want for your style of editing.
As the screen shot illustrates, features in blue are enabled, those in white are not. To toggle a feature on or off, click it.
Show Duplicate Frame Markers displays a blue bar at the bottom of a clip who’s frames duplicate the same clip used elsewhere in the same sequence. (This is a holdover from the days of film, when there was only one original film negative.)
Show Audio Names displays the file name in an audio clip. This is useful when editing dual-system sound where the audio file has a different name from the video file.
Show Through Edits is covered in Tip #563.
Minimize/Expand All Tracks is a fast way to adjust the height of all tracks in the timeline.
Save/Manage Presets saves these configuration settings, then switch between them as needed.
Customize Audio/Video Header customizes the icons displayed in the Track Header.
These provide lots of interesting customization options that you can adjust at any time.
Please rate the helpfulness of this tip.
Click on a star to rate it!
https://www.theinsidetips.com/wp-content/uploads/2019/09/Tips-Logo-700x150.jpg00Larry Jordanhttps://www.theinsidetips.com/wp-content/uploads/2019/09/Tips-Logo-700x150.jpgLarry Jordan2020-03-24 01:30:002020-03-21 10:15:42Tip #562: The Timeline’s Magic Wrench
In most compression software, the optimal settings are not the default.
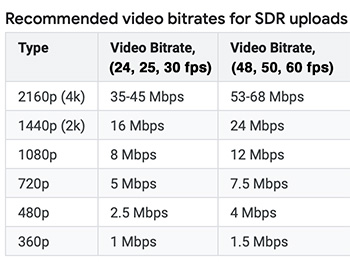
Video compression bitrates for YouTube for SDR media.
Here are settings you can use to optimize audio and video compression for YouTube. (These are based on published settings from YouTube, a link to which is below.)
Container: MP4
Video codec: H.264
Progressive (deinterlace interlaced media)
High Profile
Closed GOP
Variable bit rate
Chroma subsampling: 4:2:0
Audio codec: AAC-LC (AAC if no LC choice is available)
Bit rate: 384 Kbps stereo / 128 Kbps mono
Frame rate: The frame rate you shot. Do NOT convert frame rates.
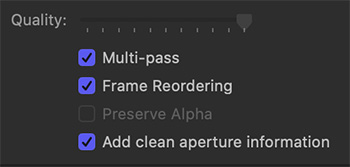
Bit rate: See screen shot for table.
If given the choice:
Turn off mulitpass compression if your hardware is more recent than 2015.
Turn on Frame Reordering
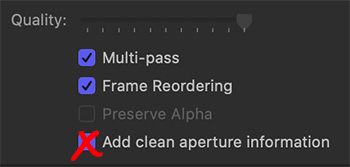
Turn off Add clean aperture information
NOTE: These settings differ from the YouTube default settings in Apple Compressor.
Uncheck “Add clean aperture information” when working with digital media.
One of the checkboxes in Apple Compressor is “Add clean aperture information.” What is this and should it be checked or unchecked?
Apple’s Help Files state: Select this checkbox to define clean picture edges in the output file. This property adds information to the output file to define how many pixels to hide, ensuring that no artifacts appear along the edges. When you play the output file in QuickTime Player, the pixel aspect ratio will be slightly altered. This process doesn’t affect the actual number of pixels in the output file—it only controls whether information is added to the file that a player can use to hide the edges of the picture.
For example, this setting would clean up edges from a VHS tape transfer that waver.
YouTube, on the other hand, prefers this option be unchecked to prevent the video from being cropped during playback.
My suggestion: If you are dealing with digital media with clean edges, uncheck this before starting compression.
Please rate the helpfulness of this tip.
Click on a star to rate it!
https://www.theinsidetips.com/wp-content/uploads/2019/09/Tips-Logo-700x150.jpg00Larry Jordanhttps://www.theinsidetips.com/wp-content/uploads/2019/09/Tips-Logo-700x150.jpgLarry Jordan2020-03-24 01:30:002020-04-05 18:32:04Tip #560: What is “Clean Aperture” in Apple Compressor?
Ever wonder what Frame Reordering does in Apple Compressor? Me, too. So, I did some research. Here’s what I learned.
Frame reordering is the concept of allowing frames to be decompressed in a different order than their display order. For almost all cases, leave this box checked for H.264 encoding. Some more advanced compressors use “frame reordering” to more efficiently represent movie data.
Important: If you select “Allow frame reordering,” your output file may be more efficiently compressed but may not be compatible with decoders on older hardware. For example, if someone asks you to create your content with “B-frames turned off.”
In looking at YouTube’s latest upload specs, they make no mention of this setting. My suggestion is to leave it on unless you are specifically required to turn it off.
Please rate the helpfulness of this tip.
Click on a star to rate it!
https://www.theinsidetips.com/wp-content/uploads/2019/09/Tips-Logo-700x150.jpg00Larry Jordanhttps://www.theinsidetips.com/wp-content/uploads/2019/09/Tips-Logo-700x150.jpgLarry Jordan2020-03-24 01:30:002020-04-05 18:31:07Tip #559: What is “Frame Reordering” in Apple Compressor?
Tip #529 illustrated how to use the Range tool to quickly add volume keyframes to a clip. However, we can also use the Audio Animation editor to add keyframes for audio effects, such as reverb or distortion. Here’s how.
Apply an audio effect to a clip in the Timeline. (In this example, we’ll use Distortion > Telephone.)
Select the clip in the timeline, then choose Clip > Show Audio Animation (or press Control-A).
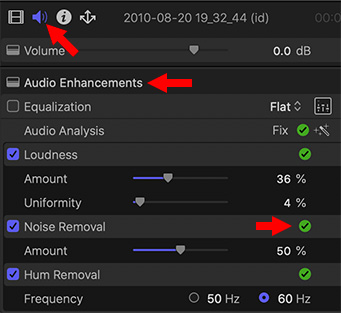
Select the effect in the Audio Inspector, then click the disclosure button (right red arrow) to expand that effect in the Audio Animation editor.
Use the Range tool to select the value you want to modify.
Drag the control line up or down to set keyframes.
EXTRA CREDIT
Drag keyframes left or right to reposition.
Drag keyframes up or down to modify the setting.
You can set keyframes manually in the Audio Animation bar by Option-clicking the line you want to modify.
Control-click a keyframe to delete it.
Please rate the helpfulness of this tip.
Click on a star to rate it!
https://www.theinsidetips.com/wp-content/uploads/2019/09/Tips-Logo-700x150.jpg00Larry Jordanhttps://www.theinsidetips.com/wp-content/uploads/2019/09/Tips-Logo-700x150.jpgLarry Jordan2020-03-23 01:30:002020-03-21 10:04:11Tip #553: Add Audio Effect Keyframes in FCP X
Hum Removal: Reduces common electrical hum noise at either 50 or 60 Hz.
All enhancements are designed to correct most common audio problems automatically or with minor adjustments.
You can let Final Cut Pro analyze audio and adjust these problems in your audio clips automatically, or you can make manual adjustments in the Audio Enhancements section of the Audio inspector. You can also analyze and fix audio problems when you import a clip.
NOTE: When you import a clip with the “Analyze and fix audio problems” import option selected, only severe audio problems are corrected. If the clip contains moderate problems, these appear in yellow next to Audio Analysis in the Audio Enhancements section of the Audio inspector after the clip is imported. To correct these problems, you need to automatically enhance audio in the Audio inspector.
In Final Cut Pro, select an audio clip or a video clip with audio in the timeline.
NOTE: Audio enhancement works on the component level, not the clip level. If your audio clip has more than one audio component (for example, a dual mono clip), select an individual component, then proceed with the enhancements.
Choose Modify > Auto Enhance Audio (or press Option-Command-A).
If it isn’t already open, open the Inspector, then click the Audio button at the top.
In the Audio inspector, do any of the following:
Adjust equalization: In the Equalization section, click the Equalization pop-up menu and choose an equalization preset, or click the Controls button to make manual adjustments.
Change loudness settings: Drag the Amount and Uniformity percentage sliders in the Loudness section. The Amount slider increases or decreases the overall loudness (compression) of the clip, and the Uniformity slider increases or decreases the dynamic range affected.
Change the percentage of background noise removal: Drag the Amount slider in the Noise Removal section.
Remove hum: Select either 50 Hz or 60 Hz in the Hum Removal section.
To turn off an enhancement, deselect its checkbox.
EXTRA CREDIT
Blue. A blue checkbox appears next to each enhancement that was turned on to apply a correction. You can turn on additional enhancements by selecting their checkboxes (when an enhancement is turned on, its checkbox is blue).
Green. A green checkmark next to an enhancement indicates that the clip was analyzed and, if necessary, adjusted for that enhancement.
Yellow. A yellow warning triangle indicates potential problems.
Red. A red sign indicates severe problems.
Please rate the helpfulness of this tip.
Click on a star to rate it!
https://www.theinsidetips.com/wp-content/uploads/2019/09/Tips-Logo-700x150.jpg00Larry Jordanhttps://www.theinsidetips.com/wp-content/uploads/2019/09/Tips-Logo-700x150.jpgLarry Jordan2020-03-23 01:30:002020-03-23 01:30:00Tip #530: Enhance Audio in Final Cut
With Final Cut Pro, you can use keyframes to create simple changes to audio over time, such as fading the volume or an effect in or out in the middle of a clip.
NOTE: A “keyframe” indicates where a parameter, such as volume, changes. The minimum number of keyframes for any effect are two, which mark the start and end of the change.
You can also place keyframes at specific points in a clip to change the parameter value of an audio enhancement or effect at those points. For example, you can keyframe specific points for an effect such as reverb or distortion.
USE THE RANGE TOOL
When making volume adjustments to a clip in the timeline, you can use the Range Selection tool to add keyframes automatically across a selected range.
Click the Tools pop-up menu above the timeline and choose Range Selection (or press R).
Drag across the area where you want to adjust the volume or effect.
Adjust the volume or effect within the range by dragging the effect’s horizontal control up or down.
Keyframes are automatically created within the range.
EXTRA CREDIT
Tip #553 illustrates how to add keyframes to audio effects using the hidden Audio Animation bar.
Please rate the helpfulness of this tip.
Click on a star to rate it!
https://www.theinsidetips.com/wp-content/uploads/2019/09/Tips-Logo-700x150.jpg00Larry Jordanhttps://www.theinsidetips.com/wp-content/uploads/2019/09/Tips-Logo-700x150.jpgLarry Jordan2020-03-23 01:30:002020-03-21 10:03:38Tip #529: Add Keyframes with the Range Tool
This is an excerpt from RED.com. The advent of digital cinematography has opened up new creative possibilities for how motion is captured. This article explores the influence of shutter angle along with how it can be used as a creative tool for accomplishing one’s artistic goals.
CONCEPT
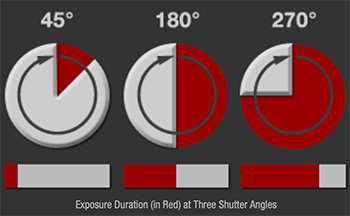
The “shutter angle” is a useful way of describing the shutter speed relative to the frame rate. This term is a conceptual relic of rotary shutters, where a disc with an angled opening would spin and let in light once per revolution to expose each frame. The larger the angle, the slower the shutter speed, all the way up to the limit of 360°, where the shutter speed could become as slow as the frame rate. At the other extreme, the shutter speed can be made arbitrarily fast by decreasing the angle.
APPEARANCE
By far the most common setting for cinema has been a shutter angle near 180°, which equates to a shutter speed near 1/48 of a second at 24 fps. Any larger, and motion appears more smeared since the end of blur in one frame extends closer to the start of blur in the next frame. Any smaller, and the motion appears more stuttered and disjointed since the blur gap increases, causing frames to become more like discrete images.
DISCUSSION
Although many film cameras were capable of only certain shutter angle ranges, digital cameras provide many exciting new possibilities. Just as focal length and aperture have been used as creative tools for controlling sense of scale and depth of field, shutter angle has the potential to do the same for motion.
The optimal setting will ultimately depend on other factors, such as the speed of subject movement within the frame, or the creative intent of the cinematographer. For example, one might wish to use a larger shutter angle to increase the exposure time and reduce image noise in low-light, or to give the impression of softer and more fluid motion. Alternatively, with fast action one might place more importance on depicting crisp details in each frame by using a smaller shutter angle.
Another consideration might be the film era one desires to emulate. Shutter angles much less than 180° more closely mimic the style of old 1950’s newsreels, for example, and a shutter angle of 180° will typically give footage a standard cinematic style.
https://www.theinsidetips.com/wp-content/uploads/2019/09/Tips-Logo-700x150.jpg00Larry Jordanhttps://www.theinsidetips.com/wp-content/uploads/2019/09/Tips-Logo-700x150.jpgLarry Jordan2020-03-20 01:30:002020-03-20 01:30:00Tip #534: What is Shutter Angle?
This article, written by Jourdan Aldredge, first appeared in PremiumBeat.com. This is an excerpt.
In the short but storied history of digital video editing platforms, we’ve seen just a few familiar names reign king — Apple Final Cut Pro, Adobe Premiere Pro, and more recently, DaVinci Resolve. However, while the big giants may still dominate the marketplace, it hasn’t stopped many other third parties and platforms from launching editing applications of their own.
Some are doing it to capture the market. While others — like YouTube — are simply trying to provide a more full, robust service to their current offerings. If you’ve uploaded a video to YouTube in the past year or so, you may have noticed that the social video-sharing platform is working hard to add tons of different functionality, controls, and analytics as its creator space continues to grow.
To get started, all you need to do is upload a video — or choose one you’ve already uploaded — and find the “Editor” tab in the studio.
Overall, at this stage the YouTube Video Editor is best for first time vloggers, or those needing to quickly edit tons of videos or long-form streams. However, I wouldn’t rule out YouTube simply using this as a first step, as they may build out the app much more in the future.
EXTRA CREDIT
Read Jourdan’s detailed review by clicking the link at the top of this article.
Please rate the helpfulness of this tip.
Click on a star to rate it!
https://www.theinsidetips.com/wp-content/uploads/2019/09/Tips-Logo-700x150.jpg00Larry Jordanhttps://www.theinsidetips.com/wp-content/uploads/2019/09/Tips-Logo-700x150.jpgLarry Jordan2020-03-20 01:30:002020-03-20 01:30:00Tip #528: A Look at YouTube’s NLE
We may request cookies to be set on your device. We use cookies to let us know when you visit our websites, how you interact with us, to enrich your user experience, and to customize your relationship with our website.
Click on the different category headings to find out more. You can also change some of your preferences. Note that blocking some types of cookies may impact your experience on our websites and the services we are able to offer.
Essential Website Cookies
These cookies are strictly necessary to provide you with services available through our website and to use some of its features.
Because these cookies are strictly necessary to deliver the website, refuseing them will have impact how our site functions. You always can block or delete cookies by changing your browser settings and force blocking all cookies on this website. But this will always prompt you to accept/refuse cookies when revisiting our site.
We fully respect if you want to refuse cookies but to avoid asking you again and again kindly allow us to store a cookie for that. You are free to opt out any time or opt in for other cookies to get a better experience. If you refuse cookies we will remove all set cookies in our domain.
We provide you with a list of stored cookies on your computer in our domain so you can check what we stored. Due to security reasons we are not able to show or modify cookies from other domains. You can check these in your browser security settings.
Google Analytics Cookies
These cookies collect information that is used either in aggregate form to help us understand how our website is being used or how effective our marketing campaigns are, or to help us customize our website and application for you in order to enhance your experience.
If you do not want that we track your visit to our site you can disable tracking in your browser here:
Other external services
We also use different external services like Google Webfonts, Google Maps, and external Video providers. Since these providers may collect personal data like your IP address we allow you to block them here. Please be aware that this might heavily reduce the functionality and appearance of our site. Changes will take effect once you reload the page.
Google Webfont Settings:
Google Map Settings:
Google reCaptcha Settings:
Vimeo and Youtube video embeds:
Other cookies
The following cookies are also needed - You can choose if you want to allow them:
Privacy Policy
You can read about our cookies and privacy settings in detail on our Privacy Policy Page.