… for Adobe Premiere Pro CC

Tip #533: Normalize Master Track Audio

Larry Jordan – LarryJordan.com

Adjusting the Master Mix guards against excessive overall levels.

Topic $TipTopic

This article first appeared in the Premiere Help Files. This is an excerpt.

Most of the time, we adjust audio levels for each clip, or create a bus and apply effects to the bus. However, you can also monitor and adjust levels in the Master track. This is a fast way to guard against excessive levels in your mix.

You can set the peak volume level for the master track of a sequence. Premiere Pro automatically adjusts the fader for the whole master track. The loudest sound in the track achieves the specified value. Premiere Pro scales any keyframes on the master track upward or downward, in proportion to the adjustment made in overall volume.

Here’s how:

  • Select the sequence you want to normalize.
  • Select Sequence > Normalize Master Track.
  • In the Normalize Track dialog box, type an amplitude value in the dB field. A good number to start with is -3 dB.
  • Click OK.

Please rate the helpfulness of this tip.

Click on a star to rate it!

… for Adobe Premiere Pro CC

Tip #532: How to Use the Rate Stretch Tool

Larry Jordan – LarryJordan.com

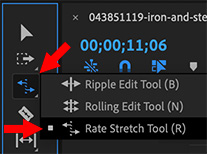
The Rate Stretch tool is a fast way to change the speed of a clip.

The Rate Stretch tool in the Tools panel.

Topic $TipTopic

This article first appeared in MotionArray.com. This is an excerpt.

What if you need your clip to fit an exact space in your edit? The Rate Stretch tool allows you to click and drag a clip to an exact duration, and Premiere will adjust the speed to fit the duration. To use the Rate Stretch Tool, just select it from the Tools panel, then click and drag either end of your clip to the desired length. Premiere Pro will update the speed of the clip.

Keep in mind that a problem with artificial slow motion is that in order to slow down a “shooting” frame rate, Adobe Premiere Pro must somehow generate new frames. It can do that by repeating existing frames or analyzing your footage, then automatically generating new frames.

When the software repeats existing frames, the result is a little bit choppy (which has a time and a place, too!). When it generates new frames, imperfections in the interpretation can cause warping and artifacting errors.


Please rate the helpfulness of this tip.

Click on a star to rate it!

… for Adobe Premiere Pro CC

Tip #523: What is Multicam Flattening in Premiere Pro?

Larry Jordan – LarryJordan.com

Flattening is the last step in editing a multicam sequence.

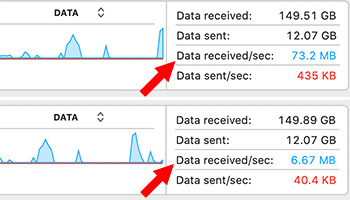
Screen shots from Activity Monitor.
Storage bandwidth during a multicam edit (top) and after flattening (bottom).

Topic $TipTopic

Flattening disconnects unused multicam clips from the timeline. The big benefit is that it decreases the load on your storage system during playback. Here’s what you need to know.

When you are editing a multicam sequence, all the clips in your sequence are playing at once. Depending upon the codec, frame size, frame rate and bit depth you are using, this can require massive speed from your storage.

For example, in this screen shot, the top image show a multicam clip playing at 73 MB/sec. While not huge – or even large by 4K standards – this number indicates how hard your storage is working to supply all those streams in real time. (You can see this for yourself in Utilities > Activity Monitor > Disk.)

When you flatten a multicam clip, you disconnect, permanently, all the angles that you are not using in the final edit. This means that rather than playing all the clips at once, Premiere is only playing the one clip you have on screen at that instant.

As you can see in the bottom screen shot, this cuts total media bandwidth a lot!

While every multicam clip is different, the savings in unnecessary wear-and-tear on your system, combined with faster overall performance, means that when you are happy with your multicam edit flatten it.

To do so, select the multicam clip, then choose Clip > Multicamera > Flatten.


Please rate the helpfulness of this tip.

Click on a star to rate it!

… for Apple Final Cut Pro X

Tip #526: Top and Tail Trimming

Larry Jordan – LarryJordan.com

High-speed Trims!

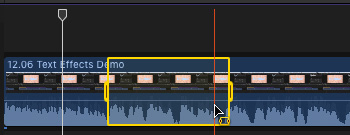
Use the Range tool to trim both top and tail at the same time.

Topic $TipTopic

It seems I’ve gotten lazy and always trim my clips by dragging the In or the Out. However, there is a much faster way to trim the top or tail of a clip:

  • Put the playhead where you want to move the In and type: Option + [
  • Put the playhead where you want to move the Out and type: Option + ]
  • Using the Range tool (or set an In and Out) trim to the selected range, type: Option +

High-speed trims!

EXTRA CREDIT

You can use the Skimmer instead of the playhead, but I’ve found the playhead to be better for trimming because it is less easy to jiggle out of position.


Please rate the helpfulness of this tip.

Click on a star to rate it!

… for Apple Final Cut Pro X

Tip #525: Replace Missing Audio – Fast

Larry Jordan – LarryJordan.com

Two keystrokes and done!

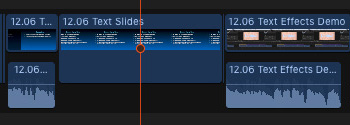
A video clip with missing audio in the Final Cut timeline.

Topic $TipTopic

Have you ever deleted the audio or video of a clip, only to realize later that you need it back? Yup, me too.

Here’s a blindingly fast way to replace the timeline clip:

  • Put the playhead in the clip you want to fix; you can use the skimmer, but I prefer the playhead. You don’t even need to select the clip.
  • Type Shift + F (This creates a match frame of the timeline clip in the Browser.)
  • Type Option + R (This replaces the timeline clip with the clip in the Browser, but matching the In of the Timeline clip.)

Literally, you can replace missing audio in less than 1/2 a second.

Wow…!


Please rate the helpfulness of this tip.

Click on a star to rate it!

… for Apple Final Cut Pro X

Tip #524: Assign Multiple Shortcuts to a Menu

Larry Jordan – LarryJordan.com

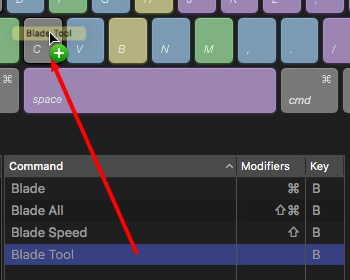
Multiple shortcuts can be assigned to the same menu option.

Drag the menu option on top of a key to create a new shortcut.

Topic $TipTopic

I am a huge keyboard shortcuts junky. Except, sometimes I get confused about which shortcut goes with which application. A hidden feature in Final Cut is the ability to assign multiple shortcuts to the same menu option. Here’s how this works:

  • Open Final Cut Pro > Commands > Customize (Shortcut: Option + Cmd + K)
  • In the top left corner of the Command Editor, click the Default menu and duplicate it. (Assuming you haven’t created a personal set of keyboard shortcuts already. If you have, be sure it is selected in this menu.)
  • In the Search box in the top right, search for the shortcut you want to duplicate. In my case, I’m searching for the Blade tool to create a second shortcut.
  • At the top of the Command Editor, click the modifier keys you want associated with this shortcut.
  • When you look at the keyboard, all the keys that are gray do NOT have a shortcut attached to them for that modifier key combination.
  • For this example, I want to assign a single letter to the Blade shortcut. So, I turned off all the modifier buttons at the top.
  • Then, from the Command list in the bottom center, DRAG the shortcut name on top of the key you want to create a shortcut for. In the screen shot, I’m dragging the text Blade Tool on top of “C”.

Ta-DAH! In the Command List, I now have two keyboard shortcuts for the same Blade tool.


Please rate the helpfulness of this tip.

Click on a star to rate it!

… for Random Weirdness

Tip #521: What is Color Temperature?

From warm to cool, color temperature tells us where white light falls.

Image courtesy of Bhutajata - CC BY-SA 4.0, https://commons.wikimedia.org/w/index.php?curid=44144928
Color temperature in degrees Kelvin from 1000° K to 12,000° K.

Topic $TipTopic

Color temperature is the measure of the perceived color of white light on a scale from warm (gold) to cool (bluish). These lighting facts might interest you, ’cause I found them interesting.

  • What we would consider “white” light is around 6500° K. (“K” stands for “Kelvin” which is a measure of absolute temperature indicating how much you would need to heat a “black body” to get it to glow at this color.)
  • The effective color temperature of the sun is about 5780° K .
  • The changing color of the sun over the course of the day is mainly a result of the scattering of sunlight and is not due to changes in the sun itself.
  • The Earth’s atmosphere scatters blue color frequencies more than warmer colors, which is why the sky is blue. (It’s called Rayleigh scattering, named after the 19th-century British physicist: Lord Rayleigh.)
  • Color temperature is meaningful only for light sources that generate light in a range going from red to orange to yellow to white to blueish white. It does not make sense to speak of the color temperature of a green or purple light.
  • Color temperatures over 5000 K are called “cool colors” (bluish), while lower color temperatures (2700–3000 K) are called “warm colors” (yellowish).
  • Bizarre fact: The temperature of a “warm” light is cooler than the temperature of a “cool” light.
  • Most natural warm-colored light sources emit significant infrared radiation.
  • A warmer (i.e., a lower color temperature) light is often used in public areas to promote relaxation, while a cooler (higher color temperature) light is used to enhance concentration, for example in schools and offices.
  • Most digital cameras today have an automatic white balance function that attempts to determine the color of the light and correct accordingly. While these settings were once unreliable, they are much improved in today’s digital cameras and produce an accurate white balance in a wide variety of lighting situations.

Please rate the helpfulness of this tip.

Click on a star to rate it!

… for Random Weirdness

Tip #520: Tips for Using Shotgun Mics

Larry Jordan – LarryJordan.com

Think of shotgun mics as “lenses for sound.”

This is the symbol of a low-cut filter.

Topic $TipTopic

These tips are taken from this Audio-Technica video. Link. There’s no “perfect” mic, but shotgun mics are ideally suited for video production. Here are some tips on how to use them.

  • The length of a shotgun mic is analogous to a lens: short shotguns are wide angle, long shotguns are for closeups.
  • Short dynamic shotguns sound best when placed 2-3 feet from the mouth of the speaker.
  • Placing the mic above or below the speaker’s mouth does not alter the sound, but pointing the mic down tends to minimize room noise.
  • Always use a foam windscreen indoors to guard against wind noise. Outdoors, invest in a soft, furry blimp to minimize wind noise.
  • If your mic has a low-frequency cut-off switch, use it. (The screen shot illustrates the low-frequency roll-off switch.) This minimizes traffic rumble, wind noise and some handling vibration by removing frequencies below human speech. A low-cut filter also improves the clarity of dialog.
  • Condenser shotguns tend to sound better with richer sound than dynamic shotguns. Condenser shotguns will also pickup good sound up to 6 feet away from the talent.
  • Long shotguns are the best choice for exterior shots. They can pick up clean sound up to nine feet away from the talent, but they are extremely directional and can only be pointed while wearing headsets.
  • While long shotguns are good outside, inside they tend to pickup excess reverberation.
  • With any shotgun indoors, noise from the side is generally less of a problem than echo. For this reason, short condenser shotguns tend to be preferred because their design minimizes echo.
  • Regardless of length, any shotgun will sound better as it gets closer to the talent, up to a limit of about 2-3 feet.

In short, there’s no one perfect mic. Understanding how shotguns work can help assure you record the best sound possible.


Please rate the helpfulness of this tip.

Click on a star to rate it!

… for Random Weirdness

Tip #492: Creative Truths From Real Editors

Larry Jordan – LarryJordan.com

Topic $TipTopic

For several years, I ran the “Creative Truths Contest.” This invited readers to send in aphorisms that best represent the editing process. As you might imagine, editors took a pretty dim view of, well, just about everything.

Here are five of my favorites, along with the name of the editor that contributed it to the contest.

    • No one knows what you do but they always know that “it won’t take long.” (Jeff Fulton )


    • Every new technology opens a whole new world of things that can go wrong. (Will Schwarz)


    • As a dedicated production professional, I sit in dark places and wait for bad things to happen. (Mark Triplett)


    • Got a client you haven’t heard from in months or a year? Erase their old project files and media, and you are guaranteed a phone call or email from them within 24 hours, wanting a re-edit. (Mark Suszko)


  • Needed Lead EDITOR: Must have at least 5 years of experience. No out of college applicants will be excepted. Must be expert in Adobe Premier, Photoshop, and After Effects. We will ONLY look at candidates that are capable of shooting with a pro camera, setting up lighting, and recording live audio. You must have a deep understanding in DaVinci Resolve and Cinema 4D. This is an ENTRY LEVEL POSITION. (Hector Pina)

EXTRA CREDIT

Here’s a link to read more.


Please rate the helpfulness of this tip.

Click on a star to rate it!

… for Apple Motion

Tip #515: Using the Active Camera Menu

Larry Jordan – LarryJordan.com

Controlling a camera in 3D space is tricky. The Active Camera menu helps you manage.

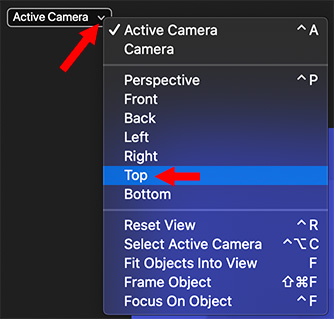
The Active Camera menu in Apple Motion 5.x.

Topic $TipTopic

As you move into 3D space in Motion, the Active Camera menu becomes an essential navigation tool. The Camera pop-up menu is divided into three sections: Top, Middle, and Bottom.

The top section lets you select the active scene camera as well as any other scene cameras you’ve added to your project. A Motion project can have more than one camera.

  • Active Camera/Camera: When you choose Active Camera from the pop-up menu, the topmost camera in the Layers list at the current playhead position (in the Timeline) becomes the active camera. The active camera is the camera through which you view your project in the canvas. It’s also the camera view that’s rendered when you export your project. If a project contains only one scene camera (as shown above), two items appear at the top of this pop-up menu: Active Camera and Camera, which represent the same camera.
  • If a project contains more than one scene camera (as shown below), all scene cameras appear at the top of the Camera pop-up menu, under the Active Camera item. To make a different scene camera the active camera, choose a different camera from the top section of the pop-up menu. (Scene cameras listed in this section of the Camera pop-up menu appear in the same order as they do in the Layers list.)

The middle section of the Camera pop-up menu lets you choose a reference camera to help you see your composition from various angles. Choose any of the following to activate a reference camera view:

  • Perspective: Like a real-world camera, views the scene with perspective distortion. For example, layers farther away from the camera appear smaller than layers closer to the camera. The perspective view defaults to a view from the front center.
  • Front: This orthogonal camera looks straight down the Z axis and shows a perpendicular view from the front of the scene.
  • Back: This orthogonal camera looks straight down the Z axis and shows a perpendicular view from the back of the scene.
  • Left: This orthogonal camera looks straight down the X axis and shows a perpendicular view from the left of the scene.
  • Right: This orthogonal camera looks straight down the X axis and shows a perpendicular view from the right of the scene.
  • Top: This orthogonal camera looks straight down the Y axis and shows a perpendicular view from the top of the scene.
  • Bottom: This orthogonal camera looks straight down the Y axis and shows a perpendicular view from the bottom of the scene.
  • Note: The orthogonal camera views (Front, Back, Left, Right, Top, and Bottom) ignore perspective.

NOTE: The reference camera views cannot be exported. However, you can still animate a scene camera when a reference camera view is selected.

Because objects (except 3D text) are 2D (flat), they may not be visible in the canvas when you choose an orthogonal camera view (Front, Back, Left, Right, Top, and Bottom). This is because orthogonal views are at right angles (perpendicular) to 2D elements in your project. When you select an object that’s invisible to an orthogonal reference camera, a thin white line represents the object in the canvas.

The bottom section of the Camera pop-up menu allows access to five frequently used commands:

  • Reset View: Resets the camera view to its default orientation. (Control-R)
  • Select Active Camera: Selects the active camera in the project—the topmost camera in the Layers list that is visible at the current frame (when there are multiple cameras existing at the same frame in time). (Control-Option-C)
  • Fit Objects Into View: Reframes the current camera to fit the selected objects into the canvas. (F)
  • Frame Object: Frames the selected objects in the active view. If no objects are selected, Frame Object resets the reference camera to view all objects in the scene. (Shift-Command-F)
  • Focus On Object: Used when a camera has depth of field turned on. Adjusts the camera’s Focus Offset to the selected object. (Control-F)

After you choose a camera view (scene camera or reference camera), use the 3D view tools to pan, orbit, or dolly the camera.

EXTRA CREDIT

To avoid getting lost, I generally just use the Active Camera and Top perspective.

The Motion help files have much more on working with cameras in 3D space.


Please rate the helpfulness of this tip.

Click on a star to rate it!