… for Apple Motion

Tip #705: 3 Functions of the Hand Tool

Larry Jordan – LarryJordan.com

The fastest way to reposition the display is to press and drag with Pan or Zoom.

The Hand menu in Motion, has three different options: Pan, Zoom and Walk 3D View.

Topic $TipTopic

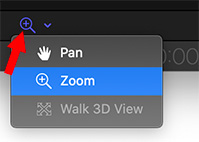
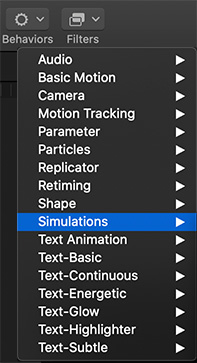
The Hand menu in Motion, has three different options: Pan, Zoom and Walk 3D View. Most of the time, we use the hand (Pan) tool. But, there’s a lot more you can do. Watch.

  • Pan. (Shortcut: H). This option moves the image in the Viewer horizontally or vertically. This only affects the display in the Viewer, no changes are made to the project.
  • Zoom. (Shortcut: Z). This option zooms in when clicking in the Viewer. Press Option and click to zoom out. Press, hold and drag the cursor to zoom in or out. This only affects the display in the Viewer, no changes are made to the project.
  • Walk 3D View. The Walk 3D View tool lets you position a camera in 3D space as you would in a computer game, using a keyboard-and-mouse navigation method.

MORE ON THE WALK 3D VIEW OPTION

  • The pointer changes to indicate that the Walk 3D View tool is active.
  • Use the Up Arrow, Down Arrow, Right Arrow, and Left Arrow keys to move the camera in 3D space; press and hold the Option key while using the arrow keys to move the camera more slowly.
  • You can also drag in the canvas to orient the camera.
  • If you’re using a scene camera, you can also record the movement you create using the Walk 3D View tool, by creating keyframes.

NOTE: The Walk 3D View tool is available only when Active Camera, Camera, or Perspective is selected from the Camera pop-up menu.


Please rate the helpfulness of this tip.

Click on a star to rate it!

… for Apple Motion

Tip #704: What Does 3D Transform Do?

Larry Jordan – LarryJordan.com

The 3D Transform tool is the fastest and easiest way to rotate an element in 3D.

The on-screen controls in the Viewer when 3D Transform is active.

Topic $TipTopic

The 3D Transform tool controls element position and rotation in 3D space.

To select it, either click the “World” icon in the tool bar, or type the shortcut Q. Dragging an arrow changes position, dragging a white circle changes rotation.

3D uses the mnemonic: RGB = XYZ. Arrows and circles are color-coded so you know when way an object will move:

  • Red. Horizontal movement and rotation on the X-axis.
  • Green. Vertical movement and rotation on the Y-axis.
  • Blue. Movement to or from the camera and rotation on the Z-axis.

You don’t need to switch a group into 3D space to take advantage of 3D perspective.

EXTRA CREDIT

When working with Z-space:

  • If the group is set for 2D, the stacking order in the Layers panel determines foreground and background.
  • If the group is set to 3D, an element’s position in Z space determines foreground and background.

Please rate the helpfulness of this tip.

Click on a star to rate it!

… for Apple Motion

Tip #683: How Motion Processes Behaviors and Keyframes

Larry Jordan – LarryJordan.com

Keyframes are processed first, then simulations, then behaviors.

The Behavior menu in Apple Motion.

Topic $TipTopic

This tip originally appeared as an Apple KnowledgeBase article. This is an excerpt.

There’s no limit to the number of behaviors you can add to an object. Multiple behaviors applied to a single object work together to create a final animated effect. But, what happens when you have multiple behaviors, keyframes and simulations applied? Here’s how Motion handles this.

When combining different behavior types (such as Parameter and Simulation behaviors) or combining behaviors and keyframes, it’s important to understand the behaviors’ order of operations. Motion evaluates behaviors and keyframes in the following order:

  1. Keyframes
  2. Simulation behaviors
  3. All other behaviors

Parameter behaviors are applied in the order in which they are added, from the bottom of the Layers list up (like the order of filters and the compositing order of image layers).

IMPORTANT: The order of operations is always in effect—regardless of the order in which behaviors are applied or keyframes are added to a layer or group.

  • When you animate an object with keyframes and then apply a behavior, the effect of the keyframes is evaluated first.
  • When you animate an object with any behavior and then add keyframes, the effect of the keyframes is evaluated first.
  • When you animate an object with a behavior and then apply a Simulation behavior, the Simulation behavior is evaluated before the first behavior (and therefore may have no effect).

NOTE: Although the Spin behavior appears in the Basic Motion category, Spin is treated as a Simulation behavior in the order of operations.

EXTRA CREDIT

The article, linked above, has more details and examples.


Please rate the helpfulness of this tip.

Click on a star to rate it!

… for Visual Effects

Tip #711: 5 Tips for Getting a Job in VFX

Larry Jordan – LarryJordan.com

Visual effects jobs are everywhere, but so’s the competition. These tips help you get ahead.

Fill your mind with images.

Topic $TipTopic

This article first appeared in CGSpectrum.com. This is an excerpt.

Visual effects jobs are everywhere. Many movies, TV shows, ads and video games depend on VFX to tell their story. These days, almost every major show out there has some level of VFX. However, VFX is an extremely competitive market, so here are some tips to help you get ahead.

  1. Go to a school that specializes in visual effects. This is one of the best ways to gain a foothold in this type of career.
  2. Strive to be the best at your craft.
  3. Create an amazing showreel of your best work. When applying for visual effects jobs, your showreel will often be the first thing a recruiter sees. Be unique with your showreel, grab the recruiter’s attention and keep it.
  4. Never stop looking for inspiration. Continue to grow by feeding off your ideas. Don’t be afraid to try new things, they may not always work, but you’ll never know until you investigate them. When things start to get dull, you need to look for things you may have overlooked before.
  5. Be a great team player. One person can make or break a team. Be conscious of your attitude towards the people around you and what you’re working on. Don’t be afraid to have someone critique your work and vice versa.

EXTRA CREDIT

The article, linked above, contains videos expanding on these ideas.


Please rate the helpfulness of this tip.

Click on a star to rate it!

… for Visual Effects

Tip #710: (More) LifeSaving VFX Tips

Larry Jordan – LarryJordan.com

5 more tips to improve your VFX shots.

VFX shot from Boardwalk Empire © Home Box Office (HBO). Visual effects by Brainstorm Digital.

Topic $TipTopic

This article, written by Eran Dinur, first appeared in NoFilmSchool.com. This is an excerpt. Eran Dinur’s experiences as a visual effects supervisor who works on a variety of film and TV projects caused him to write “The Filmmakers Guide to Visual Effects.”

Here are five more VFX tips to consider.

  1. Shadow alert. Strong cast shadows on a sun-lit green screen can seriously damage the success of the shot, and you want to do anything you can to avoid this. On a sunny day, it’s best to set up the screen against the sun so that it’s fully in shadow (and the actors won’t cast their own shadows on the screen). 
  2. Don’t let elements break frame. When shooting VFX elements, you naturally want to have the element as big as possible in the frame for optimal resolution and quality. But you should also make sure that no part of the element breaks frame. Partial elements that get abruptly cut off are useless.
  3. Shoot VFX elements at high frame rate. Whether you are shooting elements of smoke, fire, debris, blood squibs, dust hits or splashes, it’s almost always better to shoot at a higher frame rate. This allows the VFX team to use the elements at a slower speed and still maintain full quality. Slowing down elements to make them feel bigger is a tried and tested technique.
  4. Black is the new green — sometimes. Green screens work well for people, or cars, or horses—basically anything that’s mostly solid. But semi-transparent elements like fire or water don’t extract well from a green screen. With a black screen, the extraction process is not based on hue but on luminosity.
  5. On set reference imagery is invaluable. Reference images of the set and its surroundings are indispensable for a variety of VFX tasks, from camera tracking to matte painting.

EXTRA CREDIT

Eran’s first 5 tips are in Tip #709. His complete article – and book – are worth reading.


Please rate the helpfulness of this tip.

Click on a star to rate it!

… for Visual Effects

Tip #709: Lifesaving VFX Tips

Larry Jordan – LarryJordan.com

5 Tips to Simplify VFX Shots

The Wolf of Wall Street © Paramount Pictures, Red Granite Pictures, Appian Way, Sikelia Productions, EMJAG Productions. Visual effects by Brainstorm Digital.

Topic $TipTopic

This article, written by Eran Dinur, first appeared in NoFilmSchool.com. This is an excerpt. Eran Dinur’s experiences as a visual effects supervisor who works on a variety of film and TV projects caused him to write “The Filmmakers Guide to Visual Effects.”

Here are five VFX tips to consider.

  1. Be careful with tracking markers. Any markers not part of a VFX shot will need to be cleaned up in post later. There’s no need for markers if the camera doesn’t move during the shot.
  2. Use green on green. The best color for tracking markers on a green screen is green (and blue for blue screens). Just make sure the markers are slightly brighter or darker than the screen itself (having a few types of green gaffer tape around is useful). If you can see the markers in the monitor, they are visible enough to be used for tracking
  3. Successful crowd tiling can save money on extras. When you can’t afford hundreds of extras, crowd tiling is a great alternative. It is also much cheaper (and faster) than CG crowd simulations and digital doubles.
  4. Beware of trying to fix shaky cam in post. Consider these two issues: First, every stabilization also requires a push in, and the bigger the shake, the tighter you’ll need to go. This means that on top of losing parts of the image, you also lose quality.
  5. Keep safety wires behind the actors. Removing safety wires and rigs is standard VFX fare. But not all wire removal shots are equal, and some can turn out to be very difficult and expensive. If wires (or other parts of the rig) cross in front of the actor, it will take some difficult reconstruction of the actor’s moving face, body, and clothing to remove them.

The other, even more significant problem is the fact that stabilization can eliminate the motion, but not the motion blur (there really is no trick in the VFX book to kill motion blur in the footage).

EXTRA CREDIT

Eran’s second 5 tips are in Tip #710. His complete article – and book – are worth reading.


Please rate the helpfulness of this tip.

Click on a star to rate it!

… for Codecs & Media

Tip #703: What is GoPro Cineform?

Larry Jordan – LarryJordan.com

This 12-bit, full-frame video codec is optimzied for speed and image quality.

Topic $TipTopic

GoPro CineForm is a 12-bit, full-frame wavelet compression video codec. It is designed for speed and quality, at the expense of a very high compression size. Image compression is a balance of size, speed and quality, and you can only choose two. CineForm was the first of its type to focus on speed, while supporting higher bit depths for image quality. More recent examples would be Avid DNxHD and Apple ProRes, although both divide the image into blocks using DCT.

The full frame wavelet has a subject quality advantage over DCTs, so you can compression more without classic ringing or block artifact issues. Here are the pixel formats supported:

  • 8/10/16-bit YUV 4:2:2 compressed as 10-bit, progressive or interlace
  • 8/10/16-bit RGB 4:4:4 compressed at 12-bit progressive
  • 8/16-bit RGBA 4:4:4:4 compressed at 12-bit progressive
  • 12/16-bit CFA Bayer RAW, log encoded and compressed at 12-bit progressive
  • Dual channel stereoscopic/3D in any of the above

Compression ratio: between 10:1 and 4:1 are typical, greater ranges are possible. CineForm is a constant quality design, bit-rates will vary as needed for the scene. Whereas most other intermediate video codecs are a constant bit-rate design, quality varies depending on the scene.

EXTRA CREDIT

Here’s a link to learn more.


Please rate the helpfulness of this tip.

Click on a star to rate it!

… for Codecs & Media

Tip #702: Is GoPro Cineform Still Useful?

Larry Jordan – LarryJordan.com

GoPro Cineform is available for free for both Mac and Windows.

Topic $TipTopic

When GoPro canceled GoPro Studio a while back, it became more difficult to convert GoPro footage into a format that can be easily edited.

This article, from David Coleman Photography, describes how to convert and play GoPro footage.

While GoPro Studio is no more, you can download the codecs themselves from the GoPro-Cineform decoder page. There you’ll find versions for Mac and Windows. In the case of the Mac version, it’s still called NeoPlayer, which is its old name.


Please rate the helpfulness of this tip.

Click on a star to rate it!

… for Codecs & Media

Tip #701: How to Export an Alpha Channel

Larry Jordan – LarryJordan.com

Alpha channels are not supported in H.264 or HEVC media.

Topic $TipTopic

The alpha channel determines transparency in a clip. However, no compressed codec supports alpha channels. Why? Because including the alpha channel makes a file really big!

Here, courtesy of RocketStock.com is a list of video codecs and image formats that support alpha channels.

Video Codecs and Image Formats with Alpha Channels

  • Apple Animation
  • Apple ProRes 4444
  • Avid DNxHD
  • Avid DNxHR
  • Avid Meridien
  • Cineon
  • DPX
  • GoPro Cineform
  • Maya IFF
  • OpenEXR Sequence With Alpha
  • PNG Sequence With Alpha
  • Targa
  • TIFF

Be sure to test your codec before committing to a project. Not all versions of DNx or GoPro Cineform support alpha channels.


Please rate the helpfulness of this tip.

Click on a star to rate it!

… for Adobe Premiere Pro CC

Tip #700: Vibrance vs. Saturation

Larry Jordan – LarryJordan.com

Vibrance adjusts saturation, without risking clipping.

The Vibrance setting is in Lumetri > Creative panel.

Topic $TipTopic

What’s the difference between Vibrance and Saturation? Something significant, actually. Learn more here.

Both these settings are in the Lumetri > Creative panel.

  • Saturation. Adjusts the saturation of all colors in the clip equally from 0 (monochrome) to  200 (double the saturation).
  • Vibrance. Adjusts the saturation so that clipping is minimized as colors approach full saturation. This setting changes the saturation of all lower-saturated colors with less effect on the higher-saturated colors. Vibrance also prevents skin tones from becoming oversaturated.

The short answer is that when you need to adjust saturation, you may get better results by using Vibrance, than Saturation, especially if there are a lot of highlights or shadows in your image.


Please rate the helpfulness of this tip.

Click on a star to rate it!