… for Adobe Premiere Pro CC

Tip #699: A Fast Way To Color Balance

Larry Jordan – LarryJordan.com

Click the WB Selector on something that’s supposed to be gray to remove color casts.
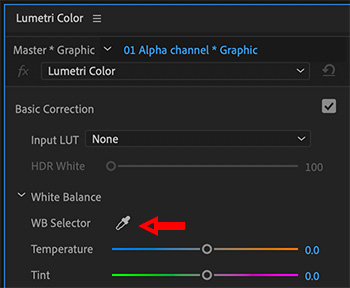
Click the WB Selector eyedropper on something gray in an image.

Topic $TipTopic

Deep inside the Lumetri Color panel is a tool that makes removing color casts a snap… well, ah, actually, a click. Here’s how it works.

  • Select the clip you want to color correct.
  • Switch to the Color workspace and open Lumetri > Basic Correction.
  • Click the WB Selector eyedropper. It won’t change color when you select it, which is distracting.
  • Click the eyedropped on something in the currently selected image that is supposed to be mid-tone gray or white.

Instantly, the image is corrected so that the color cast disappears.

EXTRA CREDIT

What this tool does is adjust temperature and tint settings to color correct the image. If you don’t like the results, you can manually adjust both sliders to improve the results.

Additionally, once the color correction is to your liking, click the Auto button at the bottom of this section to automatically set grayscale levels for the clip.


Please rate the helpfulness of this tip.

Click on a star to rate it!

… for Adobe Premiere Pro CC

Tip #658: Tips for Working with Photos

Larry Jordan – LarryJordan.com

Time spent prepping your photos before editing, speeds the editing process.

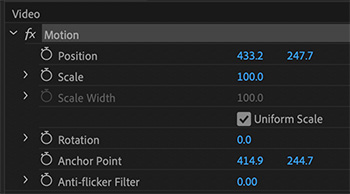
The Effect Control > Motion panel in Premiere.

Topic $TipTopic

This article, written by Jason Boone, first appeared in PremiumBeat.com. This is an excerpt.

Working with stills in Adobe Premiere Pro is a little bit of a different workflow than when you’re editing video. With images, you’re often dealing with a variety of resolutions and framing, you may event want to add some movement. Here are some tips.

Check the Resolution. Photographs come in all different shapes and sizes. Many have a vertical aspect ratio, while others are square or rectangular. If you plan to scale up a photo, you’ll want to make sure you have a high enough resolution to keep the image sharp, once it’s scaled.

Fit to the Frame. If you’re just looking to match an image to the sequence frame size, there’s a quick, easy way to do this. Once you have an image in your sequence, simply right-click, and select either Scale to Frame Size or Set to Frame Size.

  • Scale to Frame Size will actually resample your image, removing pixels and setting the scale to 100 percent. That means if you scale this image back up at a later time, you’ll be losing quality.
  • Set to Frame Size, on the other hand, will simply adjust the scale attribute so that the image fits perfectly in the sequence frame.
  • To change how Premiere Pro handles your photos by default, go to the Edit > Preferences > Default Media Scaling drop-down menu.

Position the Anchor Point. To reposition the anchor point, select the word “Motion” in Window > Effect Controls panel. This reveals the cross-hairs of the anchor point within the Program panel. With the cross-hairs visible, I can now easily move the anchor point.

Animate the Photo. Use keyframes in Effect Controls > Motion to add movement to your images.

EXTRA CREDIT

The PremiumBeat article, linked above, has more photo tips and a video demo.


Please rate the helpfulness of this tip.

Click on a star to rate it!

… for Apple Final Cut Pro X

Tip #698: Playback Shortcuts

Larry Jordan – LarryJordan.com

7 shortcuts that simplify preview and playback.

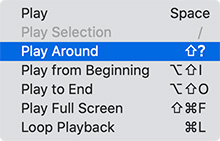
The View > Playback menu.

Topic $TipTopic

Hiding in plain sight are seven shortcuts that can making previewing and playing your projects a lot easier.

These shortcuts are located in the View > Playback menu – and, I’ll bet, you looked at these once then immediately forgot about them.

Shortcut What It Does
space Plays from the position of the playhead
/ Plays selection
Shift + ? Backs up the Preroll duration and plays until reaching the postroll duration.
Shift + Option + I Plays from the beginning of the browser clip or timeline
Shift + Option + O Plays from curent playhead position to the end
Shift + Cmd + F Plays the timeline full-screen
Cmd + L Loops timeline playback

NOTE: Preroll and Post-roll durations are set in Preferences > Playback.


Please rate the helpfulness of this tip.

Click on a star to rate it!

… for Apple Final Cut Pro X

Tip #696: What Does the Alpha Channel Show?

Larry Jordan – LarryJordan.com

Alpha channels define the amount of translucency for each pixel.

When viewing alpha channels, black is transparent, gray is translucent and white is opaque.

Topic $TipTopic

Just as the red, green and blue channels define the amount of each color a pixel contains, the alpha channel defines the amount of transparency each pixel contains.

A pixel can be fully transparent, fully opaque or somewhere in between. By default, every video pixel is fully opaque.

NOTE: The reason we are able to key titles over backgrounds is that titles contain a built-in alpha channel that defines each character as opaque and the rest of the frame as transparent.

Using either the View menu at the top right corner of the Viewer or View > Show in Viewer > Color Channels > Alpha to display the alpha channel for whichever clip contains the playhead (or skimmer).

While we can easily work with alpha channels inside Final Cut, in order to export video that retains transparency information, we need to use the ProRes 4444 or Animation codecs. No other ProRes, HEVC or H.264 codec supports alpha channels.

EXTRA CREDIT

The Event Viewer also supports displaying alpha channels.


Please rate the helpfulness of this tip.

Click on a star to rate it!

… for Apple Final Cut Pro X

Tip #695: Display the Event Viewer

Larry Jordan – LarryJordan.com

The Event Viewer gives FCP X the ability preview browser images.

The Event Viewer (left) provides previews of browser images.

Topic $TipTopic

Hidden inside Final Cut Pro X is the Event Viewer, which allows us to compare images in the browser with images in the timeline.

To enable it, go to Window > Show in Workspace > Event Viewer.

Whatever clip you select in the browser, will be previewed in the Event Viewer.

  • To play a clip, click the image, then press spacebar
  • Set Ins or Outs in the browser.
  • All keyboard shortcuts that work in the browser also work in the Event Viewer
  • To change the size of both monitors, drag the vertical edge between them
  • If two-monitor viewing is enabled, the Event Viewer will appear on the same monitor as the viewer.

EXTRA CREDIT

Go to View > Show in Event Viewer to see the different display options the Event Viewer provides.


Please rate the helpfulness of this tip.

Click on a star to rate it!

… for Random Weirdness

Tip #688: Using a Split-Field Diopter

Larry Jordan – LarryJordan.com

A split-field diopter is a filter that directly alters the focus within your shot.

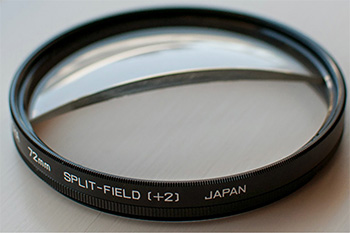
A split-field diopter lens. (Image courtesy of Hoya.)

Topic $TipTopic

This article, written by Anthony Najera, first appeared in PremiumBeat.com. This is an excerpt. The split-field diopter is a practical lens attachment that can add an unusual and visually exciting effect to your movie. Here’s what you need to know.

A split-field diopter is a partial lens that you attach to the front of your camera’s lens. It’s a partial lens because it only has glass covering half of the lens space. Essentially, it’s a filter that will directly alter the focus within your shot.

The split-field diopter lets you to focus on a subject (or object) positioned close to the camera on one side of the frame while also focusing on a more distant subject positioned on the other side of the frame. It allows a shot to have two planes of focus rather than one, making the foreground (captured through the diopter) and background (captured through the uncovered half of your camera’s lens) both appear equally clear.

For instance, instead of having to rely on a rack focus between a nearby subject and a distant subject, the split-field diopter keeps both near and distant focal planes sharply in focus at the same time. This can create a split-screen effect, but it happens in camera instead of in post.

Additionally, the split-field diopter can be a great alternative when you’re looking for deep depth of field. Ordinarily, to achieve a deep focus range, you’d need to stop-down the aperture quite a bit (f/16+), but this requires a ton of light and can be very difficult to do indoors. With a split-field diopter, you can create the illusion of deep focus, even with a wide aperture.

EXTRA CREDIT

The PremiumBeat article has more details and several examples of the diopter in use. The link is at the top of this tip.


Please rate the helpfulness of this tip.

Click on a star to rate it!

… for Random Weirdness

Tip #687: Motion Graphics Freelancing Tips

Larry Jordan – LarryJordan.com

Building a freelance career just takes focus and a willingness to “just get started.”

Topic $TipTopic

Recently, MotionArray.com sat down with freelancer Owen Chikazawa, also known as We Wander, to learn his thoughts on how to be a successful freelance motion graphic designer. This is an excerpt.

  • Getting Started as a Motion Graphic Freelancer. First off, you don’t have to jump in with both feet. Many artists don’t realize that they can take on a few extra jobs during the evenings or weekends in order to build a strong client base and a portfolio of work.
  • Going Freelance Full Time. One thing that is important when jumping into the freelance pool full time is making sure that you have enough money to keep you going through lean times. A common mistake is feeling like you will always be busy and not being financially prepared for downturns.
  • How to Get Work & Stay Busy. So how do you do this? Owen adds, “Go to creative meetups and network.” This might seem like common sense, but a lot of people miss this one. They don’t realize the power of networking. Even meeting other artists can lead to work as they may recommend you if they are too busy for a job. Let everyone know what you do and find events that are more likely to bring you work or connections.

He also suggests:

  • Be personable and positive
  • Continuously develop your craft

EXTRA CREDIT

The entire interview is worth watching. Use the link at the top of this tip.


Please rate the helpfulness of this tip.

Click on a star to rate it!

… for Random Weirdness

Tip #669: Add Subtitles to YouTube

Larry Jordan – LarryJordan.com

The best way to add captions to YouTube is to create the SRT caption file first.

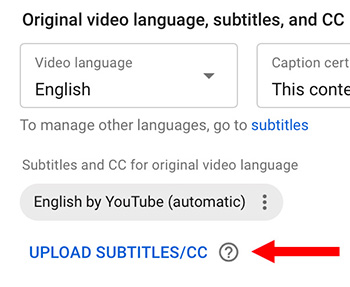
The Upload captions button in YouTube Studio.

Topic $TipTopic

Adding subtitles to your clips on YouTube expands the number of people that can benefit from watching your projects. Here’s how to add subtitles and closed captions.

YouTube wants all subtitles in SRT format. The easiest way to do this is to use automatic speech-to-text transcription software. The highest quality is to get a human transcription service to do this for you. You can also do this yourself, but after you transcribe one project, you’ll want to find another way to do this. Transcription is slow, laborious and painstaking to get right.

NOTE: You don’t have to know every language to add subtitles. YouTube sends all subtitles out to Google Translate for other languages.

Here are the steps:

  • Go to YouTube Studio and select your video.
  • In the middle of the More Options page you’ll see a link to upload subtitles.

NOTE: Be sure to select the correct language for your subtitles.

Click the Download button.

NOTE: If you need to create or edit your subtitles, click the Edit on Classic Studio button.

Done. After a few minutes, ,your captions will appear for your video on YouTube.

EXTRA CREDIT

Here’s an article I wrote that covers process this in more detail for Adobe Premiere Pro.

Here’s an article I wrote that covers process this in more detail for Apple Final Cut Pro X.


Please rate the helpfulness of this tip.

Click on a star to rate it!

… for Apple Motion

Tip #672: Checkbox Widget in Motion

Larry Jordan – LarryJordan.com

Checkboxes provide an easy way to enable or disable a setting in a Final Cut Pro X template.

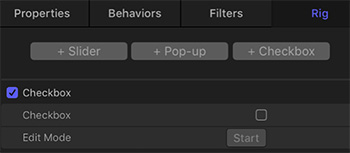
The Checkbox rigging control panel.

Topic $TipTopic

This tip originally appeared as an Apple KnowledgeBase article. This is an excerpt.

Checkboxes are a control structure, created in Motion, that allow an editor in Final Cut to toggle something on or off.

Checkbox widgets allow you to switch between two snapshots—that is, between two sets of parameter states. Typically, checkbox widgets are used to create an on/off type of effect, although you can store any parameter states in either snapshot, creating more of a toggle effect.

The activation checkboxes in the Rig Inspector and in the Layers list (beside the checkbox widget) have no effect on the constituent parameters of the checkbox.

Checkbox widgets contain the following controls in the Rig Inspector and Widget Inspector:

  • Checkbox: Use this widget control to switch between two snapshots (parameter states).
  • Edit Mode: Click the Start button to enable snapshot recording.

Checkboxes provide an easy way to enable or disable a setting in a Final Cut Pro X template.


Please rate the helpfulness of this tip.

Click on a star to rate it!

… for Apple Motion

Tip #671: Combine Behaviors and Keyframes

Larry Jordan – LarryJordan.com

Combining keyframes with behaviors is an easy way to create unusual effects.

A keyframed Motion Path, with the Randomize parameter behavior.

Topic $TipTopic

This tip originally appeared as an Apple KnowledgeBase article. This is an excerpt.

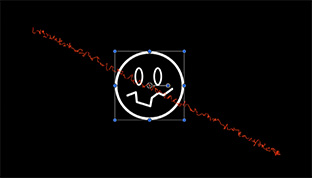
Any object can have behaviors and keyframes applied to it simultaneously. When this happens, the values generated by the behavior and the keyframed values applied to the parameter are combined. For example, if you create an animation path using keyframes, you can create a completely predictable and smooth movement.

However, if you apply the Randomize parameter behavior to the same object, its effect combines with the keyframed motion path you created. As a result, the animation path follows the general direction you want, with random variation in it to make it interesting.

Although this example discusses how you can combine behaviors and keyframes to create animation paths, you can combine behaviors and keyframes for any parameter.

EXTRA CREDIT

The article, linked above, has more details and examples.


Please rate the helpfulness of this tip.

Click on a star to rate it!