… for Random Weirdness

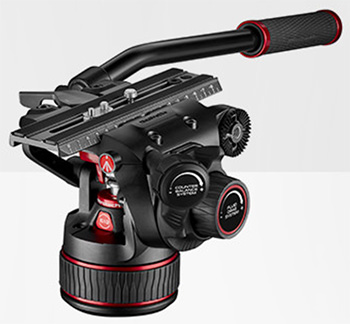
Tip #790: Why Use Fluid Tripod Heads

Larry Jordan – LarryJordan.com

Fluid heads support smooth pans, tilts and tracking.

A Manfrotto fluid tripod head

Topic $TipTopic

This article first appeared in Better Digital Photo Tips.com. This is a summary.

What is a fluid tripod head exactly, do you really need a fluid tripod head and how does this kind of tripod head work? Here are some answers.

A fluid head is designed to create smooth pans, tilts and tracking. If you shoot stills, it isn’t truly necessary, but for video, it’s essential. These heads, made for tripods and monopods, contain a fluid chamber within its design, to dampen the sudden movements and vibrations of the camera, in order to get smooth video pans and smooth tracking.

A friction head is not the same as, though cheaper than, a fluid head. Friction heads use a series of plastic washers to smooth the movement.

Here are a few features of fluid head tripods that you need to be aware of.

  • COUNTERBALANCE. A system in a fluid head that allows your camera to remain at the angle you leave it set.
  • FLUID DRAG. Grease or oil material, that is trapped between plates within a sealed pack, that acts as torque dampers instead of using friction to create drag.
  • HANDLE LENGTH. The longer the handle, the easier it is to make subtle, smooth movements. One trick to make a cheaper head work better is to slide a small PVC or other light-weight pipe over the handle to extend its length.
  • TENSION CONTROL. The ability to adjust both panning tension and tilting tension
  • WEIGHT. Heavier heads can handle heavier cameras. It’s that simple.

The article, linked above, includes multiple videos illustrating the difference fluid heads make, along with details on what to look for when buying one.


Please rate the helpfulness of this tip.

Click on a star to rate it!

… for Random Weirdness

Tip #779: Why a Lens is Worse at f/22 than f/8

Larry Jordan – LarryJordan.com

The smaller the aperture, the greater the diffraction.

Lens aperture is determined by the iris setting.

Topic $TipTopic

This article first appeared in PetaPixel.com. This is an excerpt.

It’s common knowledge that most lenses are at their best (i.e. sharpest) between f/5.6 and f/8, depending on the lens. But why? The reason a lens is softer at f/22 than it is at f/8 is due to a phenomenon called diffraction.

Two interesting points worth highlighting are:

  • Lenses get sharper as you stop down because stopping down reduces aberration, even while it increases diffraction.
  • It’s only when the “blurry points” caused by diffraction become bigger than an individual pixel that you’ll begin to see the effect in your images.

This has two consequences that are actually noticeable in the real world:

  • All other things being equal, a higher-resolution sensor will show the effects of diffraction sooner, because the individual pixels are smaller.
  • A really well-corrected lens will begin showing the negative effects of diffraction earlier.

EXTRA CREDIT

The link at the top includes more details and a video illustrating diffraction in real life.


Please rate the helpfulness of this tip.

Click on a star to rate it!

… for Apple Motion

Tip #795: Rotate Text in 3D

Larry Jordan – LarryJordan.com

3D Text can rotate and cast shadows on the text next to it.

3D Text with custom lighting, where each character is rotated invidually and casting shadows.

Topic $TipTopic

A hidden feature in Motion is the ability to rotate individual letters of 3D text. Here’s how.

We use Inspector > Properties to rotate the entire text element.

However, if you select the 3D text in the Layers panel, then go to Inspector > Text > Advanced and adjust Rotation, you can rotate each individual text character.

Not only does this give your text a different look, it also changes how it responds to different lighting based on direction. Plus, each letter can cast a shadow on the text next to it, adding depth and interest.

EXTRA CREDIT

To turn shadows off, select the text layer, then go to Inspector > Properties > Shadows and turn off Cast Shadows.


Please rate the helpfulness of this tip.

Click on a star to rate it!

… for Apple Motion

Tip #795: Rotate Text in 3D

Larry Jordan – LarryJordan.com

3D Text can rotate and cast shadows on the text next to it.

3D Text with custom lighting, where each character is rotated invidually and casting shadows.

Topic $TipTopic

A hidden feature in Motion is the ability to rotate individual letters of 3D text. Here’s how.

We use Inspector > Properties to rotate the entire text element.

However, if you select the 3D text in the Layers panel, then go to Inspector > Text > Advanced and adjust Rotation, yo


Please rate the helpfulness of this tip.

Click on a star to rate it!

… for Apple Motion

Tip #794: The Texture Adjuster

Larry Jordan – LarryJordan.com

3D text provides a wealth of lighting, texture and format controls.

3D text, using the Drama Top Right light setup and customized texture.

Topic $TipTopic

Hidden at the bottom of the Material section for 3D text – below where you select surfaces – are additional controls that allow changing the texture of each surface.

These controls vary depending upon which surface is selected. For instance, with Plaster, you can adjust:

  • Color type
  • Paint color
  • Sheen (reflectivity)
  • Surface texture
  • Texture depth
  • Opacity
  • Placement

One of the benefits to working with 3D text is the vast amount of control we have over the texture and lighting of the text.

If you haven’t explored these options yet, when you do you’ll discover a whole lot more texture control than you ever expected.


Please rate the helpfulness of this tip.

Click on a star to rate it!

… for Apple Motion

Tip #793: What Is a “Light Setup”?

Larry Jordan – LarryJordan.com

Light Setups provide a variety of placed and pre-aimed lights to shape 3D text.

A “Drama Top Right” light setup, with blue and purple colors added to the lights.

Topic $TipTopic

An element in the Object menu is “Light Setup.” What are these and how do we use them? A Light Setup is like having your own lighting grid and instruments that you can hang around any 3D object in Motion. Most of the time, this means 3D text.

In the screen shot, I created a 3D text clip, then applied grayish textures to the letters. In this case, I used Concrete > Sidewalk for the front and Plaster > Eggshell Plaster for the sides. (Using gray textures allows the greatest freedom in applying color using light.)

Next, in Inspector > Text > Lighting, I changed Lighting Style between different setups to see which one I liked the best.

For my example, given the shape and angle of the text, Drama Top Right worked great.

Finally, I selected each individual light in the Layers panel and changed color and intensity using Inspector > Light > Light Controls.

EXTRA CREDIT

Switching the light from Directional to Spot provides even greater control over fall-off and shading.

This is an effect you can play with forever, just like real lights, to get exactly the look you need.


Please rate the helpfulness of this tip.

Click on a star to rate it!

… for Visual Effects

Tip #798: The 3D Motion & Design Show Premieres

Larry Jordan – LarryJordan.com

Maxon redesigned and rebranded CineUniversity to 3DMotionShow.

Screen shot detail from first presentation at 3DMotionShow.com.

Topic $TipTopic

The team at Maxon – Cinema 4D, RedGiant & RedShift – have created a new online training and education website: 3DMotionShow.com.

It premiered June 18, with shows continuing until Dec. 9, 2020.

Current titles include:

  • Rigging and Animating Characters in Cinema 4D for the Hillarious Short: “Coffee Run”
  • Cinema 4D, Redshift and Red Giant Techniques Used to Create VFX for Talos
  • Time-Saving Compositing Tips in VFX Suite
  • Building a Crystal Cave with Cinema 4D/Redshift for the Short: “The Search”

Here’s the link to learn more and watch.


Please rate the helpfulness of this tip.

Click on a star to rate it!

… for Visual Effects

Tip #796: Particle Illusion – the App – Now FREE!

Larry Jordan – LarryJordan.com

Particle Illusion – the application – is now free.

A screen shot from a Particle Illusion demo by BorisFX.com.

Topic $TipTopic

Particle Illusion – the standalone application from BorisFX – is now available and FREE!

The new Particle Illusion application makes creating real-time motion graphics and particles a breeze.

  • Fun, fast, and easy-to-use
  • 2500+ professionally-designed, drag & drop presets
  • Unlimited hardware-accelerated particles
  • Unlimited particle emitters
  • Add forces and deflectors to create organic movement
  • Lightning-fast renders with ProRes export
  • Integrated motion blur
  • Supports up to 8K projects

See the video, learn more and download here.


Please rate the helpfulness of this tip.

Click on a star to rate it!

… for Visual Effects

Tip #792: Stunning Light Effects

Larry Jordan – LarryJordan.com

Fully-animated, colorful textures for multiple applications.

A lighting effect created by Spectrum, from Luca Visual Effects.

Topic $TipTopic

Recently, I was playing with the fascinating Spectrum plugin from Luca Visual FX. This generates fully-animated, full-screen light effects that can be used as backgrounds, illuminated text fills, or anywhere visually appealing, yet amorphous, backgrounds are required.

Spectrum is a bundle of two very customizable generators designed to create stylized light and color effects. Light Effect Generator can be used either to create unusual backgrounds or subtle overlays. Light Transition Generator allows the user to create freely interpreted quick light and color transitions over a given cut point.

Available from FX Factory, this generator supports:

  • Final Cut Pro X
  • Motion
  • Premiere Pro
  • After Effects

This plugin offers 1,400 (if I did my math right) different presets, plus tons of customization.

The plug-in costs $89 (US), however, a free trial is available to give you a chance to experiment. And, ah, giggle. This creates some very cool looks.

Here’s the link.


Please rate the helpfulness of this tip.

Click on a star to rate it!

… for Adobe Premiere Pro CC

Tip #787: Change Label Color Defaults

Larry Jordan – LarryJordan.com

Labels can help organize complex projects.

The Label Defaults section of Preferences > Labels.

Topic $TipTopic

As I was researching last week’s webinar on Adobe Premiere, I re-discovered some interesting facts about labels.

Labels can be used to:

  • Color clips in the timeline
  • Add color patches to media and sequences in the Project panel

I often use colors to flag dialog, B-roll, or stock footage clips. While totally optional, colors can help you organize a complex project. You can assign any color to anything, though there are default settings (see Tip #3).

To apply a color to an element in the Timeline or Project panel, select the object(s), then choose Edit > Label.

NOTE: You can also control-click a clip and choose Label, but the Edit menu allows you to select multiple elements and change them all at the same time.

TIP #1

  • In Preferences > Labels, there are 16 different colors you can select from.
  • To change a color, double-click the color chip.

TIP #2

  • To change the name of a color, double-click the name and type the new text.

TIP #3

  • To change the default color of a type of clip – for example, a sequence – select the color name from the Label Defaults section of the Labels preference panel.

Please rate the helpfulness of this tip.

Click on a star to rate it!