… for Adobe Premiere Pro CC

Tip #769: Two Keyboard Shortcut Secrets

Larry Jordan – LarryJordan.com

Shortcuts in Premiere are far more flexible than you might at first think.

Two shortcuts are applied to the top “Fit,” while both “Fits” share the same shortcut.

Topic $TipTopic

As I was researching last week’s webinar on Adobe Premiere, I re-discovered some hidden secrets about keyboard shortcuts.

Tip #1

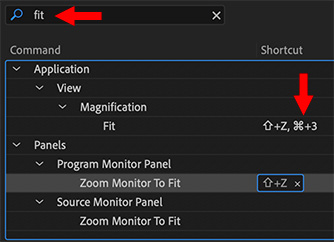
You can apply multiple keyboard shortcuts to the same menu. For example, in the screen shot, I applied two shortcuts to the top menu (right red arrow).

  • To add a shortcut, double-click in the shortcut column to open a shortcut field.
  • To add a second shortcut, double-click just to the right of any existing shortcut.

NOTE: I added a second shortcut in the screen shot just to illustrate where to click and what it looks like.

An example of where two shortcuts are helpful is that I applied both “V” and “A” to the Selection tool. Why? Because I frequently shift between Premiere and Final Cut and trying to figure out which shortcut to use to access the most basic of tools was driving me nuts.

Tip #2

You can apply the same shortcut to two different menu items. (See screen shot.)

For example, there is no default “Fit to Window” shortcut for either the Source Monitor or Program panel. So, I searched for “fit” in the Keyboard Shortcuts panel, then applied a new shortcut (Shift + Z) to both.

Now, whether I’m in the Source Monitor or Program panel, typing Shift + Z fits the image into the window.

Cool.

EXTRA CREDIT

I don’t know the actual upper limit, but you can add at least five different shortcuts to the same menu, if you want to get that carried away.


Please rate the helpfulness of this tip.

Click on a star to rate it!

… for Adobe Premiere Pro CC

Tip #766: Faster Ways to Import Media

Larry Jordan – LarryJordan.com

I knew these tips – once – but over the years I forgot them. Here they are, again.

Double-click in an empty area of the Project panel to open the Import dialog.

Topic $TipTopic

As I was researching last week’s webinar on Adobe Premiere, I re-discovered two tips for faster imports and easier clip organization. It was good to relearn these, because both can save you time.

TIP #1

I’m a keyboard junkie, so I long ago developed the habit of typing Cmd + I to import media.

But, sometimes, the mouse is even faster: Double-click anywhere in the dark gray area of the Project panel (red arrow) to open the Import dialog.

TIP #2

I’m a fan of organizing media as much as possible on my hard disk before starting a project. Specifically, I create a single master folder for project media, then create subfolders. This could be subfolders for each camera card or stills or audio or whatever grouping makes sense to you.

Then, when it’s time to import, I select all the subfolders and Premiere imports each folder into its own bin; as you can see in the screen shot.

EXTRA CREDIT

These folders are not dynamic. That means that if you add clips to a Finder folder after importing, Premiere does not automatically update the bin with the new media.


Please rate the helpfulness of this tip.

Click on a star to rate it!

… for Apple Final Cut Pro X

Tip #788: The Floating Timecode Window

Larry Jordan – LarryJordan.com

The project timecode window displays the current project playhead location.

The floating Project Timecode window.

Topic $TipTopic

There are two floating timecode windows in Final Cut Pro X: one for projects and one for source media. Here’s how to use the Project Timecode window.

  • Choose Window > Project Timecode to display the floating window.
  • Drag a corner to resize it.
  • Control-click in the window to copy the currently-displayed timecode.
  • Drag the window to move it.

I use this window for most of my edits, just to help me remember where I am.

EXTRA CREDIT

Open the Commands window, search for “timecode” then assign keyboard shortcuts to:

  • Toggle the project timecode window open or closed.
  • Copy project timecode
  • Paste project timecode

Tip #789 illustrates the Source Timecode window.


Please rate the helpfulness of this tip.

Click on a star to rate it!

… for Apple Final Cut Pro X

Tip #786: Get Rid of Multiple Markers – Fast!

Larry Jordan – LarryJordan.com

The Timeline Index makes it easy to delete multiple markers.

The Timeline Index, with five markers highlighted.

Topic $TipTopic

I use markers in all my projects, for chapters for navigation or to help me remember something. However, all those markers need to be cleaned up before I export the final project.

While we can’t copy or paste multiple markers in Final Cut Pro X, we can select multiple markers and delete them. Here’s how.

  • Open the project containing the markers you want to delete into the timeline.
  • Open the Timeline Index (Shortcut: Shift + Cmd + 2).
  • Click the Tags text button.
  • Select the markers you want to delete.
  • Press the big Delete key.

Gone.

EXTRA CREDIT

It may help to click either the Marker or Chapter Marker buttons at the bottom of the Timeline Index to make it easier to isolate markers from other timeline elements.


Please rate the helpfulness of this tip.

Click on a star to rate it!

… for Apple Final Cut Pro X

Tip #778: Delete Render Files to Save Space

Larry Jordan – LarryJordan.com

Render files save time – but take space. Delete them whenever you need more space.

The “Delete Generated Media” dialog.

Topic $TipTopic

Final Cut Pro X creates render files whenever you apply an effect to a clip, or change a setting in the Inspector. This is not bad, in fact, its a good thing – because it allows FCP X to play even the most complex effects at full speed and resolution. However, these render files take space. They are as big as a “normal” video file – in fact, they use the same codec, frame size and frame rate as your project.

While you need them for any clips in your project, FCP X does not erase them when you remove a clip. Why? Because it assumes you may want to use that same clip and effect somewhere else in your project. So it saves the render files to save you time later.

This means that render files accumulate, taking up a lot of extra storage space. Fortunately, it is easy to get rid of them, here’s how.

  • Select the Library, if you want to make a global change.
  • Select an Event, if you want to delete render files only for the elements in an event.
  • Select a Project, if you only want to delete render files for a specific project.
  • Choose File > Delete Generated Media.
  • Choose Delete Render Files > Unused Only.

All unused render files will be deleted.

EXTRA CREDIT

You can delete “All” render files, but as soon as you reopen a project, any needed render files for that project will be re-created; this means you don’t really save much space by deleting all renders. A better choice for active projects is “Unused only.”

When a project is done, though, feel free to delete all render files to save space. In the event you delete render files that Final Cut needs, no problem. FCP X will simply re-create them. No problem.


Please rate the helpfulness of this tip.

Click on a star to rate it!

… for Random Weirdness

Tip #774: The Best A-cam and B-cam Combos

Larry Jordan – LarryJordan.com

Three high-quality, lower-cost camera combos.

The Blackmagic Design URSA Mini Pro camera.

Topic $TipTopic

This article, written by Jourdan Aldredge, first appeared in PremiumBeat.com. This is an excerpt.

Speaking from experience, when I worked in-house with a video production company, there were often times when I needed at least a couple of cameras for a shoot. In many cases, these are A-camera and B-camera setups, where your A-cam is your high-end option for the majority of your filming, while your B-cam is usually your slightly lower-end camera, used for off-angle coverage and pickup shots.

Here are three combos to consider.

  • Blackmagic URSA Mini Pro and the BMPCC 4K. While the URSA Mini Pro has been a solid A-camera (4.6K, ProRes 444 + 422 recording) cinema workhorse since 2017, the real variable in this equation is Blackmagic’s new Pocket Cinema Camera 4K, which is a popular B-camera companion that boasts many of the same specs but at a fraction of the price.
  • Canon C300 and the Canon 5D. I spent years shooting on the Canon C300 — and both the Canon 7D and Canon 5D. Most of my career has been run-and-gun videography (and sometimes photography, to boot), so a reliable camera like the 5D or 7D has been invaluable. Meanwhile, Canon’s C300 has been a very solid cinema A-camera offering — a favorite of documentary filmmakers and corporate video producers (also for its reliability and favorable color science).
  • Sony FS7 and Sony A7 III. Going full Sony for your A-camera/B-camera setup may be your best image capture option. The Sony FS7, with its Super 35mm-sized CMOS sensor, is one of the most diverse and multi-functional A-cams on the market. Combined with the full-frame Sony A7 III (or perhaps the Sony A7S II), you should get the best of Sony’s sharp and crisp color science, and superior low-light performance, for more uncontrolled and vérité-style shoots.

EXTRA CREDIT

This article also includes more specs, pricing and links for more information.


Please rate the helpfulness of this tip.

Click on a star to rate it!

… for Random Weirdness

Tip #773: Add Atmosphere to Your Shots

Larry Jordan – LarryJordan.com

Light needs something to bounce off – atmosphere provides it.

(Image courtesy of Pexels.com)

Topic $TipTopic

This article, written by Tanner Shinnick, first appeared in PremiumBeat.com. This is an excerpt.

If you do a quick search on cinematography blogs, you’ll find that one of the most common questions is How do I create the texture of blinds on a wall? There are two parts to the equation: a hard light source and atmosphere.

The DF-50 Hazer is the industry standard. You’ll find it at every rental house, and it’s a breeze to use. Typically, it creates an oil-based haze. This formula helps the haze hang in the air for longer, so you’re not constantly re-hazing the scene. While it’s not the cheapest rental, it’s consistent, and you’ll find it on most professional sets.

A Halloween (or party fog machine) is a cheap and efficient option. In fact, you can purchase a fog machine for roughly the same price as the hazer rental. You can find them at most party stores, especially around Halloween. However, there are some drawbacks. The fog they create is water-based, so it doesn’t hang in the air quite as long as the fog from an oil-based hazer.

If you’re on a budget (or working as a one-man band), Atmosphere Aerosol is a great alternative. The compact cans fit right into your camera bag, which is great to keep around for whenever you need fog in a pinch.


Please rate the helpfulness of this tip.

Click on a star to rate it!

… for Random Weirdness

Tip #767: Import Media From an iPhone – FAST!

Larry Jordan – LarryJordan.com

Importing media from an iPhone is fast and easy with Preview.

The File menu for Preview on a Mac.

Topic $TipTopic

Importing media from an iPhone into a Mac is fast and easy … if you know the secret.

OK, I’ll tell you.

  • Connect your iPhone to a Mac using a Lightning > USB cable.
  • Unlock your phone.
  • Open Preview (the app) on the Mac.
  • Go to File > Import from iPhone.

Preview then displays a directory of all the images and video on your phone. Simply drag the files you want from this window to your desktop – or wherever you want them stored.

This method, unlike Air Drop, allows you to easily select multiple files to transfer and copies them at a much faster rate. When you are done, simply unplug the cable. Nothing to eject or shut down.

Very, very easy – if you know the secret.


Please rate the helpfulness of this tip.

Click on a star to rate it!

… for Apple Motion

Tip #777: Keyframes vs. Behaviors

Larry Jordan – LarryJordan.com

Use Keyframes for precise control over specific parameters.

Keyframes illustrated in the Motion Timeline.

Topic $TipTopic

When should you use keyframes instead of Behaviors? This Apple KnowledgeBase post has the answer.

As an alternative to animating with behaviors, you can animate most text parameters using keyframes. The text animation method you use (keyframing or behaviors) depends on your project, or more specifically, your timing needs:

  • Use keyframes if you need an action to happen at a specific point in time in your project. For example, if you want text to be completely transparent at frame 1, become completely opaque at frame 60, become transparent again at frame 90, and opaque again at frame 120, use keyframing. Keyframes apply specific values to an object’s parameters at specific frames.
  • Use behaviors if the timing of the animation doesn’t need to be precise. For example, if you want the text to be completely transparent at frame 1, become opaque over frames 60–90, and become transparent by frame 120, use the Fade In/Fade Out behavior. Behaviors generate a range of values that are applied to an object’s parameters.

You can combine keyframing and behaviors to animate any object in Motion. For example, if you keyframe text opacity, you can then apply the Tracking behavior to animate text tracking, or you can keyframe the Tracking parameter. However, if you keyframe the text Opacity parameter and then apply a Fade In/Fade Out behavior to the text, unexpected results may occur.


Please rate the helpfulness of this tip.

Click on a star to rate it!

… for Apple Motion

Tip #776: Copy & Paste Into a Region in Motion

Larry Jordan – LarryJordan.com

We can select a region in the timeline, then copy and paste into it.

A region (lighter color) selected in the timeline.

Topic $TipTopic

In Motion, we can make changes to a range of frames, known as a region. For example, you can cut or copy a section of time to remove it from your project completely, or just move it to a new position in Timeline. Regions need not align with object edges in the Timeline—you can create a region that begins midway through an object.

You can also paste objects into a defined region using the Paste Special command, which lets you insert, overwrite, or exchange objects in the Timeline. Additionally, you select a region and insert blank frames, creating an empty placeholder for a clip you don’t yet have.

Here’s how to paste into a selected region:

  1. In Motion, select an object.
  2. Press Cmd + C to copy or Command-X to cut your selection.
  3. Press and hold the Command and Option keys, drag in the timeline ruler to select a region.
  4. Choose Edit > Paste Special.
  5. The Paste Special dialog appears.
  6. Select “Insert into time region” or “Overwrite into time region,” then click OK.

The Clipboard contents are pasted into the region using the method you specified.

NOTE: This requires selecting a region in the Timeline, not the mini-timeline.

EXTRA CREDIT

Here’s an Apple Support page with more options about working with regions.


Please rate the helpfulness of this tip.

Click on a star to rate it!