Inspector > Media changes the character of the media itself.
The Inspector > Media pane for a selected clip in Apple Motion.
Have you ever selected a clip in Motion, then looked at the source media controls in the Inspector? Yeah, me neither. But there’s some cool stuff there. Take a look.
https://www.theinsidetips.com/wp-content/uploads/2019/09/Tips-Logo-700x150.jpg00Larry Jordanhttps://www.theinsidetips.com/wp-content/uploads/2019/09/Tips-Logo-700x150.jpgLarry Jordan2020-06-18 01:30:002020-06-18 01:30:00Tip #775: Examine and Alter Media Clip Properties
Quality green screen keys focus on lighting, background and separation.
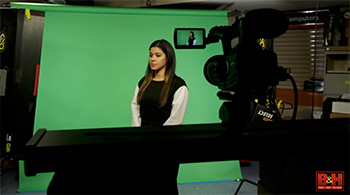
Image from B&H green-screen video.
As this video tutorial makes clear, the worst thing you can say on set about a green-screen effect is: “We’ll fix it in post.” As this video tutorial from B&H makes clear, by the time you get a green-screen to post, it is often too late.
This video tutorial illustrates key concepts to improve the quality of green-screen work on set; from lighting to background to staging. While the entire video is filled with tips – and only runs about three minutes – the most useful are examples to help you pay attention to your lighting.
https://www.theinsidetips.com/wp-content/uploads/2019/09/Tips-Logo-700x150.jpg00Larry Jordanhttps://www.theinsidetips.com/wp-content/uploads/2019/09/Tips-Logo-700x150.jpgLarry Jordan2020-06-17 01:30:002020-06-13 10:31:15Tip #785: A Good Green-screen Tutorial
NewBlueFX provides effects with an emphasis on titles
A sample title from NewBlueFX Titler Pro.
NewBlueFX is not well known on the Mac, but they’ve been creating effects for Windows systems for years.
They are best known for titling and effects, with both Titler Pro and Titler Live. They currently support Premiere, Avid, Edius, VEGAS and their own application: NewBlue Titler Pro 2+.
If you want to see what’s possible, and how to create it, check out their tutorials page. NewBlueFX has a wealth of plugins, templates and tutorials to bring your titles to the next level.
RedGiant Product Quick Tips are a fast way to see what’s possible.
A RedGiant Product Quick Tip: Quick & Awesome Titles
Wondering how to create a specific effect? Or hoping to find a faster and easier way to create the effect you see in your imagination?
The team at RedGiant has published a ton of tutorials covering their products, along with usage tips for nine different host applications (Avid, DaVinci, Final Cut, and Premiere, to name four).
What’s especially helpful is their series of Quick Tips – short video demos that illustrate cool effects you can create without a lot of extra work using their tools.
Virtually all cameras only record partial images. Debayering is required to make them whole.
A camera sensor Bayer pattern (Image by en:User:Cburnett – Own work, CC BY-SA 3.0)
Debayering, or demosaicing, is a digital image process that reconstructs a complete image from the incomplete color samples recorded by virtually every video camera.
In this screen shot, notice that the camera records twice as many green pixels as either red or blue.
Wikipedia writes: Most modern digital cameras acquire images using a single image sensor overlaid with a color filter array (CFA). This has alternating red (R) and green (G) filters for odd rows and alternating green (G) and blue (B) filters for even rows. There are twice as many green filters as red or blue ones, catering to the human eye’s higher sensitivity to green light.
Since each pixel of the sensor is behind a color filter, the output is an array of pixel values, each indicating a raw intensity of one of the three filter colors. (The camera sensor itself only captures luminance data.) Thus, an algorithm is needed to estimate for each pixel the color levels for all color components, rather than a single component. Demosaicing is part of the processing required to render these grayscale images into a viewable image.
EXTRA CREDIT
Many modern digital cameras can also save images in a raw format allowing the user to demosaic them using software, rather than using the camera’s built-in firmware.
https://www.theinsidetips.com/wp-content/uploads/2019/09/Tips-Logo-700x150.jpg00Larry Jordanhttps://www.theinsidetips.com/wp-content/uploads/2019/09/Tips-Logo-700x150.jpgLarry Jordan2020-06-16 01:30:002020-06-13 10:25:39Tip #781: What is Debayering?
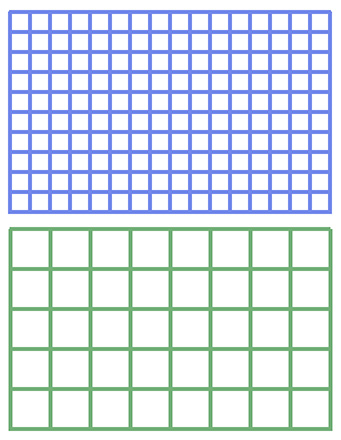
Proxy files are a tradeoff: faster performance with lower image quality.
The proxy file (green) has 1/4 the pixels of the source media, but with the same geometry. The pixels aren’t bigger, just fewer.
At its simplest, a proxy file is a “stand-in,” a proxy, for another file. However, when it comes to media, a proxy file is a smaller version of the original file.
This reduced size provides several benefits:
Smaller storage requirements
Slower bandwidth requirements
Ability to run on older or slower systems
However, while smaller files are a good thing, the real challenge is to create proxy files that provide a similar geometry to the source file, otherwise, any effects you create with them will need to be altered when you switch back to the source media.
For this reason, proxy files, by intent, are 1/4 the size of the source image but with the same aspect ratio as the source file. This decreases file size and bandwidth by 75%, but matches the geometry of the source.
The easiest way to create this is to divide each frame into a series of 4-pixel grids, then remove 3 of the 4 pixels in each grid. This means that a 4K (3840 x 2160) becomes 960 x 540. Often, many proxy files use 1280 x 720 because this is already a common video format.
While not providing the same image quality as the source media, the image is good enough to use for editing, until the time comes for final effects, color grading and output.
Please rate the helpfulness of this tip.
Click on a star to rate it!
https://www.theinsidetips.com/wp-content/uploads/2019/09/Tips-Logo-700x150.jpg00Larry Jordanhttps://www.theinsidetips.com/wp-content/uploads/2019/09/Tips-Logo-700x150.jpgLarry Jordan2020-06-16 01:30:002020-06-13 10:02:29Tip #780: What’s a Proxy File?
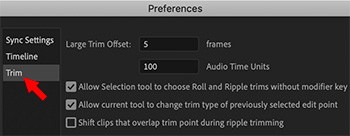
Trim preference settings in Premiere. Check the top box.
There is a trimming preference setting that can speed trimming your clips. However, it is off by default. Here’s what you need to know to turn this on.
Open Preferences > Trim and check the top box.
Allow Selection tool… This changes the cursor to the Ripple or Roll trimming tools depending upon where it is located relative to the edit point.
For example, hover the cursor near the Out and the cursor changes to a Ripple trim. Hover it over the edit point, and it automatically changes to a Roll trim. Near the In switches to the Ripple tool again.
When this option is not checked, hovering over an edit point displays the Trim In/Out tool, which is less helpful than Ripple and Roll.
Please rate the helpfulness of this tip.
Click on a star to rate it!
https://www.theinsidetips.com/wp-content/uploads/2019/09/Tips-Logo-700x150.jpg00Larry Jordanhttps://www.theinsidetips.com/wp-content/uploads/2019/09/Tips-Logo-700x150.jpgLarry Jordan2020-06-16 01:30:002020-06-13 10:21:55Tip #772: A Preference for Faster Trimming
These shortcuts can add new markers or change existing ones.
The Add and Set marker color options in the keyboard shortcuts panel.
A new feature in the May, 2020, update for Premiere is the ability to add keyboard shortcuts for marker colors. This means that we can easily color-code new or existing markers to help us organize our projects.
However, by default, these keyboard shortcuts are not assigned. Here’s how to enable them.
Open the Keyboard Shortcuts panel.
Search for “marker”
Scroll down to the Title section.
Add keyboard shortcuts for the colors you want to use.
Add [color] Marker. Changes the marker color and adds a marker with that color at the position of the timeline.
Set [color] Marker. Changes the marker color of an existing – and selected – marker.
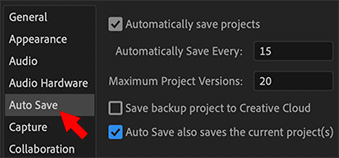
Save projects automatically whenever autosave creates a backup.
The Auto Save preference with automatic project saving enabled.
A hidden feature in Premiere is the ability to save projects whenever Auto Save creates backups. However, this feature is off by default. Here’s how to turn it on.
Open Preferences > Auto Save and check the bottom checkbox: “Auto Save also saves the current project(s).”
Now, when Premiere creates a backup of your current project, it will also save that project.
EXTRA CREDIT
Auto Save is designed to save every 15 minutes (or whatever time you’ve entered for “Automatically Save Every”). However, Auto Save does not run if nothing has changed in the project during that time.
Keep in mind that this should NOT substitute for you saving your work. This feature simply makes sure that, if a crash occurs, you don’t lose everything. For this reason, don’t rely exclusively on Premiere to save your work. Cmd/Cntrl + S is still your best friend.
We may request cookies to be set on your device. We use cookies to let us know when you visit our websites, how you interact with us, to enrich your user experience, and to customize your relationship with our website.
Click on the different category headings to find out more. You can also change some of your preferences. Note that blocking some types of cookies may impact your experience on our websites and the services we are able to offer.
Essential Website Cookies
These cookies are strictly necessary to provide you with services available through our website and to use some of its features.
Because these cookies are strictly necessary to deliver the website, refuseing them will have impact how our site functions. You always can block or delete cookies by changing your browser settings and force blocking all cookies on this website. But this will always prompt you to accept/refuse cookies when revisiting our site.
We fully respect if you want to refuse cookies but to avoid asking you again and again kindly allow us to store a cookie for that. You are free to opt out any time or opt in for other cookies to get a better experience. If you refuse cookies we will remove all set cookies in our domain.
We provide you with a list of stored cookies on your computer in our domain so you can check what we stored. Due to security reasons we are not able to show or modify cookies from other domains. You can check these in your browser security settings.
Google Analytics Cookies
These cookies collect information that is used either in aggregate form to help us understand how our website is being used or how effective our marketing campaigns are, or to help us customize our website and application for you in order to enhance your experience.
If you do not want that we track your visit to our site you can disable tracking in your browser here:
Other external services
We also use different external services like Google Webfonts, Google Maps, and external Video providers. Since these providers may collect personal data like your IP address we allow you to block them here. Please be aware that this might heavily reduce the functionality and appearance of our site. Changes will take effect once you reload the page.
Google Webfont Settings:
Google Map Settings:
Google reCaptcha Settings:
Vimeo and Youtube video embeds:
Other cookies
The following cookies are also needed - You can choose if you want to allow them:
Privacy Policy
You can read about our cookies and privacy settings in detail on our Privacy Policy Page.