… for Codecs & Media

Tip #758: AME: New ProRes Encode Presets

Larry Jordan – LarryJordan.com

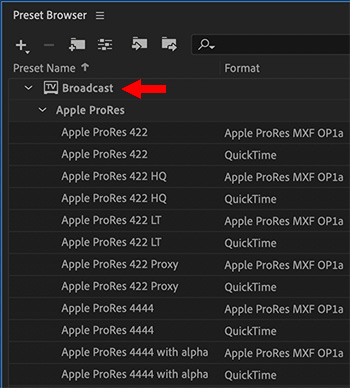
The new ProRes encoding settings in AME for QuickTime and MXF OP1a.

Topic $TipTopic

The May, 2020, update to Adobe Media Encoder now includes twelve new ProRes compression presets for both Windows and Mac versions. Presets are located in the Broadcast category and include:

  • Apple ProRes Proxy
  • Apple ProRes LT
  • Apple ProRes 422
  • Apple ProRes 422 HQ
  • Apple ProRes 4444 (with and without an alpha channel)

The only format missing is ProRes 4444 XQ, which is a high-end origination format, so it isn’t surprising that AME doesn’t include it.

NOTE: ProRes RAW can only be recorded by a camera, it isn’t a delivery format.

The settings support two wrapper formats:

  • QuickTime
  • MXF OP1a

By default, each setting matches the frame size and frame rate of the source media, though this can be modified when the preset is applied.


Please rate the helpfulness of this tip.

Click on a star to rate it!

… for Codecs & Media

Tip #756: AME: New Adobe Stock Encoding Presets

Larry Jordan – LarryJordan.com

Six new ProRes presets for Adobe Stock media.

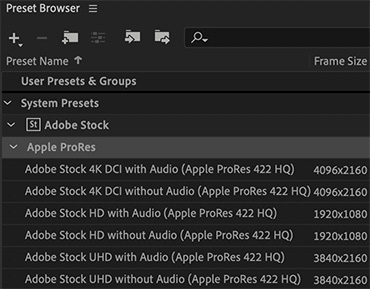
The new Adobe Stock encoding presets for Adobe Media Encoder.

Topic $TipTopic

Adobe Media Encoder has six new Adobe Stock encoding presets in the May, 2020 update. These six presets include video-only, as well as audio and video settings for three frame sizes:

  • HD (1920 x 1080 pixels)
  • UHD (3840 x 2160 pixels)
  • 4K (4096×2160 pixels)

All three use ProRes 422 HQ, and encode into a Rec. 709 color space QuickTime movie using frame rates that match the source media.


Please rate the helpfulness of this tip.

Click on a star to rate it!

… for Adobe Premiere Pro CC

Tip #755: What the Creative Looks Adjust

Larry Jordan – LarryJordan.com

Looks are fast, but the settings provide more flexibility.

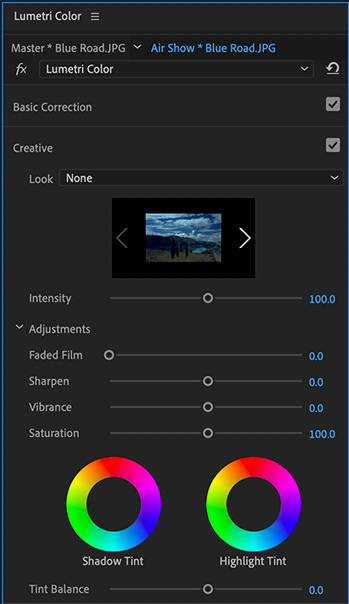
The Creative Looks section of the Lumetri Color panel.

Topic $TipTopic

The Looks section of the Lumetri Color panel provides quick settings to adjust the creative look of a clip. Here’s what the different options do.

  • Faded Film. Applies a faded film effect to your video. Drag the sliders to the right or left until you achieve the desired vintage look.
  • Sharpen. Adjusts edge definition to create a sharper-looking video. Drag the slider to the right to increase the edge definition, and drag to the left to decrease the edge definition. An increased edge definition makes the details in the video more pronounced. So, make sure that you don’t sharpen the edges too much that it looks unnatural.

NOTE: To turn off sharpening, set the slider to zero (0).

  • Vibrance. Adjusts the saturation so that clipping is minimized as colors approach full saturation. This setting changes the saturation of all lower-saturated colors with less effect on the higher-saturated colors. Vibrance also prevents skin tones from becoming oversaturated.
  • Saturation. Adjusts the saturation of all colors in the clip equally from 0 (monochrome) to 200 (double the saturation).
  • Tint wheels. Adjust the tint values in the shadows and highlights using the Shadow Tint and Highlight Tint wheels. Wheels with empty centers indicate that nothing has been applied. To apply the tint, click in the middle of the wheel and drag the cursor to fill in the wheels.
  • Tint Balance. Balances out any excess magenta or green in the clip.

EXTRA CREDIT

My recommendation, if you need to make a saturation adjustment, is to use Vibrance, rather than Saturation, to prevent chroma clipping.


Please rate the helpfulness of this tip.

Click on a star to rate it!

… for Adobe Premiere Pro CC

Tip #754: Set Grayscale Values FAST!

Larry Jordan – LarryJordan.com

One Button Access to Better Grayscale

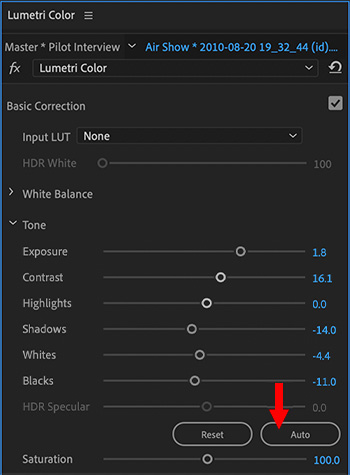
At the bottom of Basic Correction, click Auto to set overall grayscale tonal values.

Topic $TipTopic

The most frequent color adjustment we need to make to a clip isn’t color at all, but grayscale. Here’s a one-button trick to set grayscale values faster and better in Premiere Pro.

  • Open the Lumetri Color panel, then click Basic Correction.
  • At the bottom of that section is Auto.
  • When you click Auto, Premiere Pro sets the sliders to maximize the tonal scale and minimize highlight and shadow clipping.

Clicking this sets all the parameters in Tone automatically. You can then tweak each of them to get precisely the look you want. All changed settings are adjustable.


Please rate the helpfulness of this tip.

Click on a star to rate it!

… for Adobe Premiere Pro CC

Tip #753: Basic Color Correction

Larry Jordan – LarryJordan.com

These controls provide detailed control over the grayscale values in your image.

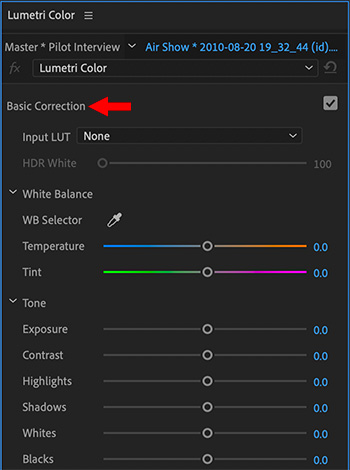
The Basic Color Correction controls in the Lumetri Color panel.

Topic $TipTopic

Using controls in the Basic Correction section, you can correct video that’s too dark or too light, and adjust both the hue (color or chroma) and luminance (exposure and contrast) in your clip. Here’s how the Basic Color Correction controls work.

WHITE BALANCE

  • White Balance. The white balance in a video reflects the lighting conditions under which the video was shot. Adjusting the white balance can effectively improve the ambient color of your video. Adjust the white balance in your clip by changing the Temperature and Tint properties. Use the slider controls to fine-tune the values until you achieve the desired color balance.
  • Temperature. Fine-tunes the white balance using a color temperature scale. Move the slider to the left to make the video appear cooler, and to the right for warmer colors.
  • Tint. Fine-tunes the white balance to compensate for a green or magenta tint. To add green tint to the video, move the slider to the left (negative values), and to add magenta, move it to the right (positive values).

TONE

Adjust the tonal scale of the video clip using the different tone controls.

  • Exposure. Sets the brightness of the video clip. Moving the Exposure slider to the right increases tonal values and expands highlights, and moving the slider to the left decreases tonal values and expands shadows. Adjust the slider until the video looks good with the desired brightness.
  • Contrast. Increases or decreases contrast. Adjusting the contrast mainly affects the midtones of color in your video. When you increase contrast, the middle-to-dark areas become darker. Similarly, decreasing the contrast makes the middle-to-light areas lighter.
  • Highlights. Adjusts bright areas. Drag the slider to the left to darken highlights. Drag to the right to brighten highlights while minimizing clipping.
  • Shadows. Adjusts dark areas. Drag the slider to the left to darken shadows while minimizing clipping. Drag to the right to brighten shadows and recover shadow details.
  • Whites. Adjusts white clipping. Drag the slider to the left to reduce clipping in highlights. Drag to the right to increase highlight clipping.
  • Blacks. Adjusts black clipping. Drag the slider to the left to increase black clipping, making more shadows pure black. Drag to the right to reduce shadow clipping.

Please rate the helpfulness of this tip.

Click on a star to rate it!

… for Apple Final Cut Pro X

Tip #749: Introduction to Clip Analysis

Larry Jordan – LarryJordan.com

Finding people isn’t always reliable, but worth trying.

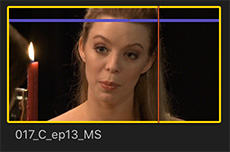
Areas with clip analysis keywords are indicated by a purple line in the browser.

Topic $TipTopic

The following text is from the Apple Final Cut Pro X Help files. The analysis options are located in the Media Import window, or the Modify menu for clips already imported into the browser.

You can have Final Cut Pro analyze your media (video, audio, and still images) and automatically correct common problems. For example, you can balance color and remove excess hum or loudness.

You can also analyze clips to identify their contents. Analysis can detect the number of people in a shot and identify whether the shot is a close-up, medium, or wide shot. This is helpful if you need to quickly find a certain type of clip while viewing footage or editing a project.

You can analyze media during import or after you import the media into Final Cut Pro. You can also set Final Cut Pro to automatically analyze clips you drag directly to the Final Cut Pro timeline from the Finder.

After certain types of analysis, keywords are automatically added to clips or clip ranges based on the results of the analysis. For example, a clip showing several people might have the Group and Medium Shot keywords assigned. In the browser, clips with analysis keywords have a purple line at the top. (Clips with keywords you add manually or keywords imported from Finder tags or folder names have a blue line at the top.)

EXTRA CREDIT


Please rate the helpfulness of this tip.

Click on a star to rate it!

… for Apple Final Cut Pro X

Tip #748: Audio Analysis Options

Larry Jordan – LarryJordan.com

Audio analysis runs in the background and, generally, is very fast.

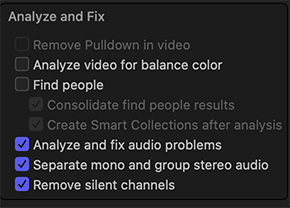
Audio analysis options in the Media Import window of Final Cut Pro X

Topic $TipTopic

The following text is from the Apple Final Cut Pro X Help files. The analysis options are located in the Media Import window, or the Modify menu for clips already imported into the browser.

NOTE: Analysis runs in the background and how long it takes is dependent upon the length of your media and the speed of your CPU.

Final Cut Pro provides automatic analysis options that can fix common audio problems, analyze and group audio channels, and remove silent channels. You can analyze audio during import, or analyze video clips with audio issues in the browser or in the timeline.

Final Cut Pro provides these audio analysis options:

  • Analyze and fix audio problems: Analyzes the audio for hum, noise, and loudness. Final Cut Pro automatically fixes problems that are considered severe (marked in red) and flags problems that are considered moderate (marked in yellow).
  • Separate mono and group stereo audio: Audio channels are analyzed and grouped as dual mono or stereo, depending on the results of the analysis. Automatically corrected audio channels are marked as Autoselected.
  • Remove silent channels: Audio channels are analyzed, and silent channels are removed. Clips that have had channels removed are marked as Autoselected.

When you drag a media file from the Finder to a Final Cut Pro event or the timeline, the import begins automatically, without displaying a window of import options. You can set automatic import options in the Import pane of Final Cut Pro preferences.


Please rate the helpfulness of this tip.

Click on a star to rate it!

… for Apple Final Cut Pro X

Tip #747: Video Analysis Options

Larry Jordan – LarryJordan.com

Analysis will take time, but it also runs in the background.

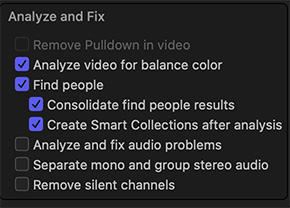
Video analysis options in the Media Import window of Final Cut Pro X

Topic $TipTopic

The following text is from the Apple Final Cut Pro X Help files. The analysis options are located in the Media Import window, or the Modify menu for clips already imported into the browser.

NOTE: Analysis runs in the background and how long it takes is dependent upon the length of your media and the speed of your CPU.

Final Cut Pro provides video and still-image analysis options that can automatically balance color in video and detect people and shot angles in video or still images. You can analyze video during import, or analyze video clips in the browser after import. Based on the results of the analysis, analysis keywords are added to clips or clip ranges.

Final Cut Pro provides these video and still-image analysis options:

  • Analyze for balance color: Analyzes video clips to detect color balance and contrast. Color is automatically balanced when you add the clip to the timeline. You can turn automatic color adjustments on and off at any time.
  • Remove pulldown: Analyzes video clips and removes pulldown patterns.
    (This option is available only when importing from a tape-based camera or device; i.e. interlaced media.)
  • Find people: Analyzes video clips and still images for the number of people present and shot types. After analysis, any of the following keywords are added to the clips or clip ranges: One Person, Two Persons, Group, Close Up Shot, Medium Shot, and Wide Shot.

NOTE: To easily locate clips with “find people” analysis keywords, select the “Create Smart Collections after analysis” checkbox.

  • Consolidate find people results: Consolidates all of the “find people” analysis keywords into one shot type keyword and one people keyword for every 2-minute segment of video. The shot type keyword chosen is the one for the widest shot type, and the people keyword chosen is the one representing the most people. For example, if a video segment contains Medium Shot, Wide Shot, One Person, and Group keywords, the segment’s analysis keywords are reduced to Wide Shot and Group during consolidation.
  • Create Smart Collections after analysis: Creates a Smart Collection for each keyword applied when video clips and still images are analyzed for the presence of people. The Smart Collections are listed alphabetically in a People folder inside the event in the Libraries sidebar.

When you drag a media file from the Finder to a Final Cut Pro event or the timeline, the import begins automatically, without displaying a window of import options. You can set automatic import options in the Import pane of Final Cut Pro preferences.


Please rate the helpfulness of this tip.

Click on a star to rate it!

… for Random Weirdness

Tip #743: 3-Step Pricing Formula for Videographers

Larry Jordan – LarryJordan.com

Pricing is hard – but it isn’t cookie-cutter either.

Topic $TipTopic

This article first appeared in MotionArray.com. This is an excerpt.

Ask any freelancer what part of their job they hate the most and chances are a good chunk of them will point to the inescapable chore that is pricing. Pricing your own services is awkward, confronting, and much like breaking up with a partner, you just wish someone else could just step in and do the dirty work for you.

But luckily for all you free agents out there, we have a quick little formula that’ll help you tackle this supremely uncomfortable task so you can quit stressing and get back to doing what you love most—making video magic!

As you’ve probably realized by now, no two video productions are the same, which means the fees you charge for them shouldn’t be either. Tailoring your prices to each project is key.

  1. Calculate Your Outgoing Expenses. The first thing you’re going to want to do is make a list of all the expenses you’re going to incur throughout the course of your project. This includes everything from the planning phase all the way through to post-production. We’re talking equipment rental, location hire, set props, actors and crew personnel, transportation costs, stock music licenses, the whole kit and kaboodle.

    Now repeat after me: All of these expenses are things that my client and, not me—repeat: NOT ME—will be covering.

  2. Calculate Your Time and Effort. Next, you’ll need to make a list of all the tasks you personally will need to undertake to see the project through to completion and how long you estimate each one to take.

    This will include any client meetings and phone calls, scripting or storyboarding, logistical planning, the total number of hours spent on set, as well as any post-production work you’ll be required to do or oversee.

  3. Decide How Much Profit You Want to Make. Lastly, you’ll need to decide how much money you’d like to walk away from the project with. To help you do this, go back to step two and take into account all of the time and effort you estimate you’ll be putting into the project and try and place a figure on what you think it’s worth.

Once you’ve decided what you’d like your profit to be, add it to your total sum of project expenses and voilà: there you have your complete project fee!


Please rate the helpfulness of this tip.

Click on a star to rate it!

… for Random Weirdness

Tip #742: The Best Advice to Keep Your Cool

Larry Jordan – LarryJordan.com

Don’t argue – just address the note.

Topic $TipTopic

This article, written by Todd Blankenship, first appeared in PremiumBeat.com. This is an excerpt.

NOTE: This is an OUTSTANDING article on dealing with clients. Click the link above to read all of it.

It’s funny how a simple conversation can change everything. A colleague or a friend says something that just sticks. You probably don’t realize the power of the moment while you’re in the moment, but then, even years later, their words pop into your head when you’re driving or working or in the shower.

I was working on a project with a producer from L.A. who had produced a ton of actual television shows. He had definitely earned the right to tell me what to do. Alas, the young and obnoxious creative that I was at the time, I argued with him. I didn’t want to make his changes. I thought my ideas were the only possible way things should go. I thought his input would absolutely ruin the project. It was the wrong call.

I pleaded my case. I explained to him why his ideas wouldn’t work and how my way was the better way. Instead of firing me on the spot, he said three simple words: “Address the note.”

I stared at him, wondering what he meant. He continued:

Just address the note — that’s all you need to do. You don’t have to do it exactly as I said it, just make me happy. I’m not a cinematographer, I’m a producer — you’ll know better what to do, specifically. My specific way may not be the best, but now you know something that’s bothering me as a producer and all you gotta do is find a way to address it and make me happy. Just address the note.

Wow.

Please rate the helpfulness of this tip.

Click on a star to rate it!