… for Codecs & Media

Tip #883: Don’t Turn Your Hard Disk Into a Camera

Larry Jordan – LarryJordan.com

Don’t panic. This problem is easy to fix. Just pay attention.

Image courtesy of pexels.com.

Topic $TipTopic

Warning! Don’t turn your hard disk into a camera. I was reminded of this today with an email from Jon G. who wrote:

“Sorry to bother as this is probably obvious but it surprised me at first….

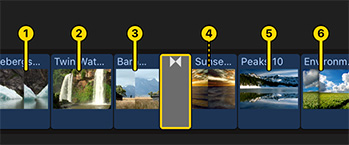
“When I went to import from an external drive, FCP saw the entire drive as a camera, not an external device! And started to load all 5,000 plus items individually, not good.”

Agreed. The first time you see this, it can be VERY scary!

This happens when you copy the folders from a camera card directly to your hard disk without putting them into their own containing folder.

If this happens to you, create a new folder on your hard disk and move all the camera card folders into that separate folder.

NOTE: To make sure you find them all, mount a camera card to your computer and use that as a guide to indicate which folders you need to find and move.

Here’s a tutorial from my website that describes this process in more detail.


Please rate the helpfulness of this tip.

Click on a star to rate it!

… for Codecs & Media

Tip #882: What is Resolution?

Larry Jordan – LarryJordan.com

DPI is irrelevant for digital media. The key setting is total pixels across & down.

The New Image menu in Photoshop.

Topic $TipTopic

When you create a new image in Photoshop, one of the parameters you need to set is Resolution. But, is resolution even relevant for digital media?

The short answer is: No.

Resolution is a print term that defines – for a fixed size image – how many pixels fit into a given space.

Digital media is the opposite. The number of pixels is fixed, but the size of the shape – the monitor – varies widely.

When creating images for the web, we have standardized on a resolution setting of 72. NOT because this is an accurate setting, it isn’t. Rather it’s to remind us to look only at total pixels across by total pixels down.

These are the pixels that will be spread to fit whatever sized monitor / frame they are displayed in.

EXTRA CREDIT

When creating images for the web or video, RGB 8-bit is the best and most compatible choice.


Please rate the helpfulness of this tip.

Click on a star to rate it!

… for Adobe Premiere Pro CC

Tip #875: The Slip Tool Simplifies B-roll

Larry Jordan – LarryJordan.com

The Slip tool makes selecting the best B-roll fast and easy.

The Program Monitor display when the Slip tool is in operation.

Topic $TipTopic

B-roll, which are images that reinforce what the speaker is talking about, are essential to most documentary and feature films. While the person on-camera describes a situation, B-roll shows what they are talking about.

Becasue each B-roll image needs to fit within the very specific time when the speaker is talking about it, our challenge is to quickly find the best possible section of each B-roll shot.

That’s where the Slip tool can help.

  • Select the Slip tool from the Tool palette (Shortcut: Y). The Slip tool allows you to change the content of a shot, without altering its duration or position.
  • Click in the middle of a B-roll clip in the timeline and drag.

As you drag (see screen shot), the Program monitor shows:

  • Last frame of the preceding shot (top left)
  • First frame of the following shot (top right)
  • First frame, and timecode, of the slipped clip (left)
  • Last frame, and timecode, of the slipped clip (right)

I use this tool all the time to get the best possible section of my B-roll to fit in the time that I have.


Please rate the helpfulness of this tip.

Click on a star to rate it!

… for Adobe Premiere Pro CC

Tip #874: A Faster Way to Add “Presence”

Larry Jordan – LarryJordan.com

Most sound effects are subtle. This setting helps sound reinforce the image.

The Creative > Reverb settings for Ambience and Sound Effects.

Topic $TipTopic

I was playing with the Essential Sound panel, looking for an idea to write about, when I discovered this: Reverb. This alters the reflections, or reverb, of a clip to more accurately sound like it is playing in a specific space.

NOTE: This effect only applies to clips that are tagged as Sound Effects or Ambience.

  • Switch to the Audio workspace and display the Essential Sound panel.
  • Tag a timeline clip as either Sound Effects (a short duration sound) or Ambience (a longer duration sound).
  • Click the word “Creative” to display this section of the panel.
  • Check the checkbox next to Creative to enable it.
  • Click the Preset menu to choose the style of reverb/reflectance that best matches the sound to the picture.
  • Vary the Amount slider until the effect sounds the best.

This is a fun effect to play with.


Please rate the helpfulness of this tip.

Click on a star to rate it!

… for Adobe Premiere Pro CC

Tip #873: The Magic of Auto-Ducking

Larry Jordan – LarryJordan.com

Auto-Ducking saves time with the mix, while still allowing changes at any time.

This composite shows the Ducking settings and the results in a music clip.

Topic $TipTopic

Auto-ducking is the process of automatically creating keyframes to reduce the level of a musical background when someone is talking. This is a relatively new feature in Premiere and the good news is that this creates settings which are infinitely adjustable, so if you don’t like the results, they are easy to change.

Here’s how this works.

  • Switch to the Audio workspace.
  • Open the sequence you want to adjust into the Timeline.
  • Select all dialog clips, then click Dialogue in the Essential Sound panel to assign the Tag.

NOTE: If you don’t see this button, click the Edit text button near the top of the panel.

  • Select all the music clips in the Timeline, then click the Music tag.
  • Once you’ve assigned both dialog and music Tags, select the music clip you want to adjust.
  • Check the Ducking checkbox to enable the feature. Leave the default settings as is until you see what this does.
  • Click Generate Keyframes and see how Premiere automatically adds keyframes to reduce the volume of the music whenever dialog is going on above it.

EXTRA CREDIT

Review the Premiere Help files to learn the different options for this feature.


Please rate the helpfulness of this tip.

Click on a star to rate it!

… for Apple Final Cut Pro X

Tip #872: The Strange Case of the Yellow Dots

Larry Jordan – LarryJordan.com

These yellow “drop zones” simplify customizing complex transitions.

The Pan Far Right transition with drop zones for clips before and after it.

Topic $TipTopic

I remembered this tip while researching a recent webinar covering the basics of editing in Final Cut Pro X.

Most of the time, when you add a transition to a clip, all you need to do is adjust the timing and, maybe, tweak the settings in the Inspector. But, in a few cases, strange yellow dots appear (see screen shot).

These yellow dots are drop zones, placeholders for images that will be supplied by the clips in the timeline. As the transition progresses, these different images appear in the animated background.

NOTE: These yellow dots provide still images, the only images that move are the two on either side of the transition itself.

To reposition a yellow dot, drag it to the frame you want displayed. You can even move them to the other side of the transition, if that helps.

EXTRA CREDIT

You’ll find most of these multi-image transitions in the Stylized category.

NOTE: If you haven’t looked at the transitions in Replicators/Clones and Stylized recently, it is worth your time to review these again.


Please rate the helpfulness of this tip.

Click on a star to rate it!

… for Apple Final Cut Pro X

Tip #871: A Faster Way to Change Durations

Larry Jordan – LarryJordan.com

I use this technique in virtually every project – especially for transitions.

Setting a duration in the timecode display.

Topic $TipTopic

I illustrated this tip while presenting a recent webinar covering the basics of editing in Final Cut Pro X.

We all know that we can change the duration of a clip, title or transition by grabbing an edge and dragging. But, there is a faster way – using timecode.

To use this technique:

  • Select a clip, group of clips, transition, title or other timeline element.
  • Type Control + D. This automatically opens and selects the Duration field in the Timecode window.
  • Type the duration you want to enter, without entering any punctuation.

Final Cut will automatically calculate the correct time based upon the frame rate of the project. For example, if you have a 30 fps project and type:

  • 30 – Final Cut enters: 1:00
  • 120 – Final Cut enters: 1:20
  • 45 – Final Cut enters: 1:15
  • 325 – Final Cut enters 3;25
  • 1234567 – Final Cut enters: 1:23:47:07 (Um, that one I had to check…)

Please rate the helpfulness of this tip.

Click on a star to rate it!

… for Apple Final Cut Pro X

Tip #870: Change the Look of a Dissolve

Larry Jordan – LarryJordan.com

Add looks to have dissolves contribute to the story you are telling.

The Look options for the default cross-dissolve transition in Final Cut.

Topic $TipTopic

I discovered this tip while researching a recent webinar covering the basics of editing in Final Cut Pro X. There are two hidden settings in every cross-dissolve that will change the look of a transition.

  • Apply the transition to an edit point.

NOTE: Since this is the default transition, the easiest way to add a dissolve is to select the edit point, then type Cmd + T.

  • Select the transition, then go the Inspector (see screen shot). There, you’ll find a dozen different settings in the Look menu that can be applied to any cross-dissolve. Experiment with these to see what they do.

NOTE: Inspector settings vary by transition.

The other option is Ease. This allows you to change the speed of entering and exiting a dissolve based upon the Ease Amount.

  • In. Affects the speed at the start of the transition.
  • Out. Affects the speed at the end of the transition
  • In & Out. Affects both the start and end of the transition.

NOTE: These speed changes are subtle and are only visible for longer transitions; say, two seconds or more.


Please rate the helpfulness of this tip.

Click on a star to rate it!

… for Random Weirdness

Tip #864: 5 Things to Build Trust with Clients

Larry Jordan – LarryJordan.com

Success as an editor requires two key things: Trust and Comfort.

Zack Arnold. (Image courtesy of Frame.io.)

Topic $TipTopic

Award-winning editor, Zack Arnold, writes in a blog published by Frame.io on how to have a long-standing career in media. Here’s an excerpt.

It isn’t the software. We are not keyboard monkeys, we are storytellers. Our ability to tell compelling and engaging stories and make an audience feel something supersedes our knowledge of any specific piece of software.

Clients care if you can tell compelling stories, move people emotionally, and deliver on deadline. And most importantly, they care whether or not they can work with you in a dark room for 60 hours a week (without you murdering each other).

If you’re interested in becoming an editor who is considered great in the room, there are only two things you have to focus on: Trust and comfort. To get there, consider these five points.

  1. Create a safe environment, i.e. a “No Chaos Zone”
  2. Accept that everyone has their own process, and set clear expectations on Day 1
  3. Embrace and experiment with new ideas (no matter how stupid)
  4. Become a ninja at finding “The note behind the note”
  5. Become so fast you can finish people’s sentences (and find any shot instantly)

Zack’s entire blog is an outstanding read. Read it all here.


Please rate the helpfulness of this tip.

Click on a star to rate it!

… for Random Weirdness

Tip #862: How the Lockdown Affects Production

Larry Jordan – LarryJordan.com

This article describes ways to continue production during lockdown.

“American Idol” got creative to finish its 18th season.

Topic $TipTopic

The folks at TV Technology released an article on “How Did the Lockdown Impact Video Production Workflows.” This is an excerpt.

Joseph Hopkins writes:

A number of major video productions have managed to continue successfully despite having their workflows disrupted by COVID-19 and the restrictions lockdown measures enforce. One of the main reasons some producers endure is because their teams have been able to adapt to working in the “new normal” by utilizing a combination of emerging technologies and time-tested IP transport solutions.

Yet, these are not simply band-aid solutions, but instead are examples of an acceleration in the evolution of production workflows taking place across the media and sports industries. This transition to IP infrastructure has exposed new capabilities not available through traditional satellite and is proving to be a framework on which to build solutions that will overcome the challenges facing the media industry today, and in the future.

Here’s the link to the full article.


Please rate the helpfulness of this tip.

Click on a star to rate it!