… for Adobe Premiere Pro CC

Tip #857: Customize Your Playback Controls

Larry Jordan – LarryJordan.com

Customizing playback controls simplifies proxy workflows, creating still frames and other tasks.
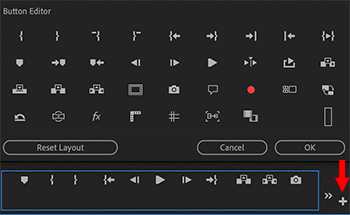
The Button Editor panel for the Program Monitor in Premiere Pro.

Topic $TipTopic

One of Adobe’s goals over the last several releases was to simplify the Premiere interface. (Because, truthfully, it was getting pretty darn crowded…) This simplification took the form of removing buttons. But… what if you need one of those buttons back? Not to worry – here’s how.

  • In the Program Monitor or Source Monitor, click the small plus sign in the lower-right corner.
  • This displays the Button Editor. (See screen shot.)
  • Hover over a button to read a description of what the button does.
  • To add a button to the control panel, drag it from the upper section into the blue controls box. For example, I added the Proxy button to the controls box to make it easy to toggle between Proxy and High-quality view.
  • To remove a controls button, drag it out of the blue box.
  • To reset the controls box back to factory defaults, click the Reset Layout button.
  • Then, when you are done, click OK.
Please rate the helpfulness of this tip.

Click on a star to rate it!

… for Adobe Premiere Pro CC

Tip #856: Create a New Sequence Preset – FAST!

Larry Jordan – LarryJordan.com

Sequence presets are used to conform clips to match a standard.

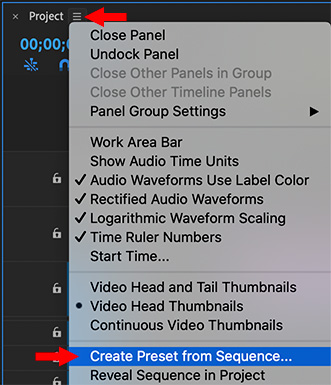
Click the “stacked pancakes” icon to reveal a hidden timeline menu.

Topic $TipTopic

The problem with creating sequence presets is that you need to know a LOT of technical specs to accurately create one. Wouldn’t it be great if there was an easier way? There is! Here’s how.

  • Create a sequence by dragging a clip with the specs you need – codec, frame size, frame rate and so on – onto the “folded paper” icon in the low-right corner of the Project panel. Most of us do this all the time.
  • Go to Sequence > Sequence Settings and verify those are the specs you need. (This step isn’t required, but it’s a good idea to double-check.)
  • Then, click the “stacked pancakes” icon next to the Project name in the timeline (see screen shot) and select Create Preset from Sequence.
  • The Sequence Preset dialog window opens, allowing you to name this new setting and add a description.
  • Click OK to save it.

Done.

EXTRA CREDIT

The benefit to creating a sequence preset is that when you add clips to the sequence that don’t match the setting, they will automatically be “conformed” or transcoded to math the sequence settings.

This solves the problem of not having a clip with the right specs to initially configure a sequence.


Please rate the helpfulness of this tip.

Click on a star to rate it!

… for Adobe Premiere Pro CC

Tip #853: Hidden Access to Photoshop Layers

Larry Jordan – LarryJordan.com

Merge All Layers is easiest, Sequence, though, tends to be more flexible.

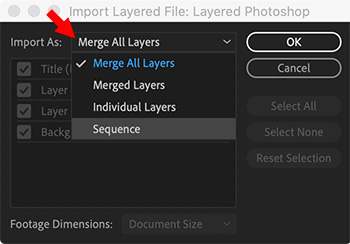
The Import Layered File window in Premiere.

Topic $TipTopic

When importing Photoshop images into Premiere, you are given four choices. Here’s a description of what each of these mean.

At the top of the Import Layered File window (which is most often used for importing Photoshop documents) is a menu with four choices:

  • Merge All Layers. This converts the separate layers in the document into a single, flattened PSD image. This is a good choice when you need to be sure that the entire image is displayed.
  • Merge Layers. Like Merge All Layers, this creates a single, flattened PSD image, but you chose which layers will be combined. This is a good choice when multiple versions are stored in the same image.
  • NOTE: Most Photoshop images contain dozens of layers. The buttons on the right simplify checking, unchecking or resetting the status of all the layers in the image.

  • Individual Layers. This imports each layer as a separate image into a bin containing one clip for each source layer. This is a good choice when there is no relationship between the layers and you need to manipulate each layer separately.
  • NOTE: When you import one layer as a single clip, its name in the Project panel consists of the layer name followed by the original filename.

  • Sequence. This imports the image as a sequence where each Photoshop layer is a separate layer in the sequence and stored in its own bin. This is a good choice when you want to adjust timing or animation of each layer separately, while still keeping them together in a single place.
  • NOTE: You enable or disable the display of a layer by checking the appropriate box in this window.

EXTRA CREDIT

Once an image is flattened, it can’t be “un-flattened.” Your only alternative to regain control over individual layers is to reimport it.

Here’s a tutorial with more details.


Please rate the helpfulness of this tip.

Click on a star to rate it!

… for Apple Final Cut Pro X

Tip #855: Apply Common Keywords Faster!

Larry Jordan – LarryJordan.com

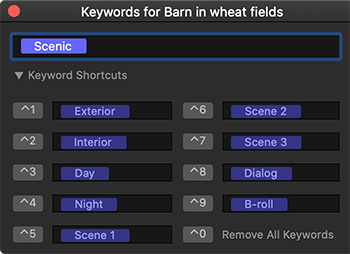
You can create up to nine common keywords, each with its own keyboard shortcut.

The floating keyword palette, with common keywords displayed.

Topic $TipTopic There’s a hidden feature in the floating Keywords palette that makes applying keywords to selected clips, or ranges, much faster. Here’s how it works.

  • Type Cmd + K to display the floating Keyword panel.
  • Twirl down the small right-pointing arrow next to the words “Keyword Shortcuts.” This displays up to nine fields that you can fill with keywords you plan to use frequently. (See screen shot.)

NOTE: A Keyword can be more than one word, but they work best when phrases are kept short.

  • To enter a keyword, simply type it into an empty field.
  • To apply a keyword, type the keyboard shortcut listed next to it. For example, Control + 1 for “Exterior”
  • To remove a keyword from either a clip or the common keyword list, select it and press Delete.
  • To remove all common keywords, type Control + 0.

EXTRA CREDIT

Remember, to apply keywords you first need to select the clip, clips, or clip range in the Browser.

You can only have nine keywords with keyboard shortcuts, but you can change these keywords at anytime without affecting any keywords already applied to clips.


Please rate the helpfulness of this tip.

Click on a star to rate it!

… for Apple Final Cut Pro X

Tip #854: A Hidden Search Feature

Larry Jordan – LarryJordan.com

Notes can be entered in the browser or the Info Inspector. (The Inspector is easier.)

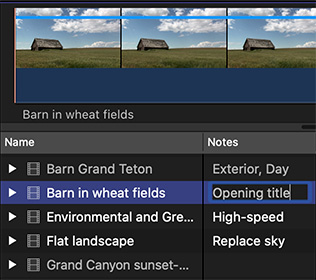
The Browser Notes field. (It’s position is shifted left by several columns.)

Topic $TipTopic

There’s a hidden feature in Final Cut that can make your searches more effective. However, it’s hidden in plain sight.

When you use the Search box at the top of the browser to look for a clip, it is actually searching in two places: the file name and the Notes field. By default, the Notes field is empty but you can add anything you want. Here’s how:

  • Switch the browser to List view (Shortcut: Option + Cmd + 2).
  • Scroll right until you find the Notes column.

NOTE: Columns can be moved left or right by dragging the column header. Reveal columns by Control-clicking any column header.

  • Click once in the Notes field. Wait a few seconds.
  • Click once, again, in the Notes field. Wait a few seconds.
  • The Notes field will open for editing. Enter any relevant text pertaining to that clip.

EXTRA CREDIT

Many asset management systems allow you to add notes to a clip before importing it into Final Cut.

I find it faster to select a clip, then go to the Info Inspector and enter directly into the Notes field there. This bypasses all the waiting for the Notes field to open.


Please rate the helpfulness of this tip.

Click on a star to rate it!

… for Apple Final Cut Pro X

Tip #850: A Quick Way to View Photoshop Layers

Larry Jordan – LarryJordan.com

Double-click a Photoshop image

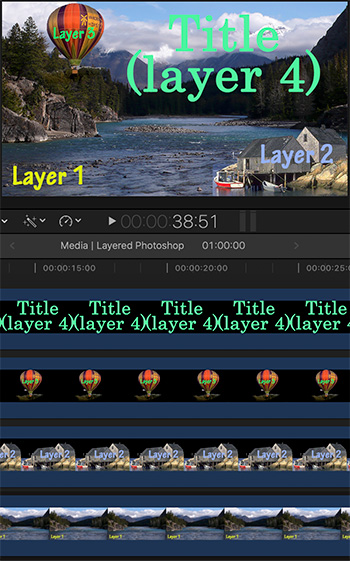
A Photoshop image (top), with it’s layers displayed in the timeline (bottom).

Topic $TipTopic

One of the benefits to using Photoshop images in your projects is that FCP X allows you to access each layer in the Photoshop document separately. But how?

Double-click it.

Whether the image is in the browser or the timeline, the Photoshop image will open in a special section of the timeline, where each layer is displayed.

At this point you can:

  • Hide a layer by selecting it and typing V
  • Animate a layer, for example, to have it slide into the frame
  • Change the timing of when a layer appears by trimming an edge
  • Add transitions to a layer; for example to have a layer fade in at a specific time
  • Delete a layer by selecting it and pressing Delete
  • Scale a layer
  • Reposition a layer

The possibilities are endless.

EXTRA CREDIT

If you adjust the clip in the browser, it will affect every iteration of that clip that is edited into the timeline.

If you adjust a clip in the timeline, it will affect only that iteration of the clip.

To “close” a Photoshop image opened into the timeline, open a different project into the timeline.


Please rate the helpfulness of this tip.

Click on a star to rate it!

… for Random Weirdness

Tip #846: 8 Reasons Why You’ll Fail in Media

Larry Jordan – LarryJordan.com

The road to success starts with lots of hard work.

Image courtesy of MotionArray.com.

Topic $TipTopic

As if life wasn’t stressful enough, the folks at MotionArray.com have compiled a list of eight reasons why you’ll fail as a filmmaker. See how many of these apply to you. (This is an excerpt of the original article.)

Becoming a filmmaker is a dream for many people. But… Here are some reasons why you might fail in the film industry and ways to overcome them so you can become the next big shot in Hollywood.

  1. You’ve got a cool camera. While it’s true that a good camera can “allow” you to get better shots, it doesn’t matter at all if you don’t know what you are doing with it.
  2. You memorized the shortcuts. Editing skills run much deeper than button mashing and speed. You have to learn about pacing, rhythm, and storytelling. Spend your energy focusing on the art of the edit.
  3. You saw the tutorial. Look, tutorials are great educational tools. We watch them all the time. Go ahead and watch those tutorials, but then take what you learned and expand on it. Experiment with new ideas.
  4. What does music have to do with filmmaking? You are a “visual” storyteller, not a musician. Think again on this one. Unless you are making a silent film, and we mean totally silent, the music and audio you use will be just as important as your visuals. Try thinking about music earlier in the process. Think about the emotions that you want to get.
  5. Your friends are great actors. Your friends might be great friends, but they probably aren’t great actors. If they are, lucky you, but let’s not kid ourselves. You aren’t going to ask your friend to mend your broken leg just because you don’t know any doctors off hand. Think about actors in the same way.
  6. You went to school for this stuff. Getting through film school will definitely give you a leg up over the competition, and education is never bad. But just remember that it’s a first step, not a straight shot to the top.
  7. Practice. What’s practice? Many of the best filmmakers of our time started with shorts. It’s a good way to get your feet wet before putting on your big boy pants. And remember, they give out Oscars for shorts too.
  8. You’ve got big dreams. Dreams are what lead us to create great things. Without big dreams, we run the risk of selling ourselves short. But… it’s not just about dreaming it into existence. Success comes from hard work.

Here’s the link to the full article.


Please rate the helpfulness of this tip.

Click on a star to rate it!

… for Random Weirdness

Tip #844: What Does a Film Producer Do?

Larry Jordan – LarryJordan.com

Producers do a bit of everything. Here are the details.

Saul Zaentz on set of The Mosquito Coast with Harrison Ford. Image via Warner Bros.

Topic $TipTopic

This article, written by Logan Baker, first appeared in PremiumBeat.com. This is an excerpt.

A film begins and ends with the producer. The producer is the catalyst for a project coming together, its complete production cycle, and its eventual release, marketing, and distribution. A good producer will cultivate a kernel of an idea into something significant, tangible, and bright on screen. So, with all that being said, on a day-to-day level, starting from story inception to hitting the silver screen — what does a producer actually do? Let’s take a look.

Here are the steps:

  • Find the literary property
  • Shape the idea into a viable film
  • Raise the money
  • Hire the director
  • Choose the cast
  • Oversee production
  • Oversee post
  • Mastermind the marketing
  • Negotiate worldwide rights

So, when all is said and done — what does a producer do? Well, a little bit of everything. They’re absolutely essential for a production to get off the ground running, as smoothly as possible. See, there’s a reason producers receive the Oscar for Best Picture.

Here’s a link to an interview in Time, with Saul Zaentz, who details the process.


Please rate the helpfulness of this tip.

Click on a star to rate it!

… for Random Weirdness

Tip #843: Free Guide to Music Licensing

Larry Jordan – LarryJordan.com

Licensing music requires thought. The law favors the creator, and penalties are high.

(Image courtesy of Pexels.com.)

Topic $TipTopic

The folks at Ritual Music have written a free Guide to “How Music Licensing Works.” (Ritual Music is a subscription-based music licensing firm.)

Their blurb reads:

Video content of all kinds is being made cheaper, faster and better every day. The music in it better keep up. By 2020, it’s expected that 30 million videos will be uploaded every single day, almost all requiring legally procured music to comply with strong digital copyright enforcement on every major platform from YouTube and Vimeo to Facebook and Instagram. This explosive growth will open up billions of new music licensing opportunities in music over the next decade.

Smaller budgets and shorter production timelines will freeze out traditional licensing models, but the demand for world-class music will still be paramount. Because of the speed, budgets and quality of digital video content creation, affordable instant-licensing solutions with world-class content will dominate this new market.

Here’s the link to their free Guide.


Please rate the helpfulness of this tip.

Click on a star to rate it!

… for Apple Motion

Tip #842: How to Improve Apparent Focus

Larry Jordan – LarryJordan.com

The Unsharp mask is applied (left) with a Radius of 2.2. The right side is the original image.

Topic $TipTopic

Given the state of today’s technology you can’t refocus an image after it’s been shot. (Well, not in any tool that I have access to…)

However, you can create the illusion of focus, which may bail you out when an image is “just a bit soft.” Here’s how.

Select the layer containing the soft image, then apply Filters > Sharpen > Unsharp mask.

NOTE: Don’t use Sharpen, Unsharp mask does a better job.

What sharpening does is emphasize the edges between objects by boosting the contrast at the edge itself. Taken to extremes this will put a harsh border around every edge. Don’t do that.

Instead, change the default Radius settings for Unsharp Mask so they are between 1.0 and 2.2. As you can see in the screen shot, the left side of her hair has sharpening and has a more apparent focus than the right side. The difference is a Radius of 2.2.

The effect is most noticeable in her hair, as the screen shot illustrates.

With this filter, less is definitely more because the default settings are excessively out of whack.

EXTRA CREDIT

Remember, this filter only affects edges. So, it won’t modify skin or other areas which have no significant texture.


Please rate the helpfulness of this tip.

Click on a star to rate it!