Grid icon duplicates the Motion Viewer to simultaneously display multiple views of your project.
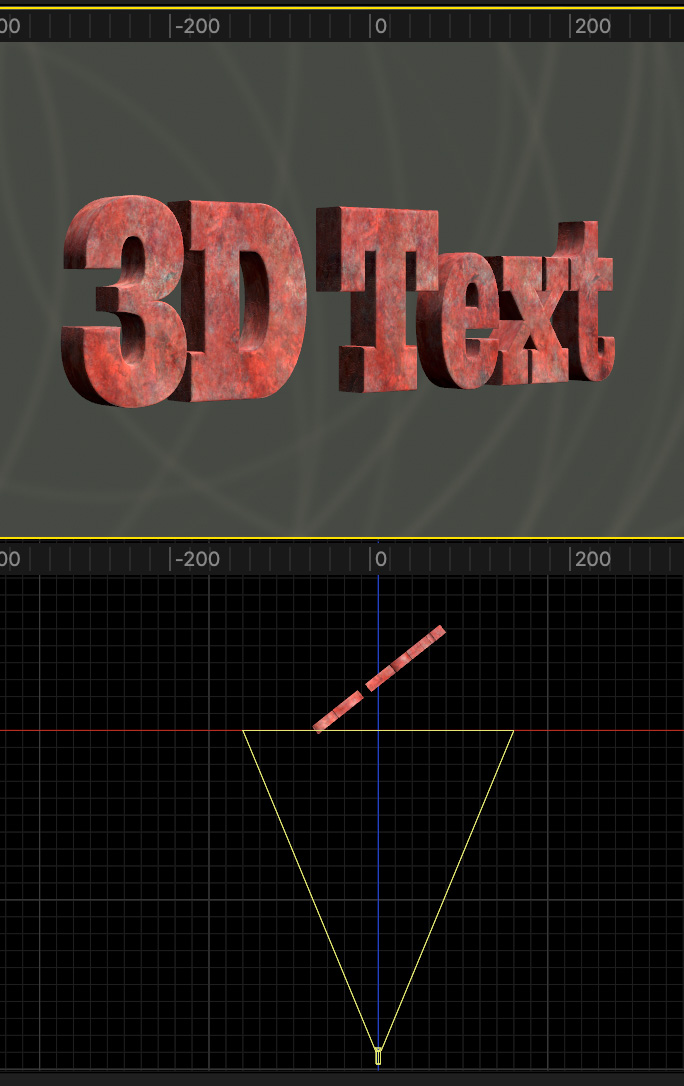
A split screen with 3D text on the top, with the Top view of a camera on the bottom.
In the top right corner of the Motion Viewer is a small “grid” icon. Ever wonder what it does? It’s pretty helpful…!
This button divides the screen into sections so that you can preview the same project from multiple views.
A common way to use this is as a split the screen (I generally use side-by-side images because I have a large monitor) so that I can see the finished version of my project on one side, with a top view of cameras and lights on the other.
NOTE: I used a top/bottom split for this screen shot because it fits better in this webpage.
While you can easily toggle between views in Motion, seeing both at the same time makes it easier to create an effect; especially involving multiple cameras.
Please rate the helpfulness of this tip.
Click on a star to rate it!
https://www.theinsidetips.com/wp-content/uploads/2019/09/Tips-Logo-700x150.jpg00Larry Jordanhttps://www.theinsidetips.com/wp-content/uploads/2019/09/Tips-Logo-700x150.jpgLarry Jordan2020-07-16 01:30:002020-07-11 09:55:57Tip #841: A Faster Way to Preview Effects
The Stencil Alpha blend mode fills text with whatever is below it in the same group.
A text clip filled with an animated line from the Motion library.
I was playing in Motion the other day and discovered a fast way to add an eye-catching effect to text – in just a few steps.
In the screen shot, I placed an animated line (Library > Content > Lines > Bar 27) below some text in the same group.
NOTE: The text in this screen shot uses the Giza font.
To get the lines inside the text, select the text in the Layers panel. Then, apply Inspector > Properties > Blend mode > Stencil Alpha.
The Stencil Alpha blend mode fills text, or any object with an alpha channel, with whatever is below it in the same group.
Because many of the lines in Motion’s library are animated, this effect can create a variety of ways to fill text with animated lines and colors. Each more interesting than the next.
Simple to create, but eye-catching in the result.
EXTRA CREDIT
One you have the text filled, you can animate it further using text behaviors.
Please rate the helpfulness of this tip.
Click on a star to rate it!
https://www.theinsidetips.com/wp-content/uploads/2019/09/Tips-Logo-700x150.jpg00Larry Jordanhttps://www.theinsidetips.com/wp-content/uploads/2019/09/Tips-Logo-700x150.jpgLarry Jordan2020-07-16 01:30:002020-07-11 09:50:31Tip #840: Simple – But Eye-catching – Text
Effects don’t always need computers to be effective.
Image courtesy of MotionArray.com.
This article first appeared in MotionArray.com. This is an excerpt.
Special effects have come a long way since the black and white films of yesteryear. Nevertheless, there’s still a handful of techniques pioneered over a century ago that are still alive and well in Hollywood today.
Forced Perspective. This is an optical illusion used to make an object or a character appear larger, smaller, closer, or further away than it actually is. It’s a technique that’s been used since the days of Charlie Chaplin, all the way up until today, playing an especially pivotal role in the Lord Of The Rings trilogy.
Rotoscoping. Over the last two decades, the art form has advanced to ‘interpolated rotoscoping,’ a digital process that uses computer graphics and vector keyframes to create animation instead.
Dolly Zoom. The dolly zoom (a.k.a. the Vertigo effect) is an iconic cinematic technique. The vertigo effect is achieved by zooming the camera lens in, while simultaneously drawing the camera back in the opposite direction on a dolly—or vice versa.
Miniature (Tilt Shift) Effect. Simply speaking, miniature effect refers to any artificial sets or models that feature in a film. With the advent of CGI, the miniature effect has slowly but surely been working its way onto the special effect endangered list in recent years. But it’s still far from extinct.
Matte Painting. In a nutshell, this is where you paint part or all of a landscape you aren’t able to film because a) it doesn’t exist, or b) you don’t have the budget to create it.
Here’s the link to the full article, including links and illustrations.
Please rate the helpfulness of this tip.
Click on a star to rate it!
https://www.theinsidetips.com/wp-content/uploads/2019/09/Tips-Logo-700x150.jpg00Larry Jordanhttps://www.theinsidetips.com/wp-content/uploads/2019/09/Tips-Logo-700x150.jpgLarry Jordan2020-07-15 01:30:002020-07-15 01:30:00Tip #847: 5 “Old School” Effects That Still Work
Earth invaded! Jets vs. Dinosaurs. What’s not to like?
(Image courtesy of Pexels.com.)
Maxon and Red Giant have teamed up to create a new visual effects tutorial on how to create an alien invasion. And, it wouldn’t be Red Giant if there wasn’t a twist. This invasion features dinosaurs..!
Inspired by the 1996 hit movie Independence Day, Seth Worley took on the challenge of replicating the invasion, sans the octopus-like aliens from the film, opting instead for flying dinosaurs. Seth used Cinema 4D to create the short film’s supervillains and tools from Red Giant Complete to incorporate Independence Day-style visual effects. In the YouTube tutorial out now, Seth showcases how to work with lens distortion, camera tracking, 3D animation, color correction, compositing and much more to create the larger-than-life effects.
According to Red Giant, the full set of tools used includes:
Maxon Cinema 4D: Cinema 4D is an Academy Sci-Tech Award-winning professional 3D modeling, animation, and rendering software solution. Its powerful and flexible toolset makes 3D workflows more accessible for design professionals.
VFX Lens Distortion Matcher: A tool that makes it incredibly easy to undistort footage from any lens so that elements can be composited into a shot. Even if the kind of lens is unknown – wide angle, GoPro, fisheye, etc. – Lens Distortion Matcher can figure it out instantly.
VFX Supercomp: Supercomp is a compositing environment that makes it easy to create complex, seamless composites. In Supercomp, light and atmospheric effects interact with all layers and elements of a scene in a far more natural way, and with far less pre-composing in After Effects than ever before.
Trapcode Tao: With tools to generate complex procedural 3D geometries using built-in auto paths, mask shapes, and the motion from 3D lights, Trapcode Tao brings new depth to motion graphics projects.
VFX Optical Glow: A blazing fast, drop-dead gorgeous, photo-realistic glow effect for After Effects and Premiere Pro, Optical Glow makes adding picture-perfect glow effects to projects incredibly simple.
Red Giant Universe: Red Giant’s collection of GPU-accelerated video effects and transitions plugins for motion graphics artists and editors, Universe boasts over 85 tools supported across eight host-applications.
Magic Bullet Colorista IV: Magic Bullet Colorista IV provides professional color correction for filmmakers, turning Adobe Premiere Pro and After Effects into a high-speed professional color grading environment.
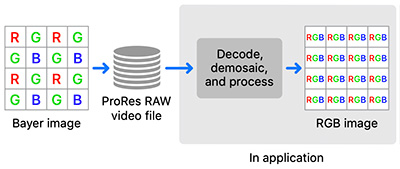
ProRes RAW is a codec optimized for speed and quality.
Processing flowchart for ProRes RAW. Note that image processing is done in the application, not camera.
Apple ProRes RAW is based on the same principles and underlying technology as existing ProRes codecs, but is applied to a camera sensor’s pristine raw image data rather than conventional image pixels.
ProRes RAW is available at two compression levels: Apple ProRes RAW and Apple ProRes RAW HQ. Both achieve excellent preservation of raw video content, with additional quality available at the higher data rate of Apple ProRes RAW HQ. Compression-related visible artifacts are very unlikely with Apple ProRes RAW, and extremely unlikely with Apple ProRes RAW HQ.
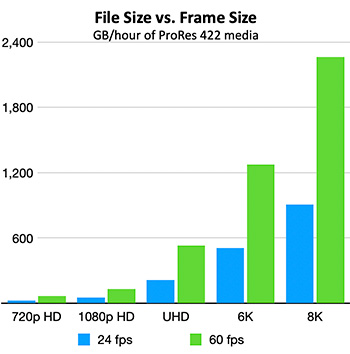
ProRes RAW is designed to maintain constant quality and pristine image fidelity for all frames. As a result, images with greater detail or sensor noise are encoded at higher data rates and produce larger file sizes.
ProRes RAW data rates benefit from encoding Bayer pattern images that consist of only one sample value per photosite. Apple ProRes RAW data rates generally fall between those of Apple ProRes 422 and Apple ProRes 422 HQ, and Apple ProRes RAW HQ data rates generally fall between those of Apple ProRes 422 HQ and Apple ProRes 4444.
NOTE: What is means is that, rather than creating RGB images in camera, which triples file size, the raw image is processed later, in the application. This still provides the highest image quality, but decreases the size of the native raw files.
Like the existing ProRes codec family, ProRes RAW is designed for speed. Raw video playback requires not only decoding the video bitstream
but also demosaicing the decoded raw image. Compared to other raw video formats supported by Final Cut Pro, ProRes RAW offers superior performance in both playback and rendering
EXTRA CREDIT
Here’s the link to Apple’s ProRes RAW white paper, which contains much more information on this format.
Please rate the helpfulness of this tip.
Click on a star to rate it!
https://www.theinsidetips.com/wp-content/uploads/2019/09/Tips-Logo-700x150.jpg00Larry Jordanhttps://www.theinsidetips.com/wp-content/uploads/2019/09/Tips-Logo-700x150.jpgLarry Jordan2020-07-14 01:30:002020-07-14 01:30:00Tip #852: What is ProRes RAW?
NOTE: This article was originally written for shooting still images in JPEG. However, these comments also apply to shooting video using AVCHD or H.264 codecs.
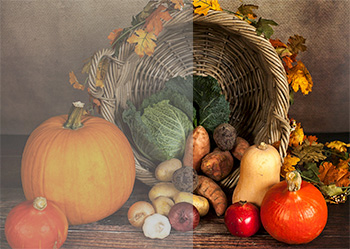
Raw is a file format that captures all image data recorded by the sensor when you take a photo. When shooting in a format like JPEG image information is compressed and lost. Because no information is compressed with raw you’re able to produce higher quality images, as well as correct problem images that would be unrecoverable if shot in the JPEG format.
NOTE: Raw is not an acronym. So, unless you are discussing ProRes RAW, it’s spelled lower case.
Here’s a list of the key benefits to shooting raw:
The article linked at the top has more details on each of these points.
Please rate the helpfulness of this tip.
Click on a star to rate it!
https://www.theinsidetips.com/wp-content/uploads/2019/09/Tips-Logo-700x150.jpg00Larry Jordanhttps://www.theinsidetips.com/wp-content/uploads/2019/09/Tips-Logo-700x150.jpgLarry Jordan2020-07-14 01:30:002020-07-14 09:56:42Tip #849: 8 Reasons Why You Should Shoot Raw
Badge colors can help you quickly spot which clips have effects applied.
The four colors of clip Fx badges.
Have you ever wanted to know which clips in your sequence have effects applied to them? Or, have you ever want to know which clips have specific effects applied to them? Well, there’s an easy way to find out – check the color of the FX badge!
Gray. No effects applied.
Green. A Motion effect (position, scale…) is applied to a clip.
Yellow. A speed change or keyframe effect is applied.
Purple. An effect from the Effects panel is applied.
EXTRA CREDIT
I looked these up, here’s Adobe’s official list of badge colors:
FX badge color
Denotes
Gray
No effect applied (default badge color)
Purple
Non-intrinsic effect applied (like, color correction, blur)
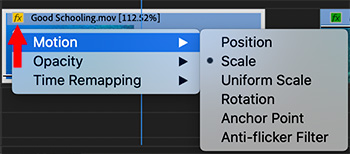
The timeline provides an easy way to add keyframes and animate effects.
Control-click the small Fx badge to display keyframe controls for a clip.
You probably know that you use keyframes to animate effects and that you can create keyframes in the Effects Panel. But… there’s a faster way, hidden in plain sight.
Control-click the small Fx badge in the top right corner of the clip you want to animate.
From the pop-up menu (see screen shot) select the parameter you want to animate with keyframes. The benefit to using the timeline to create keyframes is that you can sync them more easily with other clips located above or below the clip you are adjusting.
A thin, horizontal, white line appears in the selected clip.
Cmd-click to add a keyframe
Drag the keyframe up/down to change the value.
Drag the keyframe left/right to change the timing.
Control-click the keyframe to add curves or acceleration.
Control-click the keyframe to delete it.
EXTRA CREDIT
Use the Pen tool (Shortcut: P) to select and change multiple keyframes at once.
Please rate the helpfulness of this tip.
Click on a star to rate it!
https://www.theinsidetips.com/wp-content/uploads/2019/09/Tips-Logo-700x150.jpg00Larry Jordanhttps://www.theinsidetips.com/wp-content/uploads/2019/09/Tips-Logo-700x150.jpgLarry Jordan2020-07-14 01:30:002020-07-11 09:23:34Tip #838: A Visual Way to Animate Effects
We may request cookies to be set on your device. We use cookies to let us know when you visit our websites, how you interact with us, to enrich your user experience, and to customize your relationship with our website.
Click on the different category headings to find out more. You can also change some of your preferences. Note that blocking some types of cookies may impact your experience on our websites and the services we are able to offer.
Essential Website Cookies
These cookies are strictly necessary to provide you with services available through our website and to use some of its features.
Because these cookies are strictly necessary to deliver the website, refuseing them will have impact how our site functions. You always can block or delete cookies by changing your browser settings and force blocking all cookies on this website. But this will always prompt you to accept/refuse cookies when revisiting our site.
We fully respect if you want to refuse cookies but to avoid asking you again and again kindly allow us to store a cookie for that. You are free to opt out any time or opt in for other cookies to get a better experience. If you refuse cookies we will remove all set cookies in our domain.
We provide you with a list of stored cookies on your computer in our domain so you can check what we stored. Due to security reasons we are not able to show or modify cookies from other domains. You can check these in your browser security settings.
Google Analytics Cookies
These cookies collect information that is used either in aggregate form to help us understand how our website is being used or how effective our marketing campaigns are, or to help us customize our website and application for you in order to enhance your experience.
If you do not want that we track your visit to our site you can disable tracking in your browser here:
Other external services
We also use different external services like Google Webfonts, Google Maps, and external Video providers. Since these providers may collect personal data like your IP address we allow you to block them here. Please be aware that this might heavily reduce the functionality and appearance of our site. Changes will take effect once you reload the page.
Google Webfont Settings:
Google Map Settings:
Google reCaptcha Settings:
Vimeo and Youtube video embeds:
Other cookies
The following cookies are also needed - You can choose if you want to allow them:
Privacy Policy
You can read about our cookies and privacy settings in detail on our Privacy Policy Page.