… for Adobe Premiere Pro CC

Tip #834: An Even Faster Way to Change Clip Speed

Larry Jordan – LarryJordan.com

The Rate Stretch tool is a fast way to change the speed of clip.

Select the Rate Stretch tool from the tools palette.

Topic $TipTopic

When you need to change the speed of a clip, you can use the Rate/Duration window. Or… you can use this tool – which is MUCH faster!

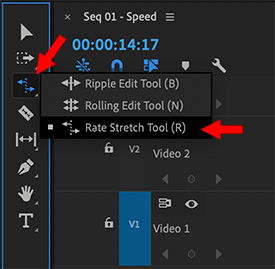
The Rate Stretch tool (Shortcut: R) changes the speed of a clip as you drag an edge.

Select it from the Tools palette, then drag the edge of a clip whose speed you want to change. The new duration is displayed next to the tool as you drag the edge of a clip.

Dragging a clip longer slows it down, dragging a clip shorter speeds it up.

EXTRA CREDIT

The Speed/Duration dialog (Shortcut: Cmd + R) provides more options and greater precision, but for sheer speed, the Rate Stretch tool can’t be beat.


Please rate the helpfulness of this tip.

Click on a star to rate it!

… for Apple Final Cut Pro X

Tip #837: A Simply Useful Shortcut

Larry Jordan – LarryJordan.com

Double-clicking the title enlarges or shrinks the Inspector.

Double-click the title at the top of the Inspector to expand to full height.

Topic $TipTopic

This is one of those techniques that, if you know it, you say “Everyone knows that!” And, if you don’t, you say: “How come nobody ever told me about this?”

By default, the Inspector displays to the top of the timeline, so you have lots of room to view your edit.

However, if you double-click the name of whatever is displayed at the top of the Inspector, (“Youth Culture,” in this screen shot), the Inspector expands to full height.

Yeah, once I learned this, I use it ALL the time.

EXTRA CREDIT

Double-click the top of the Inspector to shrink it back to half-height again.

SO useful!


Please rate the helpfulness of this tip.

Click on a star to rate it!

… for Apple Final Cut Pro X

Tip #836: Automatic Keyword Creation

Larry Jordan – LarryJordan.com

Use folder names as key words to quickly find clips without manually creating lots of events.

Media is stored in clearly labeled folders. When you import a folder, the folder name is assigned to each clip as a keyword.

Topic $TipTopic

There’s a huge benefit to clearly naming the folders where media is stored before you import your clips. The reason? Keywords.

For example, in this screen shot, I gave each media folder an easy-to-read name.

NOTE: For your projects, pick names which help you determine which files are in each folder. Names need not be this simple, though shorter names are better.

When it comes time to import, select the containing folder (“Pond5” in this example), not just individual clips.

Make sure, in the Import Settings on the right of the Media Import window, that Keywords > From Folders is checked.

This means that, when you import the file, FCP X will assign a keyword to each clip with the name of the folder(s) that contained it. A mountain shot stored in the Scenic folder would be given “Scenic” and “Pond 5” as keywords.

These keywords make it VERY fast to find all the files stored in the same folder without having to create lots of extra events to organize them.


Please rate the helpfulness of this tip.

Click on a star to rate it!

… for Apple Final Cut Pro X

Tip #835: Create a Favorite Import Location

Larry Jordan – LarryJordan.com

There’s no limit to the number of Favorites you can create.

Drag the icon for a storage location on top of “Favorites” to create a link.

Topic $TipTopic

If you frequently go to the same storage location to import media, Final Cut has a handy shortcut that gets you there faster.

  • Open the Media Import window (Shortcut: Cmd + I).
  • In the center panel, navigate to display the drive or folder you want to make a favorite location.
  • Drag the icon for that location in the center panel on top of the word “Favorites” in the sidebar on the left.

Poof!

I use this technique all the time.

EXTRA CREDIT

  • There is no limit to the number of favorite locations you can create.
  • You can create a favorite folder which is buried layers deep on any attached storage.
  • To remove a favorite location, Control-click it and select “Remove from Sidebar.”

Please rate the helpfulness of this tip.

Click on a star to rate it!

… for Random Weirdness

Tip #827: When Is It Time to Fire Your Client?

Larry Jordan – LarryJordan.com

The creative arts are stressful- don’t let clients make them worse.

Image courtesy of Pexels.com.

Topic $TipTopic

This article first appeared in MotionArray.com. This is an excerpt.

The truth is, everyone wants to work, and everyone wants to make money, but sometimes it’s not worth the hassle to deal with a bad client. So, when do you know when it’s time to let go of a client and get on with your life? Take note of these situations and consider if it’s worth letting go.

  • Please Pay Me. We all know those clients that ask you for a ton of revisions, then they can’t seem to remember to drop the check in the mail. There are also really nice clients who never seem to pay on time either. The point is, you deserve to be paid, and you deserve to be paid on time.
  • R-E-S-P-E-C-T. Any client has the right to not like what you are putting out. It happens all the time. After all, art is subjective. But that doesn’t give a client the right to treat you like a child…or worse. If a client can’t treat you like the talented artist you are and respect that you are a human, well, then you can do better.
  • Revisions Never End. This one is tricky. After all, there is a fine line between too many revisions, and you just not being able to deliver what’s being asked. Working with clients is always going to have its fair share of headaches. And many times it’s not even the client’s fault. We artists can be hard to work with too. It’s a give and take, and we do want to work after all. But when you start dreading the client call, when you have to really wonder if it’s worth it to take that new project, then it probably isn’t.

Please rate the helpfulness of this tip.

Click on a star to rate it!

… for Random Weirdness

Tip #826: Capture Stunts Better with a Long Lens

Larry Jordan – LarryJordan.com

The key to stunts is to imply danger while keeping everyone on set safe.

Image courtesy of Pexels.com.

Topic $TipTopic

This article, written by Rubidium Wu, first appeared in PremiumBeat.com. This is an excerpt.

Shooting on long lenses is an easy way to capture normal actions and make them appear as dangerous stunts. It’s a good technique to learn and practice, because, ultimately, a director’s first duty is making sure everyone — stunt performers, actors, and camera crew — gets home safely at the end of the day.

However, the history of stunts in movies has been marred by injuries and deaths of stunt performers (and sometimes even camera crews). Lloyd himself suffered numerous injuries and burns throughout his career, even with the primitive camera tricks they used to distance him from danger.

As cameras and optics evolved, filmmakers found innovative ways to make stunts safer and sell better. The most used and useful of these is via a long lens, which continues to be a cheap and effective way for filmmakers — of all levels and budgets — to sell stunts right up to present day.

In the article linked above, Rubidium provides examples, tips and links on the best ways to shoot stunt work.


Please rate the helpfulness of this tip.

Click on a star to rate it!

… for Random Weirdness

Tip #825: Handling Unexpected Location Setbacks

Larry Jordan – LarryJordan.com

Production Planning Means Planning for Chaos

Image courtesy of Pexels.com.

Topic $TipTopic

This article, written by Jourdan Aldredge, first appeared in PremiumBeat.com. This is an excerpt.

Knowing how to quickly and safely solve problems on set can save an entire production. Here are the critical areas to focus on. This article provides videos and links to handling problems.

Let’s face it, when working in film and video production, there are going to be problems that pop up on even the most tightly-run sets. It just comes with the territory. That’s why it’s critical for any filmmaker, director, or producer to plan well, schedule accordingly, take real measures up front to address all potential safety concerns, and, you know, still expect the unexpected.

Here’s what Jourdan covers:

  • Serious Emergencies
  • Safety Measures for Stunts
  • Schedules and Delays
  • Locations and Weather
  • See a Problem, Report a Problem

The article linked above also includes links to five other articles covering film and video production.


Please rate the helpfulness of this tip.

Click on a star to rate it!

… for Apple Motion

Tip #822: Photoshop-like Image Control – in Motion

Larry Jordan – LarryJordan.com

The Levels filter performs the same function as in Photoshop – but the pixel display is not as good.

The Levels filter, with settings applied to a clip.

Topic $TipTopic

Hidden deep within Motion is an image tool that would feel comfortable to most Photoshop users: Levels. Here’s where to find it.

The Levels filter provides separate control over grayscale shadows, midtones, and highlights in an image.

To apply it:

  • Select the layer with the clip you want to adjust.
  • Choose Filters > Color > Levels to apply it to the selected clip.
  • Go to Inspector > Filters. Adjust the left (black) pointer just below the gray box to adjust shadow levels. Move the middle (gray) pointer to adjust midtones. Then slide the right pointer to adjust highlights.

Unlike Photoshop, the range of pixels is not well-displayed, so this will be less accurate than adjusting the same filter in Photoshop. Still, the operation is the same.

EXTRA CREDIT

While the middle sliders expand shadow and highlights, while adjusting midtones, the two sliders at the bottom contract grayscale values. While useful, you’ll find yourself moving the three in the middle more.


Please rate the helpfulness of this tip.

Click on a star to rate it!

… for Apple Motion

Tip #820: Weird Fun with Bulges

Larry Jordan – LarryJordan.com

Animated text as something moves behind it creates a funny and unusual look.

(Footage courtesy of Jim Walker and Lobsters Gone Wild Productions.)
The Bulge behavior animates as the shark’s fin swims behind it.

Topic $TipTopic

OK. This has no social redeeming quality whatsoever, but it made me laugh. Here’s a cool trick using the Bulge filter.

  • Place some text, in my example I used the word “Shark,” on top of a clip that has things moving through it; a shark’s fin in my example.
  • Apply Filters > Distort > Bulge.
  • Drag the circle that surrounds Bulge in the Viewer to get the shape and position you want.
  • Go to Inspector > Filters > Bulge and adjust settings as you see fit.
  • Then, keyframe the Center parameter so that the Bulge moves as something moves behind it; the shark’s fin in my example.

NOTE: Be sure to start and end with no bulge for best results. You do this by dragging the Bulge Center off to one side or the other.

EXTRA CREDIT

Experiment with different blend modes for the text to see if it improves the look for the clips you are using.


Please rate the helpfulness of this tip.

Click on a star to rate it!

… for Apple Motion

Tip #819: Use Motion’s Motion Tracker

Larry Jordan – LarryJordan.com

Motion track is a great way to move text or pointing arrows in sync with something else in the frame.

(Footage courtesy of Jim Walker and Lobsters Gone Wild Productions.)
The key to tracking success is finding a clearly defined and not obscured tracking point.

Topic $TipTopic

Motion has an OK motion tracker built into it. It’s much better than Final Cut, which has none, but not as good as Mocha Pro. Here’s how to use it.

  • Import a video clip containing the movement you want to track; the shark in the screen shot.
  • Create a new layer with the object you want to move in sync with the first object; the text “Shark” in my example.
  • Select the text track and apply Behaviors > Motion Track > Match Move.
  • In Inspector > Behaviors, make sure the background clip (Shark) appears in the top image box. If not, drag it in.
  • Position the playhead where you want the track to start.
  • Drag the yellow dot from the center of the text clip and drag it onto a clearly identifiable point in the background clip.

NOTE: This is the critically important step. The tracking point on the “shark” video needs to be visible for the entire track, sharply defined and different from elements in the image behind it. Motion’s motion tracker gets easily confused. If you don’t get a good track, try a different position for the tracking point.

  • Then, in Inspector > Behaviors click Analyze.

The motion tracker will track the moving object – the dorsal fin point in my example – moving the text in sync with the shark.

EXTRA CREDIT

There are many configuration options with this behavior. Read the help files to learn more.


Please rate the helpfulness of this tip.

Click on a star to rate it!