… for Apple Final Cut Pro X

Tip #817: Here’s How to Consolidate Your Media

Larry Jordan – LarryJordan.com

Consolidate either moves or copies all library media into one place.
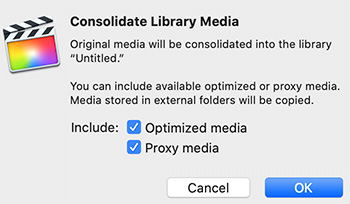
Control-click a Library name to reveal this option.

Topic $TipTopic

A hidden feature for any library in Apple Final Cut Pro is: “Consolidate Media Content.” You only see this option when Control-clicking the library name in the library sidebar (to the left of the browser). Here’s what it does.

If you, like me, tend to store media separately from the library when you are editing, you can end up with files scattered across your storage.

According to Apple’s Help files:

The Consolidate command places the files in the current library storage location. You view and set storage locations for media, Motion content, cache files, and library backup files using the File > Library Properties inspector.

The Consolidate command follows these rules:

  • When you consolidate files out of a library to an external folder, the files are moved.
  • When you consolidate files into a library from an external folder, or from an external folder to another external folder, the files are copied.

These rules prevent broken links from other libraries.

NOTE: If the media is already external, and no other libraries are using it, you can manually delete the original media after consolidating to save storage space.


Please rate the helpfulness of this tip.

Click on a star to rate it!

… for Apple Final Cut Pro X

Tip #816: A Baker’s Dozen Better Shortcuts

Larry Jordan – LarryJordan.com

If I were to pick my favorite shortcuts, these are probably it.

Topic $TipTopic

When you start doing the same tasks over and over, keyboard shortcuts can make you more efficient. Here are the keyboard shortcuts I use everyday when editing in Final Cut:

  • Control + Cmd + 1 — Toggle Library and Browser display on/off.
  • Cmd + 4 — Toggle the Inspector open or closed
  • Shift + Z — Fit image into Viewer or project into Timeline.
  • Cmd + 7 — Show/Hide video scopes.
  • Shift + I / O — Jump the playhead to the In / Out.
  • Option + X — Delete both the marked In and Out.
  • V — Toggle clip visibility off or on.
  • E — Perform a standard append edit into the Primary Storyline at the end of the timeline.
  • W — Perform a standard insert edit at the position of the skimmer/playhead.
  • D — Perform an overwrite edit into the Primary Storyline at the position of the playhead.
  • Option + W — Insert a gap into the Timeline at the position of the skimmer/playhead.
  • Cmd + B — Cut all selected clip(s) at the position of the skimmer/playhead.

BONUS

  • Shift + comma/period — Move selected edit point or connected clip ten frames left/right.
  • S — Toggle skimming on or off.
  • F — Flag a clip or clip range as a Favorite.

Please rate the helpfulness of this tip.

Click on a star to rate it!

… for Random Weirdness

Tip #811: Talent & Location Releases – What’s Needed?

Larry Jordan – LarryJordan.com

Nothing ruins a great production like a lack of releases.

Topic $TipTopic

This article first appeared in MotionArray.com. This is an excerpt.

Picture this, you just had the best video shoot ever. You hired the perfect actress to play a part in your commercial. She was a natural in every way. The setting was outdoors on a perfect day, and you got exactly what you needed. You have two days to edit everything together and deliver the spot to the client.

The day before it’s due, you get a call from the talent who says they no longer want to be a part of the commercial. And you never got them to sign the proper release. Guess what? You are in big trouble.

It may seem like when someone says they are in, then everything will be fine. But without the proper legal documents, you have no power when it comes to release and usage. And you won’t realize what a headache this can be until it happens to you.

Getting proper talent and location releases signed by the right people is one of the most important and often overlooked aspects of any video or film shoot. So, don’t let it slip through the cracks while you are busy working on shot composition or directing talent.

This article explains what talent and location releases are, when you need them and links to get forms for your next project.


Please rate the helpfulness of this tip.

Click on a star to rate it!

… for Random Weirdness

Tip #809: A Beginner’s Guide to Frame Rates

Larry Jordan – LarryJordan.com

Frame rates are fundamental to video – and difficult to change.

Topic $TipTopic

I’ve written a lot about frame rates, with my key point being that changing frame rates in post is, almost always, difficult and unsatisfactory. In this PremiumBeat.com article, written by Lewis McGregor, you’ll discover the basics of frame rates. Along the way, Lewis illustrates where they came from and how to decide which frame rate to use for your next project.

As Lewis writes: “Different mediums and different regions all demand different frame rates for various reasons. But, the number of frames per second you decide to give to your shot can also drastically change how your project looks and what you can do with the footage.”

Click the link above to read more.


Please rate the helpfulness of this tip.

Click on a star to rate it!

… for Random Weirdness

Tip #807: Create Looped Video for Live Streams

Larry Jordan – LarryJordan.com

Loops fill time or background when you don’t have anything else to show.

Simple animated loops can solve several knotty post-production problems.

Topic $TipTopic

This article, written by Charles Yeager, first appeared in PremiumBeat.com. This is a summary.

You’ve probably seen video loops on so many live streams that you don’t even give them a second thought. Here are some common loop examples:

  • Pre-Roll Loops: These video loops play before a live stream begins to give viewers a chance to settle in.
  • Live Radio/Podcast: These loops provide viewers with something of visual interest when people/subjects aren’t on screen.
  • Animation Scene Loops: These are looping animation scenes, frequently used on lo-fi music channels and other music broadcast channels.

The link (above) has a step-by-step tutorial on how to create a looped video, including the software you’ll need, and look at some common video loop examples.


Please rate the helpfulness of this tip.

Click on a star to rate it!

… for Apple Motion

Tip #806: Adjust Projects with Project Properties

Larry Jordan – LarryJordan.com

Every project setting can be adjusted after you start, except for frame rate.

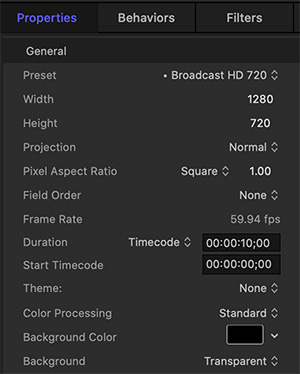
The Project Properties pane in Apple Motion. Frame rate can only be adjusted for empty projects.

Topic $TipTopic

Once you’ve created a Motion project, you can always go back and adjust its basic settings. Except… Well, let me illustrate.

Select the Project in the Layers panel.

Then, go to Inspector > Properties.

This is where you can change frame size, duration, and other settings.

NOTE: Keep in mind that you can only change frame rate in an empty project. Once even one element is added, frame rate is locked.

EXTRA CREDIT

Changing the duration does not extend or contract the timing of any elements. This is a good reason to set the duration before you start creating a project.

Also, when you change the duration, Motion sets an In and Out to match the duration of the original project. This means that you will need to remove these marks, as well as manually adjust the timing of any clips that need to extend beyond the original duration.


Please rate the helpfulness of this tip.

Click on a star to rate it!

… for Apple Motion

Tip #805: Control the Shape of Path Curves

Larry Jordan – LarryJordan.com

Curves are shaped by the white Bezier control handles revealed by the Edit Points tool.

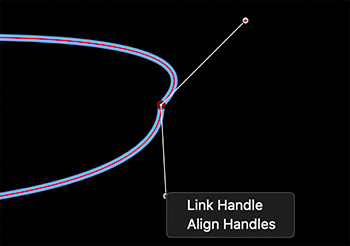
Unlinked Bezier control handles changing the shape and smoothness of a curve.

Topic $TipTopic

Using either the Pen or Paint Brush tools, we can create paths in Motion. The Pen tool creates a path, while the Paint Brush tool creates a path then decorates it with a shape style.

The trick, as with all path tools, is in how you create corners. When using the Pen tool to create a path, click to create a corner, or click and drag to create a curve. However, what happens if you don’t like the shape of the curve? Change to the Edit Points tool, then Control-click on a corner dot in the path.

This displays a menu allowing you to convert a corner to a smooth curve, or a smooth curve back to a corner.

When a corner is converted to a smooth curve, two white lines appear with a dot at each end. These are called “Bezier control handles.”

Drag the dots closer together to change the smoothness of the curve. Change the angle to change the shape of the curve.

EXTRA CREDIT

  • Press Option and drag to just change one dot. This also disconnects (“Breaks”) the two dots even when you no longer press the Option key.
  • Press Shift to constrain the movement of a dot.
  • Control-click a white dot to Link or break a dot, as well as align the two dots back into a straight line.

Watch how the curve changes as you adjust each dot by itself.


Please rate the helpfulness of this tip.

Click on a star to rate it!

… for Apple Motion

Tip #804: The Secret Identity of a Drop Zone

Larry Jordan – LarryJordan.com

Drop zones are used for both image manipulation and transitions.

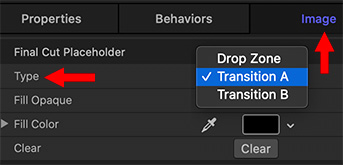
The Drop Zone Type menu in Motion 5.

Topic $TipTopic

Drop zones are objects created in Motion that allow us to include video when using a Motion template in Final Cut. However, there’s more to drop zones than first meets the eye.

To add a drop zone to a Motion project, choose Object > New Drop Zone (Shortcut: Shift + Cmd + D).

Next, select the drop zone in the Layers pane and go to Inspector > Image.

Notice, as you can see in the screen shot, that a drop zone is considered an Image. What you may not know, however, is that you can select between three different states for a drop zone:

  • Drop zone. Displays video added to the template from Final Cut.
  • Transition A. Displays the end of the out-going clip when added as a transition in Final Cut.
  • Transition B. Displays the start of the in-coming clip when added as a transition in Final Cut.

Converting a drop zone to a transition image gives you more flexility in designing templates and transitions. However, you can only have one Transition A and one Transition B drop zone per project. (Sigh… it would be cool if we could clone them.)


Please rate the helpfulness of this tip.

Click on a star to rate it!

… for Visual Effects

Tip #812: BorisFX: Tips to Improve Green Screen Keys

Larry Jordan – LarryJordan.com

Creating the perfect key starts in production; not post.

Screen shot from the BorisFX Guide to Green-Screen Keys

Topic $TipTopic

The folks at BorisFX (Continuum, Mocha Pro and Sapphire) have published a guide covering production techniques that improve green-screen key results.

It starts:

Think of all the top movies from the past decade. What do they all have in common? Epic worlds that are so stunningly realistic you feel like you are really there. These films are created in no small part thanks to the power of the chroma key and a visual effect artist’s ability to “pull a perfect key,” i.e. removing a subject from green or blue screen footage.

In this guide, you’ll get a brief history of the chroma key, how to prepare your green screen set to avoid common shooting pitfalls, a glossary of terms, and discover why Primatte technology delivers the best solution to accomplish seamless composites fast whether a subject is placed over live-action or a CG background.

Here’s the link


Please rate the helpfulness of this tip.

Click on a star to rate it!

… for Visual Effects

Tip #810: Quickly Transfer iPhone Media

Larry Jordan – LarryJordan.com

Image Capture is fast, secure, flexible… and free!

Topic $TipTopic

In my weekly newsletter, last week, I illustrated a process to quickly and securely transfer photos or video from an iPhone to a Mac using Image Capture.

While many of us use AirDrop, Apple’s free utility, Image Capture, provides the following benefits:

  • Faster file transfers due to a direct, wired connection
  • More secure transfers. There is no risk you’ll send the wrong image to the wrong person.
  • Easier selection of multiple images
  • Directly transfer files to a specific folder, without transferring images to the Downloads folder first
  • Immediately delete media from your iPhone once it has transferred to your computer

I’ve used AirDrop, Preview and 3rd-party utilities. Image Capture beats all of them.

Here’s the link to my article.


Please rate the helpfulness of this tip.

Click on a star to rate it!