… for Visual Effects

Tip #960: Motion Array: A Filmmaker’s Platform

Larry Jordan – LarryJordan.com

Motion Array is an all-in-one professional filmmaker’s platform.

The Motion Array logo.

Topic $TipTopic

I’ve quoted a lot of articles from Motion Array, but this time, I want to talk about Motion Array itself.

Motion Array is an all-in-one professional filmmaker’s platform, with unlimited asset downloads, exclusive Premiere Pro plug-ins, real-time video collaboration and approvals, and a video website builder all included in Motion Array memberships.

It provides an unlimited marketplace, where you can download every asset you need for a project from video templates and stock footage to photos, royalty-free music and sound effects.

It has plug-ins and templates for Adobe Premiere Pro, Apple Final Cut Pro X and DaVinci Resolve.

What I like most about it, though, are their tutorials. These cover:

  • Adobe After Effects
  • Adobe Premiere Pro
  • DaVinci Resolve
  • Apple Final Cut Pro X
  • MotionArray’s tools
  • Filmmaking
  • Motion Design
  • Post Production
  • The Business of Filmmaking
  • Video Effects
  • Royalty-Free Music

EXTRA CREDIT


Please rate the helpfulness of this tip.

Click on a star to rate it!

… for Visual Effects

Tip #959: Draw & Annotate Live Videos

Larry Jordan – LarryJordan.com

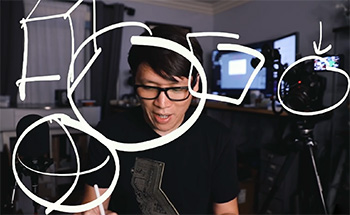
Free tools, plus a camera, equals real-time, on-screen illustration.

(Image courtesy “Adam Savage’s Tested.”)

Topic $TipTopic

This article, written by Jack Roberts, first appeared in PremiumBeat.com. This is an excerpt.

This article provides a ten-minute video tutorial on how to use an iPad to create real-time on-screen graphics. (Think John Madden and his Telestrator.)

This video comes from Norm Chan from the Adam Savage’s Tested crew. It’s a simple and ingenious way to live draw on your screen, using tools you likely already have.

Tools Required:

  • Mac or PC
  • Webcam or DSLR/mirrorless camera connected to your computer
  • iPad or tablet with USB cable
  • OBS Studio (Free)
  • ApowerMirror (Free Trial)
  • Adobe Fresco (Free)

The steps are too detailed for a tip, but the video tutorial is quick and the results are amazing. The accompanying article also provides more details.


Please rate the helpfulness of this tip.

Click on a star to rate it!

… for Codecs & Media

Tip #958: How Do Audio Cables Prevent Hum?

Larry Jordan – LarryJordan.com

All cables pick up hum. Shielded, balanced cables cancel that hum in the mixer.

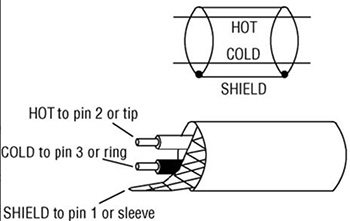
A 2-conductor shielded, balanced line.
Each conductor has equal impedance to ground, and they are twisted together so they occupy about the same position in space on the average. (Image courtesy of ProSoundWeb.com)

Topic $TipTopic

OK, so this is a bit off topic, but… I’ve known for years and years that audio cables with XLR connectors don’t have hum, while cables with RCA connector so. Today, I wondered: why?

Here’s what I learned at
ProSoundWeb.com.

“One cause of hum is audio cables picking up magnetic and electrostatic hum fields radiated by power wiring in the walls of a room. Magnetic hum fields can couple by magnetic induction to audio cables, and electrostatic hum fields can couple capacitively to audio cables. Magnetic hum fields are directional and electrostatic hum fields are not.

“Most audio cables are made of one or two insulated conductors (wires) surrounded by a fine-wire mesh shield that reduces electrostatically induced hum. The shield drains induced hum signals to ground when the cable is plugged in. Outside the shield is a plastic or rubber insulating jacket.

“Cables are either balanced or unbalanced. A balanced line is a cable that uses two conductors to carry the signal, surrounded by a shield (Figure 1). On each end of the cable is an XLR (3-pin pro audio) connector or TRS (tip-ring-sleeve) phone plug.

“Hum fields from power wiring radiate into each conductor equally, generating equal hum signals on the two conductors (more so if they are a twisted pair). Those two hum signals cancel out at the input of your mixer, because it senses the difference in voltage between those two conductors—which is zero volts if the two hum signals are equal. That’s why balanced cables tend to pick up little or no hum.”

XLR cables (called “balanced”) use two wires and shielding. RCA-type cables (called “unbalanced”) do not.


Please rate the helpfulness of this tip.

Click on a star to rate it!

… for Codecs & Media

Tip #957: Apple Supports VP9 in macOS Big Sur

Larry Jordan – LarryJordan.com

VP9 codec support is coming to macOS Big Sur – specifically Safari.

The Safari icon in macOS Big Sur.

Topic $TipTopic

Last week, Apple introduced support for the VP9 codec in Safari (Mac version) in the fourth beta of macOS Big Sur. Learn more.

Apple’s release notes state: “Support for 4K HDR playback of YouTube videos.” However, 4k HDR video on YouTube only uses the VP9 codec.

According to AppleInsider.com, “this means users will be able to natively stream 4K YouTube clips in Safari on iOS 14, tvOS 14, and macOS Big Sur.

“While 4K videos can be seen in their full resolution on Macs and Apple TV devices with the appropriate displays, the resolution of even the latest iPhones and iPads top out below 4K quality.

“Safari is getting other new additions in macOS Big Sur and Apple’s other software updates, including native support for HDR videos and WebP images.

“The lack of VP9 support has been a sticking point for users since Google introduced the codec, particularly since the Mountain View company has refused to encode clips in other Apple-friendly codecs. Since the introduction of VP9, users have been stuck with viewing YouTube in 1080p or 720p.”


Please rate the helpfulness of this tip.

Click on a star to rate it!

… for Codecs & Media

Tip #954: VP9 Refresher

Larry Jordan – LarryJordan.com

YouTube uses the VP9 codec exclusively for 4K HDR media.

Topic $TipTopic

Apple introduced support for the VP9 codec in the fourth beta of macOS Big Sur, specifically for Safari. Here’s a quick refresher.

According to Wikipedia:

VP9 is an open and royalty-free video coding format developed by Google. It is supported in Windows, Android and Linux, but not Mac or iOS.

VP9 is the successor to VP8 and competes mainly with MPEG’s High Efficiency Video Coding (HEVC/H.265).

In contrast to HEVC, VP9 support is common among modern web browsers with the exception of Apple’s Safari (both desktop and mobile versions). Android has supported VP9 since version 4.4 KitKat.

An offline encoder comparison between libvpx, two HEVC encoders and x264 in May 2017 by Jan Ozer of Streaming Media Magazine, with encoding parameters supplied or reviewed by each encoder vendor (Google, MulticoreWare and MainConcept respectively), and using Netflix’s VMAF objective metric, concluded that “VP9 and both HEVC codecs produce very similar performance” and “Particularly at lower bitrates, both HEVC codecs and VP9 deliver substantially better performance than H.264”.

Here’s a link for more information.


Please rate the helpfulness of this tip.

Click on a star to rate it!

… for Adobe Premiere Pro CC

Tip #948: What’s a Rectified Waveform?

Larry Jordan – LarryJordan.com

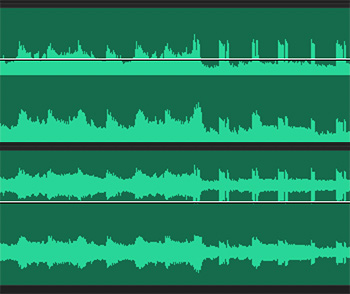
Rectified audio displays only the positive half of an audio waveform.

The same audio clip displayed as rectified audio (top) and full audio wave (bottom).

Topic $TipTopic

Another timeline display option in Premiere is “Rectified Audio Waveforms.” Any guesses what these are – and why you might use them?

All audio is a wave that travels through the air from its point of origination to our ears; or a microphone. When the sound is recorded, it is recorded as a wave, where the audio has both positive and negative values above and below a centerline. That centerline is defined as the place where audio has no volume.

The farther audio gets from the centerline, the louder it becomes.

However, seeing audio as a wave makes it harder to determine volume, because the loudest portions of a clip are at both the top and bottom of the wave.

To solve this problem, Premiere, like other NLEs, displays only half the audio wave – the positive values which are above the zero (center) line. This “sliced” version of audio is called “rectified.”

The entire wave is still captured and processed, but only the top half is displayed.

You can turn this display on or off using the fly-out (pancake) menu in the top-left corner of the timeline, next to the sequence name and uncheck Rectified Audio Waveforms.

The benefit to seeing the full wave is that, rarely, there may be audio level differences on one side of the wave but not the other. Most of the time, though, displaying audio as rectified will be fine.


Please rate the helpfulness of this tip.

Click on a star to rate it!

… for Adobe Premiere Pro CC

Tip #947: When to Use the Work Area Bar

Larry Jordan – LarryJordan.com

The Work Area Bar controls which section of the Premiere timeline will render.

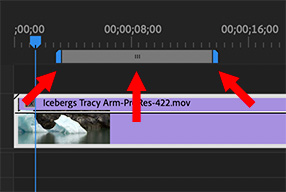
The three control areas for the work area bar: Start, Position and End.

Topic $TipTopic

The work area bar is a hold-over from the days of slower computers, but, even today, it can save you time. Here’s how to use it.

The work area bar determines what will render, when a rendering option is selected.

To enable it:

  • Click the fly-out menu next to the project name in the top left corner of the timeline and select Work Area Bar.
  • A bar (see screen shot) appears at the top of the timeline.
  • Click the small lines in the center (center arrow) and drag left or right to change its position in the timeline.
  • Drag the left or right blue edges (left and right arrows) to change its duration.

The Sequence menu has three options specific to the Work Area Bar:

  • Render Effects in Work Area. This only renders effects contained within the Work Area.
  • Render Entire Work Area. This renders everything that needs rendering within the Work Area.
  • Delete Work Area Render Files. This provides a controlled way to delete render files for a portion of the timeline without deleting all render files.

The benefit to using the work area is that you can control what you render and when. If you have a complex project, or a slow computer, rendering in small sections allows you to see the finished result for just the section you are working on quickly, without wasting time with a length render of your entire project.


Please rate the helpfulness of this tip.

Click on a star to rate it!

… for Adobe Premiere Pro CC

Tip #943: What is a Stacked Panel Group?

Larry Jordan – LarryJordan.com

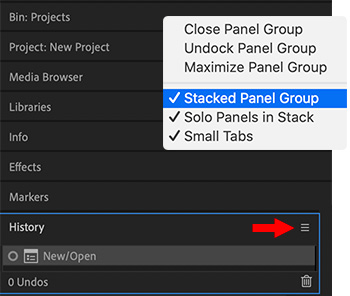
Stacked menus are often better when working on a smaller monitor.

Premiere panels displayed stacked, and the menu that activates them (inset).

Topic $TipTopic

In the fly-out menu for most panels, there’s an option for “Stacked Panel Groups.” Ever wonder what this does? Here’s the answer.

When you click the fly-out menu (pancakes) next to most panel names, one of the options is Panel Group Settings.

Click it and the menu shown in the screen shot appears.

The default setting has both Stacked Panel Groups and Solo Panels in Stack unchecked.

When you check Stacked Panel Groups, all panels in that group are listed vertically (see screen shot).

When Solo Panels in Stack is checked, only the contents of the currently active panel are displayed. Otherwise, the contents of all open panels are visible.

NOTE: The Solo option only applies when panels are stacked. The benefit to using Solo is that it keeps the interface cleaner on smaller monitors.


Please rate the helpfulness of this tip.

Click on a star to rate it!

… for Apple Final Cut Pro X

Tip #946: Organize Custom Motion Projects

Larry Jordan – LarryJordan.com

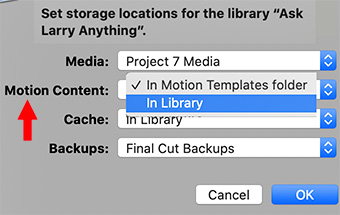
One choice simplifies access. The other simplifies backups and archiving.

Storage Locations panel displaying Motion content storage options.

Topic $TipTopic

By default, when you create or customize any Final Cut Pro effects, transitions, titles, or generators in Motion, that content is stored in the Motion Templates folder located in your Movies folder. You can also store Motion content inside a library—for example, to move a project or library to another Mac, or to back up and archive your work. You may also want to store Motion content in the library if you’re working on a project with others and using shared storage.

If you have custom Motion content and you’re copying or moving clips, projects, or events to another library, storage device, or Mac, set the storage location for your Motion content to the library before doing so. Otherwise, the Motion content is not moved or copied with the other items, and you must manually back up and move the Motion Templates folder. Regardless, you must manually track and move any third-party (FxPlug) content, because it is not managed within the Final Cut Pro library.

EXTRA CREDIT

Storing Motion projects in the Motion Template folder means they are accessible to all Final Cut libraries.

Storing Motion projects in the library simplifies backups and archiving, but means those custom projects are not available for other libraries.

Motion projects that ship with Final Cut – that is, those you did not create yourself – are available to all libraries and can’t be moved into the library file itself.


Please rate the helpfulness of this tip.

Click on a star to rate it!

… for Apple Final Cut Pro X

Tip #945: Consolidate Your Media

Larry Jordan – LarryJordan.com

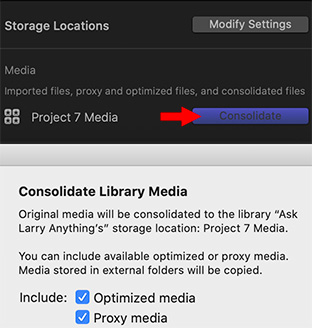
Consolidation can be done at any time – no need to wait to get organized.

The Consolidate button and resulting panel (below).

Topic $TipTopic

You’ve been editing like a mad fiend and the project is done. Now, you need to gather everything together for final backup and archiving. But, with media and files scattered across your system, just how are you going to do this? Easy, watch.

You may not know where all your files are, but Final Cut does. So, as I illustrated in Tip #944, we will create a custom media storage location, then consolidate all our media files into it.

  • First, open the Library you want to consolidate and select it’s name in the Library List.
  • Go to Inspector > Library Properties and click Modify Settings for Storage Locations.
  • Create a new location for the Media menu option.
  • Next, click Consolidate in the Media section.

The Consolidate command follows these rules:

  • When you consolidate files from a library into an external folder, the files are moved.
  • When you consolidate files into a library from an external folder, or from an external folder to another external folder, the files are copied.
  • These rules prevent broken links from other libraries.

NOTE: If the media is already external, and no other libraries are using it, you can manually delete the original media after consolidating to save storage space.

EXTRA CREDIT

  • If you are in mid-project, DO include Optimized and Proxy media.
  • If you are archiving a project, DO NOT include Optimized or Proxy media.

If FCP X needs either of these files and they are missing, it will automatically rebuild them.


Please rate the helpfulness of this tip.

Click on a star to rate it!