… for Apple Final Cut Pro X

Tip #944: Change Library Storage Locations

Larry Jordan – LarryJordan.com

This option organizes your media, while still keeping it external.

The Storage Locations panel, which is part of Library Properties.

Topic $TipTopic

By default, Final Cut Pro X either stores media in the library file, or points to its current storage location somewhere else on your system. But… there’s a third option that may make more sense for your project.

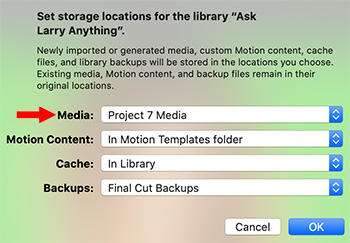
  • Select a Library in the Library List.
  • In the Inspector, click Modify Settings for Storage Locations.
  • Use the Media pop-up menu (see screen shot), to create a new, external, folder to store all files imported into this project.

Files from other locations will be copied into this location.

The benefits to using a custom library folder are:

  • Media is still stored outside the library; making it accessible to other projects and applications
  • Media is stored in one place, which makes moving libraries, backups, and archives a LOT easier.
  • Each Library can have its own custom folder, which simplifies organizing media by project.
  • It is still easy to share the same media between projects.

EXTRA CREDIT

The only downside to this option is that media is copied into this folder, which may increase total storage requirements.


Please rate the helpfulness of this tip.

Click on a star to rate it!

… for Random Weirdness

Tip #937: Tips to Great Interviews

Larry Jordan – LarryJordan.com

Interviews are directed conversations to get useful content.

The heart of a good interview is a good story. (Image courtesy pexels.com.)

Topic $TipTopic

Technology is important, but the reason people are watching your video is the content, not the tech.

A while ago, I wrote an article on interviews and asking the right questions. An interview is not a conversation; it is a directed conversation to get useful content.

Here are some ideas to consider:

  • Plan. Planning is not as sexy as production, but it is just as essential. When time is limited, you can’t afford to wander around trying to discover your subject during an interview. You need to have a goal in mind.
  • Guests. Before the guest enters the set, I’ve worked out camera angles, framing, lighting, and mic issues with the crew. Once the guest enters, direct your full attention to them. As the interviewer, you need to build a relationship, a rapport, with the guest from the moment they walk in.
  • Get Started. Asking questions is part art and part science. The art is really listening to what your guest is saying. Actors call this being “in the moment;” focusing intently on your guest and what they are saying. The science is in how you construct your questions.

    For a fifteen minute interview, I try to create about 18 questions. My general assumption is that it takes about a minute for a guest to answer one question. For live shows I use all of each answer. For taped shows, I select the best parts.

  • Ask Questions. For me, an interview has an emotional arc, the same as a drama. I start with easy questions – “Tell me about your company” – then move into the WHAT, WHERE, and HOW questions. These set up a problem and what was done to solve it. Finally, I wrap up with WHY questions. These always elicit emotional responses.

    The secret code between my camera operator and me is that What/Where/How questions are shot on a medium close-up. But with Why questions the camera needs to zoom into a close-up, because Why questions bring emotions near the surface, where the camera can see them. Close-ups amplify emotions.

  • Questions I Try Not To Ask. Anything that can be answered with a Yes or No.
  • When the Interview is over. Just before calling “Cut!,” but when all my questions are done, I always ask the guest: “Is there a question I should have asked that I did not?” This gives them a chance to reflect to see if they want to add, or modify anything. About a quarter of the time, the guest will suggest a great question that I hadn’t thought of.

    When the interview is over, the very first words should be to the guest. Even if they were a train-wreck, congratulate them on doing a great job.

    While there is a fine line between flattery and down-right lying, telling a guest they were terrible won’t improve your interview. So, you might as well make them feel good as they leave the set.

EXTRA CREDIT

Here’s the link to the full article.


Please rate the helpfulness of this tip.

Click on a star to rate it!

… for Random Weirdness

Tip #935: 8K is Coming – Time to Get Ready

Larry Jordan – LarryJordan.com

8K is an issue of when, not whether. This article can help.

The Canon EOS R5 (8K video camera)

Topic $TipTopic

This article, written by Jourdan Aldredge, first appeared in PremiumBeat.com. This is an excerpt.

Larry comments: Jourdan has compiled an excellent discussion of shooting and editing 8K, even 12K, media. Are file sizes bigger? Yes, absolutely. Are images better? Also, yes. The issue is nuanced, but this is a short blog that’s worth reading.

Jourdan writes:

Believe it or not, there will come a day when filmmakers and video professionals look back at 8K and laugh. Not because 8K was such a hot topic, but because we’ll have moved on to 16K or higher! Seriously, if you look back at how the news of 4K cameras was handled, you’d think the video world was about to collapse under the weight of the increased pixels and file sizes.

Instead, we’ve all largely learned to embrace 4K, as it has truly been a game-changer in how video professionals and filmmakers frame their shots, manage their workflows, and handle post-production.

Even though the first 8K televisions were unveiled in 2019, 4K television is only recently starting to find its footing — sort of. The technology has been adopted by half the households in the US, and according to an article in Forbes, most people can’t tell the difference between 4K and 8K televisions in the first place.

His article (linked above) covers:

  • The Upsides of 8K
  • The Challenges of 8K
  • 8K for Visual Effects
  • Should You Shoot 8K

Larry summarizes: His answer is: Yes, but that doesn’t mean you need to switch to 8K immediately. However, 8K is coming and we need to get ready.


Please rate the helpfulness of this tip.

Click on a star to rate it!

… for Random Weirdness

Tip #924: Dropbox Simplifies File Transfers

Larry Jordan – LarryJordan.com

This new features solves problems getting files from Point B to Point A.

The Request Files page inside Dropbox.

Topic $TipTopic

Warren “ButchNelson suggested this tip.

There’s a new feature in Dropbox called “Request a file.” This is a link you can send to anyone and they can upload a file of almost any size; up to the limits of your Dropbox plan.

The file appears in the Request a File folder.

I’ve used this feature this week to collect files from iPhones, Android phones, Macs and PCs. For someone like me, who deals in files from all different sources, I’m in heaven!

It is amazingly easy to use.

Larry adds: To access this, open the Dropbox app, click File Requests in the sidebar on the left, then the blue Request Files button.

Dropbox displays a dialog asking you to specify a storage location, then emails that need to be contacted.


Please rate the helpfulness of this tip.

Click on a star to rate it!

… for Apple Motion

Tip #934: Working with Regions

Larry Jordan – LarryJordan.com

Moving the In and Out to create a work region simplifies reviewing complex sections of a project.

Loop playback (left arrow) repeats playback between the In (center) and Out (right).

Topic $TipTopic

When you are working on a complicated transition, Motion has a hidden control feature that allows you to focus on just a portion of a project. Here’s how this works.

At the bottom left of the timeline, left red arrow, is a loop icon. When enabled (blue), this tells the playhead to continuously play from the beginning to the end of a project; looping from the end to the beginning.

Well, ah, not the beginning to the end, but the In to the Out. These two icons (center and right red arrows) mark the In and Out of a Motion project.

Drag them to bracket the section you want to concentrate on, then, when you press the spacebar, Motion will continuously loop between those two points until you tell it to stop.

EXTRA CREDIT

  • I. Set the In.
  • O. Set the Out.
  • Option + X. Clear the In and the Out.
  • Control + L: Enable/disable Loop playback.

Please rate the helpfulness of this tip.

Click on a star to rate it!

… for Apple Motion

Tip #933: An Easier Way to Time Audio

Larry Jordan – LarryJordan.com

The audio timeline displays timing and location of individual audio clips.

Individual audio clips are displayed in the timeline when this icon is clicked.

Topic $TipTopic

I’ve written before that working with audio in Apple Motion is a frustrating experience. However, this hidden interface makes finding and timing multiple audio clips a lot easier.

On the right side of the timeline is a speaker icon. (Indicated by a red arrow. However, I moved the icon from the right corner so it would fit into this screen shot.) Click it to display the audio timeline.

The timeline now displays all imported audio clips and allows you to adjust placement and timing, as well as add behaviors and audio filters.

If you have struggled to control your audio, this hidden portion of the timeline will make a big difference.


Please rate the helpfulness of this tip.

Click on a star to rate it!

… for Apple Motion

Tip #932: Where Motion Stores Custom Effects

Larry Jordan – LarryJordan.com

Storage locations are set by default, but you still have a lot of control.

This dialog determines effect name and storage location.

Topic $TipTopic

When you create a custom effect, transition, generator or title in Motion, where does it get stored?

While you determine the category in which a new effect is stored, Motion saves all effects in:

[ Home Directory ] > Movies > Motion Templates.

Inside that folder are folders for the five different groups:

  • Compositions
  • Effects
  • Generators
  • Titles
  • Transitions

Within each of these group folders are different category folders.

EXTRA CREDIT

  • You can move effects from one location to another within the same group (i.e. titles) simply by dragging.
  • To remove an effect, make sure FCP X and Motion are not running, then drag the effect you no longer want to the trash. This removal does not affect any clips to which this soon-to-be-deleted effect is applied.
  • You can duplicate an effect to share with different categories within the same group (i.e. titles),  but you can’t move an effect between groups (i.e. move a title into generators). It won’t work..

Please rate the helpfulness of this tip.

Click on a star to rate it!

… for Visual Effects

Tip #939: 25 After Effects Tips

Larry Jordan – LarryJordan.com

25 tips to turn the beginning user into a power user.

(Image courtesy of NoFilmSchool.com.)

Topic $TipTopic

This article, written by Jason Boone, first appeared in NoFilmSchool.com. This is an excerpt.

The world of motion graphics can be a bit daunting if you’re just getting started. The shortcuts listed below are geared to help you become more comfortable working in the wonderful world of Adobe After Effects. These tips and tricks focus on a wide range of topics—learn how to more efficiently navigate the workspace, work with keyframes, customize the interface, and properly handle layers.

In addition to listing the 25 tips, Jason provides details on what each does, along with a video illustrating how they are used.

The article link at the top takes you to the right spot.


Please rate the helpfulness of this tip.

Click on a star to rate it!

… for Visual Effects

Tip #938: 10 Essential After Effects Tricks

Larry Jordan – LarryJordan.com

After Effects is filled with many different ways to work more efficiently.

Topic $TipTopic

This article first appeared in RocketStock.com. This is an excerpt.

These 10 quick and easy After Effects tricks are essential for any motion designer!

  1. Quick Pan. Hold down the space bar and drag.
  2. Build a RAM Preview. Control + O.
  3. Duplicate layers. Command + D.
  4. Adjust Render Quality. Select the dropdown menu at the bottom of the composition panel.
  5. Export Alpha Channels. Include both RGB + Alpha in the Output Module.
  6. The “Wiggle” Expression. Add the expression wiggle(10,10) into your expression editor.
  7. Save Frames. Composition > Save Frame As > File.
  8. See All Keyframes. U.
  9. Keyframe Scaling. Hold down option and drag a selection of keyframes.
  10. The Graph Editor. With keyframes selected, hit the small graph icon in the timeline.

The article link at the top includes detailed descriptions, illustration of each shortcut and links to more After Effects tips and tutorials.


Please rate the helpfulness of this tip.

Click on a star to rate it!

… for Visual Effects

Tip #936: 10 Must-Know After Effects Shortcuts

Larry Jordan – LarryJordan.com

These ten shortcuts are essential for any After Effects user.

Topic $TipTopic

This article, written by Joe Frederick, first appeared in PremiumBeat.com. This is an excerpt.

These simple key combinations let you perform commands that you’d typically execute with your mouse, and while they may only save you a few seconds each time you use them, those saved seconds will add up to saved hours over the duration of a project. Here are the 10 keyboard shortcuts you should learn first.

  1. Activate Selection Tool: V
  2. Activate Hand Tool: H
  3. Reveal All Keyframed Properties: U
  4. Precompose Selected Layers: Ctrl + Shift + C
  5. Show/Hide Opacity: T
  6. Fit to Screen: Shift + /
  7. Split Layer: Cmd + Shift + D
  8. Trim Layer Out Point to Current Time: Option + ]
  9. Go Back/Forward One Frame: Command + Right/Left Arrow
  10. Stretch Keyframes: Option + Mouse Drag

EXTRA CREDIT

The article has illustrations for each shortcut, as well as a detailed description of how and when to use it.


Please rate the helpfulness of this tip.

Click on a star to rate it!