… for Codecs & Media

Tip #907: Why Can’t I Subclip H.264 Media?

Larry Jordan – LarryJordan.com

Extracting media from compressed files almost always requires recompression.

I-frame (top) vs. GOP compression. Edits can only be made on the green I-frames.

Topic $TipTopic

I got an email recently from a reader asking for a way to export subclips from an H.264 video without recompressing it, because he didn’t want to lose any image quality.

The problem is that this can’t be done. Here’s why.

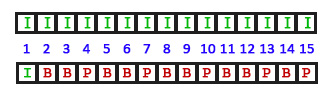
In an ideal world, each frame in a video should be self-contained. This is called I-frame compression and is illustrated by the top line in the screen shot.

The benefit to I-frame compression is that each frame is fully self-contained, high-quality and very efficient to edit. The disadvantage is that the media files are very large. ProRes, GoPro Cineform and DNx are all I-frame formats.

However, many cameras, to save storage space and stay within the technical bandwidth of MicroSD camera cards, compress the media using GOP (pronounced “gop”) compression (the bottom line in the screen shot). H.264 and HEVC, use this format.

NOTE: Not all GOP groups are 15 frames, some use 7 frames or other frame counts. However, the overall concept is the same.

What a GOP group does is store a complete image on the first frame of the group, then only record the changes for each group of pixels, essentially as a text file, for each frame that follows in the group.

The benefit to GOP compression is that the media files are very small. But, in order to display an image the computer needs to find the I-frame at the start of the group, then calculate the changes for each succeeding frame until it gets to the frame you want to display. This additional calculation is why we describe this format as “inefficient.”

Every GOP clip MUST start with an I-frame. If I wanted to extract a portion of a GOP-compressed clip, say starting at frame 10, I would need to first, recreate an I-frame for frame 10, then rebuild the entire GOP structure during export for the rest of the clip. That means re-compressing the entire clip to rebuild the GOP structure.

This is why recompressing already compressed GOP media tends to look bad; the computer needs to rebuild and recompress every frame to recreate the GOP structure.

This is also the reason that working with I-frame media is faster with overall higher image quality, because the CPU needs to work far less to calculate and display images.


Please rate the helpfulness of this tip.

Click on a star to rate it!

… for Adobe Premiere Pro CC

Tip #912: The Hidden Dynamic Search Bin

Larry Jordan – LarryJordan.com

All searches are dynamic, with bins appearing in the Files panel.

The Create Search Bin window, displaying searchable metadata.

Topic $TipTopic

Hidden in plain sight in Premiere’s Files panel is the ability to create bins that search all clips in a project based on specific criteria and display the results – dynamically – in a bin in the Files panel.

It’s called a Search Bin.

Click the small folder icon immediately to the right of the text search box at the top of the Files panel. This displays the Create Search Bin dialog (screen shot).

You can search on a variety of metadata, as indicated by the popup menu.

Additionally, lower red arrow, you can refine your search using Boolean logic; specifically AND or OR; by selecting it from the middle popup menu.

The results of these search criteria are stored in a bin in the Files panel, named after your search.

Best of all, the results are dynamic. As different clips meet your search criteria, they will appear, or disappear, from this search bin.


Please rate the helpfulness of this tip.

Click on a star to rate it!

… for Adobe Premiere Pro CC

Tip #911: The Skin Tone Line is Your Friend

Larry Jordan – LarryJordan.com

All of us are the same color, but not the same grayscale value.

The skin tone line (red arrow) in the Lumetri scopes.

Topic $TipTopic

One of the most powerful color correction / grading tools that we have is the skin tone line. (Indicated by the red arrow in the screen shot.) Once you know how to use it, it is easy to quickly fix color problems and make your on-screen talent look great.

Human skin is translucent. That which gives skin it’s color is the red blood circulating underneath; and all of us have the same color red blood.

That which adds variation to our skin is its grayscale. You can verify this for yourself the next time a piece of dead skin falls off. If you look at it, it doesn’t have any color, just varying shades of gray. Some of us have lighter or darker gray skin than others.

So, if you have a shot with an incorrect color balance, crop to isolate a well-exposed piece of skin – avoid makeup or hair – then adjust color settings so the color values are parked ±2° on the skin tone line.

NOTE: Generally speaking, Asians tend to be 2° below the line, everyone else is either on it or 2° above it.

Of course, there are individual exceptions and lighting can make a big difference. But, if you are looking to salvage a problem shot, the skin tone line can help you get things back on track.

EXTRA CREDIT

Here’s a tutorial from my website that describes this in more detail.


Please rate the helpfulness of this tip.

Click on a star to rate it!

… for Adobe Premiere Pro CC

Tip #910: Vibrance vs. Saturation

Larry Jordan – LarryJordan.com

Vibrance also prevents over-saturation of highlights or shadows.

Vibrance settings in the Lumetri Color panel > Creative.

Topic $TipTopic

Ever wonder what the difference is between “vibrance” and “saturation?” Well, for video, the difference is significant.

SATURATION

Saturation uniformly increases the amount of all colors in an image, regardless of how saturated they already are. This can result in over-saturating (clipping) certain colors, or skin tones. This tends to make skin tones look too orange and unnatural.

VIBRANCE

Vibrance is a “smart-tool” which increases the amount of the more muted (less saturated) colors without adjusting the well-saturated colors. (Think of this as an audio limiter filter applied to saturation; soft passages are boosted, without changing the louder passages.) Vibrance also prevents skin tones from becoming overly saturated and unnatural.

Vibrance becomes especially helpful in not over-saturating highlights or shadows.

EXTRA CREDIT

The Vibrance setting is located in Lumetri Color > Creative.


Please rate the helpfulness of this tip.

Click on a star to rate it!

… for Apple Final Cut Pro X

Tip #909: Add a 360 VR Title

Larry Jordan – LarryJordan.com

360 VR titles are positioned using the Reorient settings, not text positions.

The 360° Basic 3D title, Constantia font, positioned using Inspector > Reorient. (Image courtesy of Allynn Wilkinson.)

Topic $TipTopic

In traditional film, titles are fixed in relation to the frame. In 360 VR, they are locked to a specific position in the image. This means titles don’t “float,” they appear or disappear depending where in the VR sphere the viewer is looking.

This makes adding titles trickier because you can’t assume the viewer will actually see them if they are looking somewhere else.

Final Cut includes seven different 360° title templates. These are essentially the same, except for their built-in animation.

Unlike other titles, though, you position them using the Video Inspector > Reorient settings (see screen shot).

Keep in mind that if the viewer is looking somewhere else in the frame, they won’t see your title. For this reason keep titles on screen much longer than you would use for a “normal” film.

EXTRA CREDIT

It might help to think of titles more as “labels” than “titles.”


Please rate the helpfulness of this tip.

Click on a star to rate it!

… for Apple Final Cut Pro X

Tip #908: Add Transitions to 360 VR Video

Larry Jordan – LarryJordan.com

Transitions need to be used sparingly. Think of VR more as live theater than film.

Note the difference in controls for a VR transition.

Topic $TipTopic

The key concept you need to understand about 360 VR video is that, because the video is a sphere, you need to edit as little as possible. However, you can still add transitions. Here’s how.

With normal video, most transitions start at the edge of the frame. But, with 360 VR, there is no edge – the entire image is a sphere. Moving in for a closeup on one side means moving away from a close-up on the other side of the sphere.

In traditional film, we bring the camera closer to the actor. In 360 VR, we bring the actor closer to the camera.

This “sphere-ness” also affects transitions. A traditional transition doesn’t understand that there’s an up or down to the image. This means that you need to pick transitions from the Transitions > 360° category.

Then, go to the Inspector and adjust the Longitude (starting point), Direction and Speed to get the effect you want.

EXTRA CREDIT

Remember, unlike traditional film, you can’t assume where the viewer will be looking. Since you are shooting a sphere, the viewer could be looking anywhere within it when your transition starts.

Soft edges are always a good idea.


Please rate the helpfulness of this tip.

Click on a star to rate it!

… for Apple Final Cut Pro X

Tip #906: How to Display 360 VR Video

Larry Jordan – LarryJordan.com

Final Cut can display and navigate 360 VR video on screen and on headset.

“Normal” display (top) and 360 VR view (bottom). Image courtesy of Allynn Wilkinson.

Topic $TipTopic

360 VR shoots video with the camera at the center of a sphere. You can look around, up or down inside the image as if you were standing still and turning your head.

Final Cut Pro X supports editing and exporting 360 VR video – but, by default, the Viewer does not display it properly. (See screen shot.)

To display 360 VR:

  • Create a new project, and make sure the settings match your 360 VR clip.
  • Choose View > Show in Viewer > 360° (Shortcut: Option + Cmd + 7).
  • Move around the image by dragging inside the 360 view.
  • Adjust the position of the center using the slider in the top left corner. However, this is best left at the default setting of 90°.

While 360 VR is designed for the viewer to move around the shot, you can set the default opening angle by clicking the Reorient (“world”) icon in the low-left corner of the 360° Viewer, then adjusting the shot to suit.

EXTRA CREDIT

You can precisely change the default framing for the selected clip using the Reorient settings in the Inspector.


Please rate the helpfulness of this tip.

Click on a star to rate it!

… for Random Weirdness

Tip #899: Essential Gear for a Production Company

Larry Jordan – LarryJordan.com

Buy gear as you need it, not in anticipation of needing it.

Blackmagic URSA Mini 12K camera.

Topic $TipTopic

This article, written by Jourdan Aldredge, first appeared in PremiumBeat.com. This is an excerpt.

From 4K cameras and gimbals to editing software and computers, here’s a look at the essential gear you’ll need to start your own video production company.

While you’ll find lots of content online that insists you should immediately get your hands on a high-end camera, a couple of new drones, and some studio space — — I actually suggest starting small when it comes to cameras, gear, and equipment.

Larry adds: My philosophy is to buy your gear using client dollars, rather than your own, as much as possible.

Here is the essential gear Jourdan recommends:

  • Versatile 4K Hybrid Camera. Any video production company that wants to get work needs to have a 4K camera ready to go at a moment’s notice. Luckily, there are plenty of surprisingly affordable options.
  • Go-To Cinema Camera (Own or Rent). You can get more work — broadcast commercial shoots and the like — by offering clients a higher-end cinema camera option. However, I’d suggest renting high-end cameras until you’re certain you’ll need one consistently enough to warrant the investment.
  • Tripods, Gimbals, and Rigs. For those just starting out, I recommend investing in at least one: tripod, slider, handheld rig and gimbal/steadicam.
  • Three-Point Lighting Kit. Invest based on current needs, then expand. Specifically, start with a simple three-point lighting kit that’s functional, easy to move quickly, sturdy enough to not fall or break, and priced in a way that won’t limit your resources elsewhere.
  • Audio Recording Bundle. Audio needs vary drastically from shoot to shoot, but I’ve found that having these basics will cover the majority of your projects:
    • Multi-channel audio recorder
    • Shotgun boom mic
    • Boom mic pole
    • Boom mic stand
    • Wireless lav kit
    • Multiple headphones
  • Quality Editing Computer. If you’re offering full service (also called turnkey) video production that includes editing work, then I highly recommend putting most of your investment resources into your computer(s) and editing workflow. Apple computers — like the Apple Mac Pro, iMac Pro, and MacBook Pro — have never let me down.
  • Editing Software. There’s no wrong answer here. Adobe Premiere Pro, Apple Final Cut Pro X and DaVinci Resolve still rule the industry.

EXTRA CREDIT

In the article linked above, Jourdan provides specific gear suggestions, with links to learn more.


Please rate the helpfulness of this tip.

Click on a star to rate it!

… for Random Weirdness

Tip #898: Top Ten Single Take Music Videos

Larry Jordan – LarryJordan.com

One take means much more pressure on production – but the results are worth it.

Screen shot from OK Go “The Writing’s on the Wall.”

Topic $TipTopic

The folks at MotionArray have compiled the Top Ten One-Take Music Videos. Because, why not? This article first appeared in MotionArray.com. This is an excerpt.

We often focus on the art of editing, but what about the art of not editing? What we mean here, is the very tricky art of directing and shooting a scene in a single take. And in this case, we’re taking a look at some of our favorite single take music videos.

Here’s their list. The link at the top provides more details and a link to each video. Enjoy debating your own top ten.

  1. Lucas – Lucas with the Lid Off
  2. Feist – 1, 2, 3, 4
  3. Cibo Matto – Sugar Water
  4. Interpol – No I in Threesome
  5. Gary Jules – Mad World
  6. OK GO – The Writing’s On The Wall
  7. Bat For Lashes – What’s A Girl To Do
  8. Weezer – Undone, The Sweater Song
  9. Sia – Chandelier (One Take Version)
  10. OK GO – Upside Down & Inside Out

Please rate the helpfulness of this tip.

Click on a star to rate it!

… for Random Weirdness

Tip #897: The Real Reason for a 12K Camera

Larry Jordan – LarryJordan.com

12K is all about improving 4K image quality.

The Blackmagic Design URSA Mini 12K camera.

Topic $TipTopic

Last week, Blackmagic Design released a new version of the URSA Mini camera that shoots 12K video frames! Why???

As many of you know, I am not a fan of ever-larger frame sizes; or the massively huge files these formats create. However, recently, Simon Wyndham, writing for Red Shark News,  wrote a thoughtful analysis of the thinking behind this camera.

The entire article is worth reading, including a discussion of why the camera supports Blackmagic RAW, but not ProRes or ProRes RAW, and the new way it uses to record raw sensor data that bypasses deBayering. Like I said, an article well worth reading.

NOTE: Here’s the article link.

THE KEY HIGHLIGHT

However, the key behind Simon’s analysis for me was his thinking about 12 K images. Here’s an excerpt:

“Blackmagic Design didn’t really make the camera with the resolution it has so that you can film in 12K. You can do this perfectly easily of course if you want to, but the real reason why it exists is so that you can shoot exceptional 8K and 4K.

“It was famously said that the perfect resolution for a camera is 100MP (14K). Why? Because the human eye consists of 100 million rods and cones. The 80MP of the 12K URSA Mini is well on the way towards that ideal. At resolutions as high as this pixels become pretty much irrelevant. It becomes a point at which digital, for all intents and purposes, becomes analogue.

“Noise structure becomes incredibly fine, and with oversampled lower resolutions it becomes averaged out further. Subtly of detail and texture structure is picked up that you simply do not achieve with a native 4K or even 8K camera. At this sort of resolution, while aliasing technically still exists, it is visually reduced to nothing. It’s just too fine to see. High frequency edges become naturally smooth.

“Even on a 4K television, and in some instances an 8K one it is possible to see the edge structure on something like sharp white text on a dark background depending on the distance you sit. At ultra high resolutions these high frequency edges are totally smooth. And as we’ve mentioned many times before on RedShark, higher resolutions are not necessarily about more detail, but much more about edge smoothness.

“So primarily the 12K URSA Mini is not about actually filming 12K on a daily basis, but it is about filming extremely high quality oversampled lower resolutions.

“Do you need the extra resolution? No, you can work perfectly well with your existing 4K camera. But, and it’s a big but (no Shrek reference intended), we are in the business of producing the best pictures possible. And while high resolution isn’t the only arbiter of picture quality, it is an indisputable fact that it is most certainly an important one.”


Please rate the helpfulness of this tip.

Click on a star to rate it!