… for Apple Motion

Tip #896: Don’t Use the Rectangle Tool…

Larry Jordan – LarryJordan.com

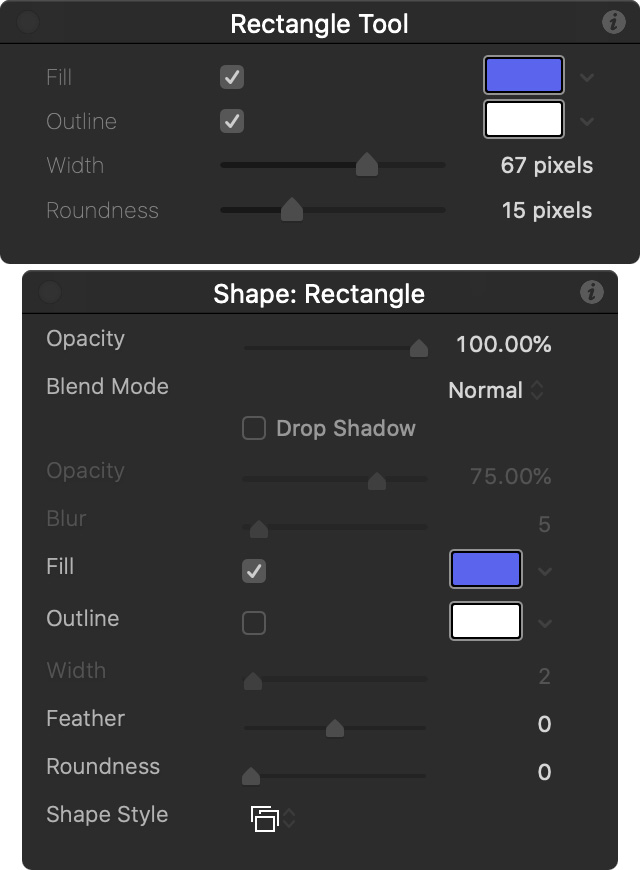
Formatting options for the Shape tool are limited compared to the Select tool.

Top: Options for the Rectangle tool.
Bottom: Options for the Arrow tool.

Topic $TipTopic

…to change an existing rectangle. Or any geometric shape.

The settings in the HUD for the rectangle tool only apply to the NEXT rectangle you draw. If you want to change an existing rectangle, first select the Select tool (Shortcut: Shift + S).

As the screen shot makes clear, the formatting options for the Rectangle tool are very limited. Especially when compared to after you draw the rectangle, then select the Select tool.


Please rate the helpfulness of this tip.

Click on a star to rate it!

… for Apple Motion

Tip #895: Add a Curve to a Line

Larry Jordan – LarryJordan.com

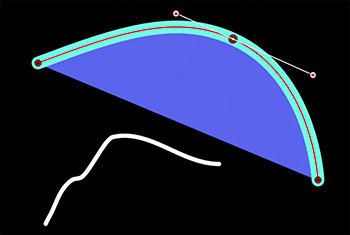
Curve control points are added by Option-clicking any line.

The cyan line was drawn by the Pen tools, the squiggle by the Paint Brush. Both were modified into curves using Edit Points.

Topic $TipTopic

Whether you draw a line with the Paint Brush or the Pen tool, once you’ve drawn the line, you can still make changes to it. Here’s how.

  • After you’ve drawn a line using either the Paint Brush or Pen tools, select the Edit Points tool.

NOTE: This is in the same menu as the Arrow (Select) tool.

  • Select the line you want to adjust in the Layers panel.
  • Then, Option-click with the Edit Points tool on the line where you want to add a curve and drag.

A curve is added.

EXTRA CREDIT

  • Drag the white Bezier control dots to change the shape of the curve.
  • Get different curve results by pressing Shift, Control, Option or Command while dragging a control dot.

Please rate the helpfulness of this tip.

Click on a star to rate it!

… for Apple Motion

Tip #894: What is the HUD?

Larry Jordan – LarryJordan.com

The HUD is a fast way to adjust common settings for selected elements.

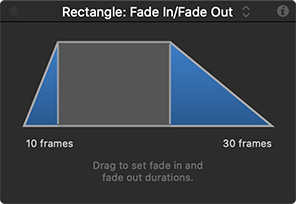
The HUD displaying a customized Fade In/Fade Out behavior.

Topic $TipTopic

The HUD, originally called the “Heads-up Display,” is a floating, interactive control panel for whatever you have selected in the Layers panel.

The HUD icon is located in the upper right corner of the Motion interface. You can access it by clicking the icon, choosing Window > Show HUD or using a keyboard shortcut.

Back when Motion was first released, the HUD was assigned F8 as a keyboard shortcut. However, Apple is moving away from F-keys in all it’s apps. While Motion still supports some F-keys, the HUD was recently reassigned to Option+Cmd+L.

The HUD makes it easy to make quick, intuitive changes to selected layers and effects. For instance, in this screen shot, dragging the vertical line for each blue triangle allows altering the duration of a Fade In / Fade Out behavior from the default 20 frames to whatever makes sense for your project.

If you haven’t used the HUD, it is an excellent tool filled with the most common settings you need to tweak for whatever is selected.

If you were wondering why the HUD doesn’t appear when you press F8, now you know.

And, if you use the HUD on a regular basis, consider yourself one of the “smart folks in the know.”


Please rate the helpfulness of this tip.

Click on a star to rate it!

… for Visual Effects

Tip #902: More Free VFX Tutorials

Larry Jordan – LarryJordan.com

More than 29,000 tutorials covering a wide variety of subjects.

Image courtesy of Pexels.com.

Topic $TipTopic

I was looking for free visual effects tutorials and discovered Envato Tuts+. These self-paced tutorials allow you to learn at your own pace.

Their website states: “We believe everyone can be creative. It’s not a rare or magical talent, just a mindset and a set of skills. We’re all born with curiosity, playfulness, and an ability to learn. As adults, we can choose to foster that creative spark and devote time to master the practical skills needed.”

With more than 29,000 tutorials online, choose from categories such as: Design, Photography, Animation, Video, 3D and Motion Graphics.

Here’s the link


Please rate the helpfulness of this tip.

Click on a star to rate it!

… for Visual Effects

Tip #901: Better Screen Replacements in After Effects

Larry Jordan – LarryJordan.com

Screen replacements provide higher quality with greater image control.

Image courtesy of Jason Boone, the author of this tutorial.

Topic $TipTopic

Written by Jason Boone, this first appeared in PremiumBeat.com. This tutorial offers a step-by-step guide to one of the most common VFX techniques — the screen replacement using Adobe After Effects.

Shooting a screen almost never looks right. A much better option is to replace the screen with a whole new image. A screen replacement tracks the screen in your shot, then uses that tracking data to “replace” the screen with a separate clip or sequence.

Here’s a summary of the steps:

  • Step 1: Track the Screen. After Effects has a great point tracking system, but I prefer the planar tracker of the Mocha effect. It’s just more versatile when it comes to tracking for screen replacements. And don’t worry, Mocha AE is bundled with After Effects, so you already have it installed.
  • Step 2: Prep the Replacement Clip. Phones use vertical video, which means clips need to be prepped correctly.
  • Step 3: Replace the Screen.
  • Step 4: Isolate Any Screen Reflections. Since the reflection of my original clip is on top of a blank black screen, I can separate it using basic blend modes, such as Lighten, Add, or Screen.

EXTRA CREDIT

In the article, the author provides a video showing exactly how he uses these tools, along with an illustrated transcript of his material.


Please rate the helpfulness of this tip.

Click on a star to rate it!

… for Visual Effects

Tip #900: Putting Text Message on Screen

Larry Jordan – LarryJordan.com

There’s no perfect answer – but, at least, you have options.

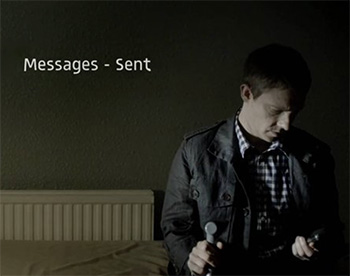
Image from “Sherlock” on the BBC.

Topic $TipTopic

This article, written by Rubidium Wu, first appeared in PremiumBeat.com. This is an excerpt.

Text messages are one of the main ways people communicate. And, as art imitates life, text messages have made their way into films and TV, which presents a problem for filmmakers — how to show a text message exchange in a way that doesn’t bore the audience.

Here are several ideas:

  • Method 1: Place Text on Screen. The first (and probably most popular way) to show a text message exchange is to shoot the phone itself. This is also how a lot of filmmakers show emails when the need arises. But it leaves you with a dated interface.
  • Method 2: Display Unfiltered Text On Screen. Rather than attempting on-screen OS representations, you can take the approach popularized by shows like Sherlock: Just display the message on the screen in plain, unfiltered text. (See screen shot.) This has the dramatic advantage of the above method, but it’s device agnostic — it works just as well for an early flip phone as it does for a future phone. However, this causes problems if you need to localize your film for multiple languages, as these titles are burned in.
  • Method 3: Use Subtitles. Why not, as some filmmakers have done, just insert a subtitle for the text message, as if it’s another character speaking? While this method doesn’t exactly scream “high production value,” it does help you avoid dated footage, allows you to see character reactions, and can be changed to any language.

EXTRA CREDIT

The article linked above includes more details, and a free template offer for After Effects users.


Please rate the helpfulness of this tip.

Click on a star to rate it!

… for Codecs & Media

Tip #905: What’s a Media “Container?”

Larry Jordan – LarryJordan.com

Containers simplify storing different media types in one place.

Topic $TipTopic

QuickTime, MXF, WAV and MPEG-4 are all media containers. But, what’s a container and why is it used?

Wikipedia: “A container format (informally, sometimes called a wrapper) belongs to a class of computer files that exist to allow multiple data streams to be embedded into a single file, usually along with metadata for identifying and further detailing those streams.”

Because a media file can have different attributes based on whether it holds audio, video, timecode, captions or other media information, it becomes easier to store each of these elements in its own file, then store all these different components in a single container.

An analogy is a file folder holding different sheets of paper. Each paper could be written in a different language, but unified by being contained in that single folder.

Wikipedia: “Container format parts have various names: “chunks” as in RIFF and PNG, “atoms” in QuickTime/MP4, “packets” in MPEG-TS (from the communications term), and “segments” in JPEG. The main content of a chunk is called the “data” or “payload”. Most container formats have chunks in sequence, each with a header, while TIFF instead stores offsets. Modular chunks make it easy to recover other chunks in case of file corruption or dropped frames or bit slip, while offsets result in framing errors in cases of bit slip.”

Here are two links to learn more: Wikipedia and Mozilla

Please rate the helpfulness of this tip.

Click on a star to rate it!

… for Codecs & Media

Tip #904: Why You Should Avoid HDV

Larry Jordan – LarryJordan.com

Where possible, avoid using HDV to maximize image quality.

Topic $TipTopic

HDV was one of the first, if not THE first, consumer-grade HD video format. As such, it was an eye-opening opportunity to discover the benefits of HD.

However, compared to media formats today, HDV has three serious limitations:

  • First, most HDV material is interlaced. While this plays acceptably on TV monitors, it looks awful on the web. This is because TVs are designed to display interlaced media, while the web is designed for progressive.
  • Second, unlike all digital media today, HDV uses rectangular pixels which are stretched to fill the frame, rather than square pixels. This means that an HDV image won’t look as sharp as digital images today.
  • Third, HDV records half the color information compared to most modern cameras. (And one-quarter the color of high-end cameras.)

NOTE: The only way to get rid of interlacing is to remove every other line of video, thus cutting vertical image resolution in half. Then, existing lines are either duplicated or guessed at using various methods of image interpolation.

So, if you are given the option to shoot or convert media into HDV, be very cautious before you agree. There are very few situations today where this makes sense.

EXTRA CREDIT

If you have existing HDV material, consider getting it transcoded to ProRes 422. While not required, you do need to start thinking about how to preserve and convert your older media assets, especially if you plan to edit them in the future.


Please rate the helpfulness of this tip.

Click on a star to rate it!

… for Codecs & Media

Tip #903: A Caution About Frame Rate Conversions

Larry Jordan – LarryJordan.com

The highest image quality occurs when media is played at its source frame rate.

Topic $TipTopic

During this last week, I’ve gotten more emails than usual about frame rate conversions. Some of the concerns are software related; for example, there may be a problem with Compressor converting 24 fps material to 25 fps.

However, the bulk of my email centered on jitter caused by the conversion.

It is important to stress two key points:

  1. The web does not care about the frame rate of your media. The web plays anything. There’s no benefit to changing rates.
  2. The best image quality is ALWAYS when media is played back at the frame rate it was shot. As much as possible, shoot the frame rate you need to deliver.

Converting from 24 to 48, 59.94 to 29.97 or 60 to 30 is smooth and easy; every other frame is dropped or each frame is doubled. But converting 24 to 25, or 30 to 25 or 29.97 to 24 is a recipe for stutter and jitter.

To decrease your stress, before you start shooting, carefully think about the frame rate you need to deliver – or potentially might need to deliver – then shoot that rate. (And, remember, again, that the web doesn’t care about frame rates. So don’t convert media for the web.)


Please rate the helpfulness of this tip.

Click on a star to rate it!

… for Adobe Premiere Pro CC

Tip #893: Timeline Mouse Shortcuts

Larry Jordan – LarryJordan.com

Changing timeline track heights is easily done using the mouse or keyboard.

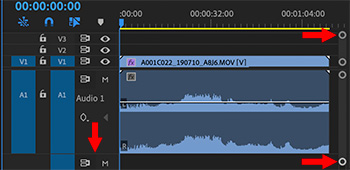
Drag the circles on the right to change video (top) and audio (bottom) track heights.

Topic $TipTopic

One of the problems of being a keyboard shortcut junkie is that I can easily overlook interesting mouse shortcuts. Here’s one; well, two, actually.

  • To change the height of a timeline track, drag the horizontal line that separates two tracks (the left arrow in the screen shot).
  • But is it easier to see and drag one of the white circles on the right side of the timeline. The upper circle changes the video track height, the lower circle changes the audio track height.
  • Drag the space between the two circles in the middle to change where the division between audio and video occurs in the timeline.

EXTRA CREDIT

Just so keyboard folks are not left out:

  • You can change the height of video tracks in the timeline by typing Cmd + [plus] / [minus]

NOTE: Control, for you Windows folks.

  • You can change the height of audio tracks in the timeline by typing Option + [plus] / [minus]

NOTE: Alt, for you Windows folks.


Please rate the helpfulness of this tip.

Click on a star to rate it!