A new subscription bundle – 1,500 presets in 177 effects.
(Image courtesy of Pexels.com.)
Last week, NewBlueFX announced TotalFX – a collection of over 1,500 presets in 177 effects in 30 different products. This is a comprehensive suite of titling tools, transitions, filters and video editing plugins.
This includes Titler Pro 7 Ultimate, the “industry-standard in tiling software for video editors. Deliver exceptional production value with stunning 3D animated titles and motion graphics without sacrificing productivity. Titler Pro 7 integrates with all of today’s leading NLEs.”
Available via monthly, quarterly or annual subscription; or perpetual license. The annual subscription is $239 (US).
The type of cabling determines maximum network speed and distance.
(Image courtesy of Pexels.com.)
I want to upgrade my office network to 10 gigabit Ethernet. But that requires replacing my Category 5e cables with either Cat6 or 6e. That got me wondering: What’s the difference?
According to Black Box: “Cat5e, also known as Category 5e or Category 5 Enhanced, is a network cable standard ratified in 1999. Cat5e cables are typically 24-gauge twisted pair wires, which can support Gigabit networks at segment distances up to 100 meters.
Cat6 came out only a few years after Cat5e. Cat6 is a standardised twisted pair cable for Ethernet that is backward compatible with Cat5/5e and CAT 3 cable standards.
Like Cat5e, Cat6 cables support Gigabit Ethernet segments up to 100 m, but they also allow for use in 10-Gigabit networks over a limited distance. At the beginning of this century, Cat5e typically ran to the workstations, whereas Cat6 was used as the backbone infrastructure from router to switches.
The main difference between Cat5e and Cat6 cable lies within the bandwidth, the cable can support for data transfer. Cat6 cables are designed for operating frequencies up to 250 MHz, compared to 100 Mhz for CAT5e. This means that a Cat6 cable can process more data at the same time. Think of it as the difference between a 2- and a 4-lane highway. On both you can drive the same speed, but a 4-lane highway can handle much more traffic at the same time.
Because Cat6 cables perform up to 250 MHz which is more than twice that of CAT5e cables (100 Mhz), they offer speeds up to 10GBASE-T or 10-Gigabit Ethernet, whereas CAT5e cables can support up to 1GBASE-T or 1-Gigabit Ethernet.
1 Gigabit Ethernet supports cables up to 100 meters. 10 Gigabit Ethernet on Cat6 cable limits distance to 55 meters.
EXTRA CREDIT
A newer version of Cat6 is Cat6e (also called “CAT6A”). According to TrueCABLE:
Cat6A cable is made and terminated to tighter tolerances than Cat6. This means the copper conductors are twisted tighter. This requires higher specification patch panels, wall jacks, and RJ45 connectors.
Cat6A speed is at least 500 MHz. This allows 10 Gbp/s (Gigabits per second) up to 328 feet (100 meters). Cat6 speed is 250 MHz. Therefore, it only supports 10 Gbp/s to 165 feet (55 meters) under ideal conditions; less in heavy cross talk environments.
Cat6A cable often uses thicker copper conductors and jackets. This make installation more difficult and drives up the price.
Please rate the helpfulness of this tip.
Click on a star to rate it!
https://www.theinsidetips.com/wp-content/uploads/2019/09/Tips-Logo-700x150.jpg00Larry Jordanhttps://www.theinsidetips.com/wp-content/uploads/2019/09/Tips-Logo-700x150.jpgLarry Jordan2020-09-22 01:30:002020-09-19 09:39:30Tip #1030: What’s the Difference: Cat5e, 6 or 6e?
HEVC was designed with HDR in mind. However, compression times are very slow.
(Image courtesy of Pexels.com.)
Stephen asks: I have been filming home movies for more than 60 years. I try to get the best output I can and future-proof my movies. Earlier this year my wife and I did an Antarctic cruise and managed to avoid Covid 19. I filmed this in HLG with a Sony PXW Z90.
I want to produce a deliverable HLG movie that I can watch on my HDR TV, an LG OLED. What format should I use?
Larry replies: You’ll need to use 10-bit HEVC. There are two flavors of HEVC: 8-bit and 10-bit. You MUST use the 10-bit version, 8-bit codecs, whether HEVC or H.264, do not support HDR media. (ProRes, though 10-bit and great for editing, is not a supported playback format for televisions.)
Apple Compressor, among other software, compresses into HEVC. However, on older computers, 10-bit HEVC will take a LOOOONNNGGGG time to compress. Probably 10 hours for a one-hour program. So, do a short test to verify this format will work on your TV, then allow enough time to compress the longer version.
Newer computers use hardware acceration for 8-bit HEVC, which speeds things a lot. However, I don’t know of any Mac hardware that accelerates 10-bit HEVC. I expect that to change in the near future.
Please rate the helpfulness of this tip.
Click on a star to rate it!
https://www.theinsidetips.com/wp-content/uploads/2019/09/Tips-Logo-700x150.jpg00Larry Jordanhttps://www.theinsidetips.com/wp-content/uploads/2019/09/Tips-Logo-700x150.jpgLarry Jordan2020-09-22 01:30:002020-09-19 09:49:45Tip #1029: HDR Playback to TV Screens
RAW is always better, but takes more time to get the image to look right.
This illustrates what happens to a JPEG image when saved multiple times.
The folks at NightSkyPix.com looked at RAW vs. JPEG from the point of view of astrophotography. However, this also applies to shooting video more down to earth.
This is an excerpt.
Loosely speaking, a RAW image is the digital equivalent of a film negative. In reality, a RAW file is not an image that can be visualized with classic software, but must be developed before using RAW editors such as Adobe Camera Raw.
The JPEG image format is arguably the most common standard format for digital images, and the name stands for “Joint Photographic Expert Group”.
The JPEG format uses lossy and compressed image data to create an image file that is both lightweight and readily usable with any software and device able to visualize graphics.
JPEG is easier to use and view, but RAW is the better choice.
The article provides additional details, pros and cons, and illustrates these ideas with screen shots. It’s worth spending time reading.
EXTRA CREDIT
For us video folks, JPEG is similar to H.264, and RAW is similar to raw or log files.
Please rate the helpfulness of this tip.
Click on a star to rate it!
https://www.theinsidetips.com/wp-content/uploads/2019/09/Tips-Logo-700x150.jpg00Larry Jordanhttps://www.theinsidetips.com/wp-content/uploads/2019/09/Tips-Logo-700x150.jpgLarry Jordan2020-09-22 01:30:002020-09-19 09:32:32Tip #1025: RAW vs. JPEG: Which is Better?
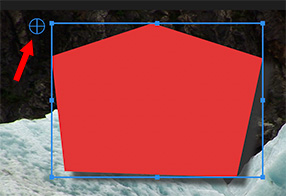
The Anchor Point can be easily moved using the Move tool.
The Anchor point (red arrow) is set by moving the cross-hair icon.
The Anchor point is that spot in an element around which it rotates or scales. Clips, shapes and text each have separate anchor points, but moving them is the same.
Select the clip who’s anchor point you want to move.
Select the Move tool.
In the Program Monitor, drag the small circle with the cross-hair to the position you want. The EXACT position is the center of the cross-hair.
If you need more precision, or need to match anchor points for multiple clips, select the clip, then, in the Effect Controls panel, enter the precise numbers you need for the Anchor point for the selected clip.
EXTRA CREDIT
Here’s where to find the appropriate Anchor point. Using the Move tool, select the object in the Program Monitor you want to adjust. It will highlight in the Effect Controls panel.
Video: Effect Controls > Motion
Shapes: Effect Controls > Shape > Transform
Text: Effect Controls > Text > Transform
Please rate the helpfulness of this tip.
Click on a star to rate it!
https://www.theinsidetips.com/wp-content/uploads/2019/09/Tips-Logo-700x150.jpg00Larry Jordanhttps://www.theinsidetips.com/wp-content/uploads/2019/09/Tips-Logo-700x150.jpgLarry Jordan2020-09-22 01:30:002020-09-22 01:30:00Tip #1024: Moving the Anchor Point
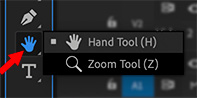
The Zoom tool is the fastest way to zoom into a timeline segment.
The Zoom tool is located in the Hand menu. (Shortcut: Z)
Hidden, but accessible with a keyboard shortcut, is the Zoom tool. This is often faster than using keyboard shortcuts to zoom into the timeline! As a certified keyboard junkie, it often hard to believe that anything with the mouse is faster – but the Zoom tool may be the exception that proves the rule.
Click and hold the cursor on the Hand tool, then select Zoom tool from the menu that appears. (See screen shot.)
NOTE: The keyboard shortcut for the Zoom tool is: Z.
While we can simply zoom into the timeline by typing + [plus] or – [minus], the Zoom tool is faster when we want to get more specific. To zoom into a specific section of the timeline, select the Zoom tool, then drag a rectangle around the section of the timeline you want to see.
Poof! That region instantly fills the timeline!
EXTRA CREDIT
The Zoom tool only works with clips in the timeline.
Type \ [back-slash] to fit everything back into the timeline again.
Please rate the helpfulness of this tip.
Click on a star to rate it!
https://www.theinsidetips.com/wp-content/uploads/2019/09/Tips-Logo-700x150.jpg00Larry Jordanhttps://www.theinsidetips.com/wp-content/uploads/2019/09/Tips-Logo-700x150.jpgLarry Jordan2020-09-22 01:30:002020-09-19 09:20:06Tip #1023: Tricks of the Zoom Tool
The Pen tool creates shapes we can use standalone or under text.
I have no idea what this it, but it’s kinda cute – and has a drop shadow.
The Pen tool allows us to draw shapes directly in the Program Monitor, fill them with color, add a border or drop shadow, then animate them. We are used to using the Pen tool as part of Effect Controls. But there is also the Pen tool in the Tools palette. We use this to draw shapes on-screen.
Put the playhead in the timeline where you want a shape to start, then, select the Pen tool from the Tools palette.
In the Program Monitor, click and draw a shape. Click to create a corner, click and drag to create a curve.
Re-click the starting point to create a closed shape, or don’t to create an open shape. (We most often use open shapes to create a curved line – it is a border with no fill.)
To move a shape, select the clip, then use the Move tool.
To adjust a shape, select the Pen tool, then, in Effect Controls, twirl down the Shape, and select Path.
NOTE: The shapes created by the Pen tool are vectors, which means they can be scaled as much as you want without losing edge sharpness.
EFFECT CONTROLS
The Shape controls, in the Effect Controls panel, provide:
Path. Redraw the shape, using the Pen tool.
Appearance. Change fill, stroke and shadow settings.
Transform. Change size, position and rotation, along with adding keyframe animation.
Please rate the helpfulness of this tip.
Click on a star to rate it!
https://www.theinsidetips.com/wp-content/uploads/2019/09/Tips-Logo-700x150.jpg00Larry Jordanhttps://www.theinsidetips.com/wp-content/uploads/2019/09/Tips-Logo-700x150.jpgLarry Jordan2020-09-22 01:30:002020-09-19 09:22:35Tip #1022: The Pen Tool
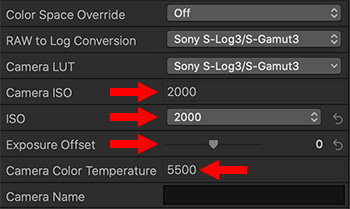
New ISO and white point settings are now available for ProRes RAW in FCP X 10.4.9.
Info Inspector > Settings. These new settings (red arrows) only appear for ProRes RAW.
A new feature in the 10.4.9 update to Final Cut Pro X is the ability to adjust ISO and, for some cameras, the white point. Apple now supports changing the ISO setting (essentially, video gain) and white point for ProRes RAW media when edited natively.
NOTE: These settings only appear for ProRes RAW media and don’t appear when FCP X is in proxy mode.
To access these, select a ProRes RAW clip in the timeline (not the browser), then go to the Info Inspector and switch the menu at the bottom left from Basic to Settings. The red arrows in the screen-shot indicate the new settings with this update:
Camera ISO. The ISO setting at which the media was recorded.
ISO. A menu allowing you to change the ISO setting from 50 to 25,600.
Exposure Offset. This slider provides finer control in adjusting the ISO. The range is one stop lower to one stop higher.
Camera Color Temperature. The white point setting at which the video was recorded.
EXTRA CREDIT
For some cameras, Final Cut also supports changing the white point. Here is the current list of cameras supporting these new features.
Please rate the helpfulness of this tip.
Click on a star to rate it!
https://www.theinsidetips.com/wp-content/uploads/2019/09/Tips-Logo-700x150.jpg00Larry Jordanhttps://www.theinsidetips.com/wp-content/uploads/2019/09/Tips-Logo-700x150.jpgLarry Jordan2020-09-21 01:30:002020-09-19 09:12:03Tip #1018: New! Adjust ISO for ProRes RAW
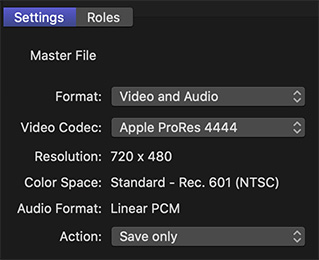
The option to include chapter markers on export has disappeared in FCP X 10.4.9.
The Master File > Settings panel. The checkbox to export chapter markers is gone.
Another problem that surfaced with the 10.4.9 update to Apple Final Cut Pro X is that chapter markers can no longer be exported – at least on my system.
As you can see from the screen shot, when exporting a master file, there’s no checkbox to include chapter markers in the export. And, not surprisingly, if I include chapter markers in my project, they don’t export.
This problem did not exist in the 10.4.8 version of Final Cut.
For now, if you need chapter markers, don’t upgrade to 10.4.9.
EXTRA CREDIT
Chapter markers can be included in both QuickTime movies and MPEG/4 movies. I use them in all my webinar downloads and streams, not just DVDs.
I’ve contacted Apple about this problem and they are looking into it.
FCP X 10.4.9 seems to create color flickering during grading.
I have received multiple reports this last week from editors reporting color shifts or color flickering when editing camera native media in Final Cut Pro X 10.4.9. This problem did not exist in Final Cut 10.4.8.
As one editor reported:
We have found the following:
The jumpiness happens as the clip is being color corrected with or without a camera LUT applied
There is no difference whether the timeline is set to “Better Performance” or “Better Quality;” the color levels still jump around
Transcoding the media to “proxy” and working with the proxy files eliminates the jumpiness during color correction
I reported the problem to Apple and they are looking at it. For now, until they figure out what’s going on:
If you haven’t upgraded to 10.4.9, don’t.
If you have, consider doing your color grades in proxy mode until this issue is resolved.
EXTRA CREDIT
Please add a comment if you’ve experienced similar problems. I will forward your comments to Apple.
Please rate the helpfulness of this tip.
Click on a star to rate it!
https://www.theinsidetips.com/wp-content/uploads/2019/09/Tips-Logo-700x150.jpg00Larry Jordanhttps://www.theinsidetips.com/wp-content/uploads/2019/09/Tips-Logo-700x150.jpgLarry Jordan2020-09-21 01:30:002020-09-21 01:30:00Tip #1016: Caution: Color Flickering in FCP X 10.4.9
We may request cookies to be set on your device. We use cookies to let us know when you visit our websites, how you interact with us, to enrich your user experience, and to customize your relationship with our website.
Click on the different category headings to find out more. You can also change some of your preferences. Note that blocking some types of cookies may impact your experience on our websites and the services we are able to offer.
Essential Website Cookies
These cookies are strictly necessary to provide you with services available through our website and to use some of its features.
Because these cookies are strictly necessary to deliver the website, refuseing them will have impact how our site functions. You always can block or delete cookies by changing your browser settings and force blocking all cookies on this website. But this will always prompt you to accept/refuse cookies when revisiting our site.
We fully respect if you want to refuse cookies but to avoid asking you again and again kindly allow us to store a cookie for that. You are free to opt out any time or opt in for other cookies to get a better experience. If you refuse cookies we will remove all set cookies in our domain.
We provide you with a list of stored cookies on your computer in our domain so you can check what we stored. Due to security reasons we are not able to show or modify cookies from other domains. You can check these in your browser security settings.
Google Analytics Cookies
These cookies collect information that is used either in aggregate form to help us understand how our website is being used or how effective our marketing campaigns are, or to help us customize our website and application for you in order to enhance your experience.
If you do not want that we track your visit to our site you can disable tracking in your browser here:
Other external services
We also use different external services like Google Webfonts, Google Maps, and external Video providers. Since these providers may collect personal data like your IP address we allow you to block them here. Please be aware that this might heavily reduce the functionality and appearance of our site. Changes will take effect once you reload the page.
Google Webfont Settings:
Google Map Settings:
Google reCaptcha Settings:
Vimeo and Youtube video embeds:
Other cookies
The following cookies are also needed - You can choose if you want to allow them:
Privacy Policy
You can read about our cookies and privacy settings in detail on our Privacy Policy Page.