… for Codecs & Media

Tip #1014: Premiere & Avid Now Collaborate

Larry Jordan – LarryJordan.com

MediaCentral extends collaboration from Avid to Adobe video editors.

The Avid logo.

Topic $TipTopic

With the June, 2020, update to Avid MediaCentral, Premiere Pro editors can now connect and collaborate with Avid Media Composer editors—no matter where they are located.

MediaCentral is Avid hardware and software that provides the remote collaboration, media management, and integration large post-production facilities and in-house post teams need to prep, complete, and deliver projects on time and on budget.

The June update provides a dedicated MediaCentral pane for Adobe Premiere making it easy to browse, search or, locate, and access clips and sequences across MediaCentral databases for editing—without leaving Premiere. And the built-in chat enables you to communicate with other editors and collaborators across the platform—on premises or remotely.

Existing MediaCentral users can now connect Premiere Pro editors into their production environment. Premiere users get the same level of access and real-time collaboration power as Avid editors. As well, MediaCentral provides more tool flexibility to fit specific needs and budget. In addition, Premiere editors can access rundowns and scripts for news editing linked to stories.

EXTRA CREDIT


Please rate the helpfulness of this tip.

Click on a star to rate it!

… for Codecs & Media

Tip #1013: The Coming File Size Tsunami

Larry Jordan – LarryJordan.com

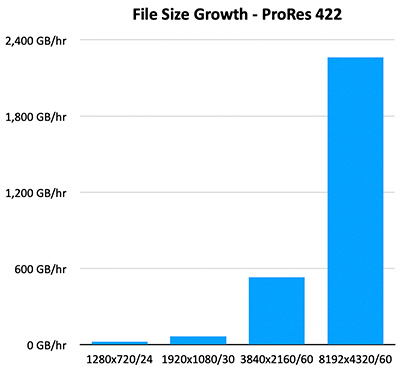
The impact of increasing frame size AND frame rate requires exponential growth in storage.

Data based on ProRes 422, numbers provided by Apple ProRes White Paper.

Topic $TipTopic

Last week, I presented a webinar on media management that applied to both Premiere and Final Cut. During the presentation I was discussing the impact frame size, frame rates and bit depth have on the file size of our media files.

The world of 8K images is coming – whether we like it or not; though, personally, I’m not looking forward to it. But, the impact of 8K on our storage capacity and bandwidth is dramatic!

As I was presenting, I realized I was missing a chart that showed the result of both frame size AND frame rate increasing. So, here it is. As this chart shows, as both frame size and frame rate increase, we see an exponential growth in file size and bandwidth.

  • 720p24 uses 23 GB/hour
  • 1920p30 uses 66 GB/hour
  • UHD/30 uses 530 GB/hour
  • 8K/60 uses 2,263 GB/hour

This means that as you plan future projects make sure your storage system has the capacity to handle it!


Please rate the helpfulness of this tip.

Click on a star to rate it!

… for Adobe Premiere Pro CC

Tip #1005: The Vertical Text Tool

Larry Jordan – LarryJordan.com

Vertical text is hard to read, but, used sparingly, can be eye-catching.

Here’s the vertical text tool and what it can do.

Topic $TipTopic

Adobe Premiere Pro provides the opportunity to create both horizontal and vertical text. Learn more.

  • Click and hold the Text tool to reveal the Vertical Text Tool.
  • Click anywhere in the Program Monitor to create text, the same as you would with the “normal” Text tool.
  • Format the text by switching to the Graphics workspace.
  • Select the text clip in the timeline, then click Edit, which is at the top of the Essential Graphics panel.

EXTRA CREDIT

As you can see in the screen shot, vertical spacing between characters is even more obvious than horizontal kerning. You tighten spacing using the Kerning control in the Text panel.

When entering text, type words in reverse order. (Smile… you’ll understand why the first time you add a second word.)

Please remember that vertical text is very hard to read quickly. Use this effect very sparingly!


Please rate the helpfulness of this tip.

Click on a star to rate it!

… for Adobe Premiere Pro CC

Tip #1004: A Faster Way to Jump

Larry Jordan – LarryJordan.com

We can jump to a specific timecode, or move to a spot relative to where we are now.

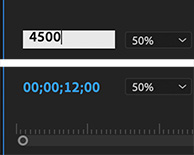
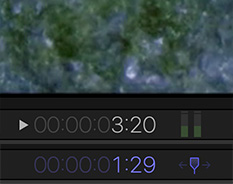
Click the blue numbers (bottom), then enter a new timecode to jump the playhead there.

Topic $TipTopic

As projects get bigger, finding faster ways to move around means you can get more done in less time. Here’s a cool trick.

Click directly on the blue timecode numbers at the bottom left of of the Program (or Source) Monitor, then enter the timecode where you want to move the playhead.

Press Return and the playhead jumps there instantly.

EXTRA CREDIT

Enter timecode as HHMMSSFF, without punctuation.

Type +, followed by a number and Return, and the playhead will add that duration to the current playhead location and move right.

Type , followed by a number and Return, and the playhead will subtract that duration to the current playhead location and move left.

If you enter a number greater than your frame rate, Premiere will automatically calculate the correct duration.


Please rate the helpfulness of this tip.

Click on a star to rate it!

… for Adobe Premiere Pro CC

Tip #1003: The Slide Tool – Relic of the Past

Larry Jordan – LarryJordan.com

The Slip tool is essential. The Slide tool is a relic of the distant past.

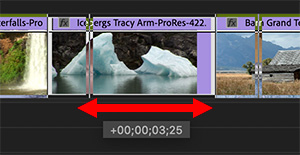
The Slide tool moving the position of a clip, without changing content or duration.

Topic $TipTopic

Last week, I wrote about the Slip tool (Tip #986). Loren took me to task asking why I didn’t write about its cousin: the Slide tool. So, now, I am.

The Slip tool (Shortcut: Y) changes the content of a shot without changing its duration or location in the timeline.

The Slide tool (Shortcut: U) changes the position of a clip inside it’s track in the timeline, without changing its content or duration. It does this by trimming the Out of the clip before it and the In of the clip after it as you drag it in the Timeline.

The Slide tool was invented back in the earliest days of non-linear editing, when we only had one video track and one title track to work with. The Slide tool allowed us to slide clips along that single video track to find the best place to put a shot.

EXTRA CREDIT

You can only Slide a clip as far as you have handles on the clips before and after it.

While I use the Slip tool all the time, I never use the Slide tool anymore, simply because it is easier to raise a clip to a higher track where I can move it as much as I want without altering the clips on the main track.


Please rate the helpfulness of this tip.

Click on a star to rate it!

… for Apple Final Cut Pro X

Tip #1001: The Little Red Box

Larry Jordan – LarryJordan.com

To quickly reset a zoomed-in image, type Shift + Z.

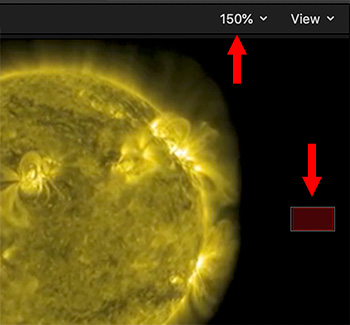
The red box helps you navigate around a zoomed-in Viewer image.

Topic $TipTopic

Ever wonder what that red box is that appears periodically on the right side of the Viewer? Well, here’s the answer.

The red box appears whenever you are zoomed into an image in the Viewer (not the timeline) such that the entire image can’t be displayed.

The red box acts as a positioning control to move about the image. Drag inside the box to change the portion of the image displayed in the Viewer.

To remove the red box, type Shift + Z (which fits the entire image in the Viewer) or click the percent menu at the top right corner of the Viewer and change the percentage to Fit.


Please rate the helpfulness of this tip.

Click on a star to rate it!

… for Apple Final Cut Pro X

Tip #998: Slip Your Way to Better B-roll

Larry Jordan – LarryJordan.com

The Slip tool in action, changing content without changing position or duration.

Topic $TipTopic

There’s a tool hidden in Final Cut that offers a faster way to select the best section of B-roll for your projects. We all know how to trim the edges of a clip. But, Final Cut also allows us to trim the content of a clip – using the Slip tool. Here’s how.

  • Select the Trim tool (Shortcut: T).
  • Click in the middle of a timeline clip and drag left or right.
  • As you do, the content of the clip changes, but not its duration or location in the timeline.

I use this technique constantly to quickly select the portion of a clip I want to use for B-roll and edit it to the timeline.

I then trim the edges of the clip to set its position and duration exactly the way I want.

Finally, I use the Slip tool (which is what we are doing when we drag the Trim tool in the middle of a clip – we are “slipping” the content) to select a different portion of the clip.

Slipping allows me to select the best portion of a clip after first setting its timing.


Please rate the helpfulness of this tip.

Click on a star to rate it!

… for Apple Final Cut Pro X

Tip #997: A Faster Way to Jump

Larry Jordan – LarryJordan.com

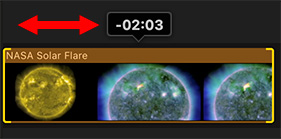
Click the timecode then enter the timecode where you want to jump the playhead.

Click the timecode (top) then enter a timecode to “jump” the playhead.

Topic $TipTopic

As projects get bigger, finding faster ways to move around means you can get more done in less time. Here’s a cool trick.

Click directly on the timecode numbers at the bottom of the Viewer, then enter the timecode where you want to move the playhead.

Press Return and the playhead jumps there instantly.

EXTRA CREDIT

Enter timecode as HHMMSSFF, without punctuation.

Type +, followed by a number and Return, and the playhead will add that duration to the current playhead location and move right.

Type , followed by a number and Return, and the playhead will subtract that duration to the current playhead location and move left.

If you enter a number greater than your frame rate, FCP X will automatically calculate the correct duration.


Please rate the helpfulness of this tip.

Click on a star to rate it!

… for Random Weirdness

Tip #984: Tips to Fix Creative Burnout

Larry Jordan – LarryJordan.com

Here are some ideas to help you recharge your creative batteries.

(Image courtesy of Pexels.com.)

Topic $TipTopic

This article first appeared in RitualMusic.com. This is an excerpt.

There are few things more frustrating in an artist’s life than creative burnout. Symptoms include the conviction your career is over because you can’t come up with the perfect opening sequence, or that you’ll never work again if you don’t finish that one song. Truth be told, even the most productive creatives need a break sometimes.

Here are our top tips on how to fix creative burnout.

  • Disconnect from your screen. Unplug. It will help.
  • Take yourself on an artist date.
  • Pep talks. Here are 11 podcasts designed to renew your creative inspiration.
  • Meditate. If your mind is full, give it time to be still.
  • Journal your inner monologue.

The creative process can be one of interminable blank space punctuated by moments of pure inspiration. Harnessing those moments is critical, but learning to ride out and manage the the blank space is perhaps even more critical to maintain creative output.

EXTRA CREDIT

This article has more ideas and links to help you recharge your creative batteries.


Please rate the helpfulness of this tip.

Click on a star to rate it!

… for Random Weirdness

Tip #983: What Are ND Filters?

Larry Jordan – LarryJordan.com

ND filters provide more control over the image by limiting the light hitting the lens.

A variable ND filter from K&F Concept.

Topic $TipTopic

This article, written by Alejandro Medellin, first appeared in Shutterstock.com. This is an excerpt.

ND (neutral-density) filters reduce the amount of light passing through a lens, making it easier to shoot in brightly-lit conditions. These are a lot like a pair of sunglasses in that it blocks out or darkens the image to negate the effects of harsh light.

Optical density on an ND filter measures the f-stop reduction of a particular filter, with higher-level filters blocking more light. Most manufacturers measure optical density by applying a number next to “ND,” such as ND2.

Starting from ND2, which is equivalent to one f-stop reduction and the lowest-level ND filter manufactured, each subsequent ND rating produces one more f-stop reduction. Using an ND2 filter with the aperture set to f/2.8 creates an image that appears as if it was shot with an aperture of f/4. Using an ND4 filter would be equivalent to two f-stop reductions. An ND8 filter would be comparable to three f-stop reductions, and so forth.

As a rule of thumb, each level lets in half as much as light as the one before — e.g., an ND64 filter lets in half as much light as an ND32 filter.

ND filters are useful for capturing images that require long exposure times. When photographing a body of water, for example, setting a long exposure time creates a smoothing effect that makes the water appear serene and glass-like.

Shooting video in broad daylight is challenging. You either have to adjust your aperture or shutter speed to get the shot you want, but that’s not always the best idea. Decreasing the aperture may let in less light, which is perfect when shooting in bright conditions, but it also eliminates the shallow depth of field, bringing everything into focus. If you need shallow depth of field in a shot, changing the aperture isn’t viable. That leaves changing the ISO or shutter speed instead.

You need to know three things before purchasing an ND filter:

  • The difference between fixed and variable ND filters,
  • what’s a combo ND and CPL filter,
  • and ND filter sizing.

The article goes to to describe different filters and has an excellent discussion of shutter speed vs. frame rate. The author also has suggestions on which ND filters to buy, depending upon your budget.

Click the link at the top to learn more.


Please rate the helpfulness of this tip.

Click on a star to rate it!