It doesn’t take a lot of gear, but planning helps.
(Image courtesy of pexels.com.)
This article, written by Joe Frederick, first appeared in PremiumBeat.com. This is a summary.
As production equipment has become more accessible, the amount of people looking to regularly film themselves is on the rise. However, there’s a real art to filming yourself successfully. Here are some tips from Jonty Egginton (“The Video Creators”) and Sarah Outen (Filmmaker).
Use the Right Camera
Stabilize the Camera
Get Quality Audio
Control Your Lighting
Film in 4K
Go with Multiple Cameras
Be Creative
Be Natural
Re-Watch Your Previous Videos
Edit Your Videos Yourself
Know How and Where to Distribute Videos
The article has more details and example videos to illustrate these points.
Please rate the helpfulness of this tip.
Click on a star to rate it!
https://www.theinsidetips.com/wp-content/uploads/2019/09/Tips-Logo-700x150.jpg00Larry Jordanhttps://www.theinsidetips.com/wp-content/uploads/2019/09/Tips-Logo-700x150.jpgLarry Jordan2020-09-11 01:30:002020-09-11 01:30:00Tip #976: 11 Practical Tips to Film Yourself
3D text provides almost unlimited design options for customizing text to fit our story.
Distressed 3D text, with a reflective pink paint applied. A blue spotlight was added to highlight the texture.
As I was playing with distressing 3D text (Tip #989) I discovered another setting: Reflective Paint. Even if you never create your own lights – and especially if you do – adding sheen to the surface of 3D text can make it “pop” more effectively.
To apply different paint surfaces to your text:
Create a 3D text clip.
Select Inspector > Text and scroll down until you see the Material section.
Below the Material section, select Options:Basic > Add Layer > Paint.
From the Paint menu, choose a surface that appeals to you.
In the settings for that surface option, select different looks from the Type menu. Drag sliders and watch what happens.
EXTRA CREDIT
In the screen shot, I applied a pink reflective paint, then added a deep blue spotlight from the side to highlight the texture of the text.
Please rate the helpfulness of this tip.
Click on a star to rate it!
https://www.theinsidetips.com/wp-content/uploads/2019/09/Tips-Logo-700x150.jpg00Larry Jordanhttps://www.theinsidetips.com/wp-content/uploads/2019/09/Tips-Logo-700x150.jpgLarry Jordan2020-09-10 01:30:002020-09-05 10:36:00Tip #990: Add Reflective Paint to 3D Text
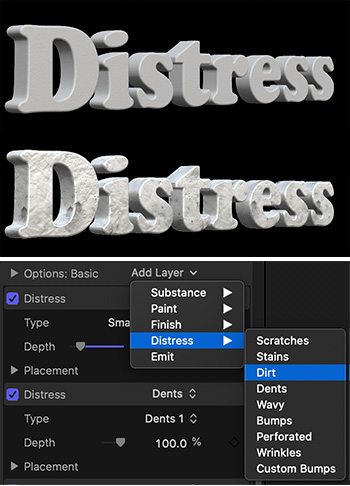
Text doesn’t have to be perfect. In fact, distressed text is often more compelling.
Plain 3D text (top), distressed text (middle) and the distress menu.
Nothing adds character to text like making it look worse. A lot worse. A hidden feature in Motion makes “distressing” your text simple and fun. Let me show you how this works.
NOTE: This option is only available for 3D text, but that doesn’t mean your text needs to look 3D.
To apply distress:
Create a 3D text clip.
Select Inspector > Text and scroll down until you see the Material section.
Below the Material section, select Options:Basic > Add Layer > Distress.
From the Distress menu, choose an effect (see screen shot).
In the settings for that option, select different looks from the Type menu. Drag sliders and watch what happens.
EXTRA CREDIT
You can apply as many different “distresses” as you want. The screen shot shows three applied to the text: Wrinkles, Dents and Stains.
Like many 3D text effects, you need to play with these to see what works best for your project. And, yes, these settings will travel to FCP X if you are creating templates.
Please rate the helpfulness of this tip.
Click on a star to rate it!
https://www.theinsidetips.com/wp-content/uploads/2019/09/Tips-Logo-700x150.jpg00Larry Jordanhttps://www.theinsidetips.com/wp-content/uploads/2019/09/Tips-Logo-700x150.jpgLarry Jordan2020-09-10 01:30:002020-09-05 10:30:26Tip #989: Add Character – Distress Your 3D Text
LUTs provide a fast way to create custom looks. Now, Motion supports them.
The LUT menu in Filters > Custom LUTs.
One of the key new features in the Motion 5.4.6 update is the ability to add custom LUTs to any imported video. A LUT (look-up table) is used to interpret the numbers stored on your hard disk into the visual image displayed on your monitor.
NOTE: Stylized LUT effects are available from a variety of third-party sources. Camera LUTs, used to convert “flat” or “log” footage from high-end cameras to standard color spaces, are available from many camera manufacturers and other sources.
With the 5.4.6 update, we can now apply custom LUTs to any imported video. To do so:
Select the clip you want to adjust in the Layers panel.
Choose Filters > Color > Custom LUTs
Go to Inspector > Filters > Custom LUT and choose the LUT you want from the LUT menu. (See screen shot.)
NOTE: Unlike Final Cut, Motion does not include camera LUTs, you will need to download the ones you need from the manufacturer of your camera.
Motion stores custom LUTs in the same location as Final Cut Pro X: /Users/username/Library/Application Support/ProApps/Custom LUTs/
EXTRA CREDIT
Because Motion stores third-party LUTs externally (outside of Motion projects), it’s inadvisable to use LUTs in templates created for Final Cut Pro X.
Short After Effects video tutorials that go from basic to advanced.
(Image courtesy of MotionArray.com.)
This article first appeared in CreativeBlog.com. This is a summary.
The team at CreativeBlog compiled “the best After Effects tutorials for motion graphics, animation and more. After Effects is at the core of the workflows of most VFX, motion graphics and 3D artists and animators. It offers a wide range of features, which can be used for everything from simple titles to full 3D stero compositing.
“Sorting through the vast number of tuts out there takes time, so we’ve done the hard work for you and scoured the web to find the very best After Effects tutorials around. We’ve even grouped them together in sections so it’s easy to find what you’re looking for.”
With 50 tips to choose from, here are the categories:
Beginner: Get started with AE
Beginner: Build your skills
Intermediate: Use AE tools
Intermediate: Connect other apps
Intermediate: Create effects
Advanced: After Effects projects
Each tutorial is illustrated with video and a short text description. Click the link at the top to learn more.
Please rate the helpfulness of this tip.
Click on a star to rate it!
https://www.theinsidetips.com/wp-content/uploads/2019/09/Tips-Logo-700x150.jpg00Larry Jordanhttps://www.theinsidetips.com/wp-content/uploads/2019/09/Tips-Logo-700x150.jpgLarry Jordan2020-09-09 01:30:002020-09-09 01:30:00Tip #994: Top 50 After Effects Tutorials
Adobe provides tutorials on stabilization and color repair.
(Repair image courtesy of Pexels.com.)
Adobe posted a series of tutorials on how to repair footage in After Effects. Here’s a summary.
This webpage has sample files and tutorials that show how to:
Stablize shaky footage using the Warp Stabilizer.
Fix exposure issues using the Lumetri Color effect.
Enhance the color in your video, again with the Lumetri Color effect.
Click the link at the top to learn more.
Please rate the helpfulness of this tip.
Click on a star to rate it!
https://www.theinsidetips.com/wp-content/uploads/2019/09/Tips-Logo-700x150.jpg00Larry Jordanhttps://www.theinsidetips.com/wp-content/uploads/2019/09/Tips-Logo-700x150.jpgLarry Jordan2020-09-09 01:30:002020-09-05 10:26:07Tip #993: Tutorials to Repair Video – from Adobe
Masks are the secret to successful compositing in After Effects.
(Image courtesy of pexels.com.)
This article first appeared in MotionArray.com. This is a summary.
In Adobe After Effects, masks are one of the tools you will likely use the most. They either hide or reveal elements of a layer, and can be used in conjunction with animation to create fun, stylish wipes. They’re an incredibly versatile tool but can be a little confusing to get your head around at first.
The article is divided into three sections:
What is a Mask? A mask is an invisible shape that tells After Effects to only pay attention to a specific section of your composition.
How to Create and Manage Masks. This is a step-by-step tutorial on using “Reveal Masking” or the Pen tool. It also covers how to work with multiple masks.
How to Add Animation and Movement. Masks can be animated like other assets in After Effects.
EXTRA CREDIT
The article has step-by-step illustrations, additional links and a video that shows these techniques in operation.
Please rate the helpfulness of this tip.
Click on a star to rate it!
https://www.theinsidetips.com/wp-content/uploads/2019/09/Tips-Logo-700x150.jpg00Larry Jordanhttps://www.theinsidetips.com/wp-content/uploads/2019/09/Tips-Logo-700x150.jpgLarry Jordan2020-09-09 01:30:002020-09-09 01:30:00Tip #992: Mask Basics in Adobe After Effects
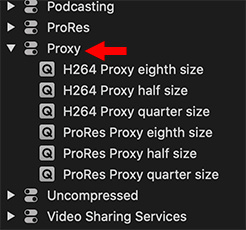
Proxy workflows are very helpful for multicam edits, as well as frame sizes greater than 4K.
The new proxy compression options in Apple Compressor.
With the 4.4.7 update to Apple Compressor, Apple added more proxy options as compression settings. In the past, we could only convert proxies to ProRes Proxy. Now, however, we can create proxies using either ProRes or H.264.
NOTE: Well, that statement isn’t completely true. You could create custom compression settings for just about any format, but this update makes proxy creation a lot easier by pre-building more compression presets.
A new “Proxy” category was added to Compressor. Inside you can choose between ProRes Proxy and H.264. H.264 files will be smaller, but ProRes will be more efficient to edit (meaning they will render and export faster).
NOTE: Using HEVC for editing proxies is not recommended because the complexity of the compression format makes them tend to bog down the system.
In addition to the two codecs, you can also choose the frame size of the proxy as a percentage of the frame size of the master file. Reducing the frame size shrinks file sizes still smaller, but also decreases image quality. To minimize storage requirements, pick the smallest proxy file that still shows enough detail to make informed editing decisions. If space isn’t an issue, use one-half size; that always yields the highest image quality.
I did a quick test. Starting with a 1 GB ProRes 422 master, a half-size ProRes Proxy file was about 90% smaller than the original. In comparison, H.264 was about 10% the size of each ProRes Proxy file. As well, each reduction in frame size cut file size by roughly 2/3.
If file storage is not a big issue or if you are editing on an older system, choose ProRes Proxy. This is a highly-efficient codec, optimized for editing, that runs well on slower systems. It also provides a slightly higher image quality, compared to H.264.
If conserving file storage is important, you need to share project files with another editor, or you have a newer system, H.264 may be the better choice.
Most of the time, we just need to see proxy files to make basic editorial decisions. When the time comes for adding effects and color grading, its a single click in the NLE to switch back to full-quality masters. As with all projects, run tests to see what works best for you before starting a major project. On the other hand, you can always regenerate proxy files and relink them, if you change your mind.
EXTRA CREDIT
You can use Compressor to create proxy files for any NLE. Final Cut also replicates these same proxy formats, so you can use the built-in proxy creation process in FCP X, if you prefer.
Please rate the helpfulness of this tip.
Click on a star to rate it!
https://www.theinsidetips.com/wp-content/uploads/2019/09/Tips-Logo-700x150.jpg00Larry Jordanhttps://www.theinsidetips.com/wp-content/uploads/2019/09/Tips-Logo-700x150.jpgLarry Jordan2020-09-08 01:30:002020-09-05 14:54:09Tip #996: More Proxy Options in Compressor
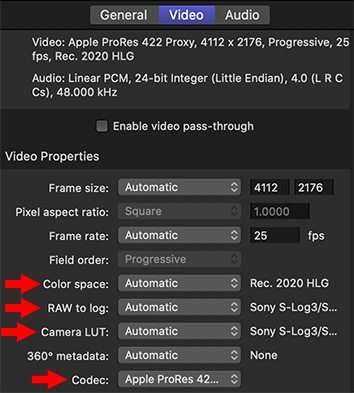
Compressor supports ProRes RAW making it useful on set creating proxy files.
Video Inspector settings for ProRes RAW images in Apple Compressor.
In a recent update, Apple added support for ProRes RAW in Compressor. Apple ProRes RAW and Apple ProRes RAW HQ bring the same performance, quality, and ease of use introduced by Apple ProRes to raw media.
When you add a ProRes RAW clip to a Compressor Batch, new options appear in the Video Inspector (see screen shot).
You can use Compressor to:
Convert between color spaces
Convert RAW to a log file
Apply a camera LUT
EXTRA CREDIT
While the Compressor help files don’t provide any detailed help on these settings, you can learn more about ProRes RAW here.
Please rate the helpfulness of this tip.
Click on a star to rate it!
https://www.theinsidetips.com/wp-content/uploads/2019/09/Tips-Logo-700x150.jpg00Larry Jordanhttps://www.theinsidetips.com/wp-content/uploads/2019/09/Tips-Logo-700x150.jpgLarry Jordan2020-09-08 01:30:002020-09-08 01:30:00Tip #995: Apple Compressor Supports ProRes RAW
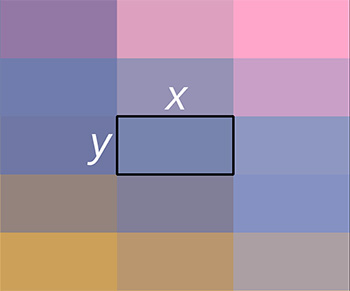
Make sure your projects match the aspect ratio of the pixels, as well as project.
An example of rectangular pixels (2:1). image courtesy of Wikipedia.
The big difference between HDV and “normal” media is the aspect ratio of each pixel. Just today, I got an email from a reader asking why their footage looked “stretched.” Here’s what you need to know.
Back in the old days, as we were making the transition from standard definition video to HD, cameras and storage devices were neither big enough nor fast enough to capture and record a full HD video stream.
To solve this problem, Sony and Panasonic created HD formats with non-square pixels. This meant that they could record fewer pixels, then stretch them horizontally in the final display so that fewer pixels would fill more space.
For example, while HDV records 720p footage using square pixels, instead of recording an image at 1920 x 1080, it records it using 1440 x 1080, then stretches each pixel’s width to fill the space of 1920 pixels, using only 1440 of them.
The problem this causes in editing is that, today, NLEs expect HD pixels to be square. When you work with older footage, if your image looks squished, check your pixel aspect ratio – or your project settings – to make sure you are compensating for these earlier rectangular pixels.
EXTRA CREDIT
Here’s a link from a few years ago that looks at HDV in more detail.
Please rate the helpfulness of this tip.
Click on a star to rate it!
https://www.theinsidetips.com/wp-content/uploads/2019/09/Tips-Logo-700x150.jpg00Larry Jordanhttps://www.theinsidetips.com/wp-content/uploads/2019/09/Tips-Logo-700x150.jpgLarry Jordan2020-09-08 01:30:002020-09-08 01:30:00Tip #991: HDV vs. “Normal” Media
We may request cookies to be set on your device. We use cookies to let us know when you visit our websites, how you interact with us, to enrich your user experience, and to customize your relationship with our website.
Click on the different category headings to find out more. You can also change some of your preferences. Note that blocking some types of cookies may impact your experience on our websites and the services we are able to offer.
Essential Website Cookies
These cookies are strictly necessary to provide you with services available through our website and to use some of its features.
Because these cookies are strictly necessary to deliver the website, refuseing them will have impact how our site functions. You always can block or delete cookies by changing your browser settings and force blocking all cookies on this website. But this will always prompt you to accept/refuse cookies when revisiting our site.
We fully respect if you want to refuse cookies but to avoid asking you again and again kindly allow us to store a cookie for that. You are free to opt out any time or opt in for other cookies to get a better experience. If you refuse cookies we will remove all set cookies in our domain.
We provide you with a list of stored cookies on your computer in our domain so you can check what we stored. Due to security reasons we are not able to show or modify cookies from other domains. You can check these in your browser security settings.
Google Analytics Cookies
These cookies collect information that is used either in aggregate form to help us understand how our website is being used or how effective our marketing campaigns are, or to help us customize our website and application for you in order to enhance your experience.
If you do not want that we track your visit to our site you can disable tracking in your browser here:
Other external services
We also use different external services like Google Webfonts, Google Maps, and external Video providers. Since these providers may collect personal data like your IP address we allow you to block them here. Please be aware that this might heavily reduce the functionality and appearance of our site. Changes will take effect once you reload the page.
Google Webfont Settings:
Google Map Settings:
Google reCaptcha Settings:
Vimeo and Youtube video embeds:
Other cookies
The following cookies are also needed - You can choose if you want to allow them:
Privacy Policy
You can read about our cookies and privacy settings in detail on our Privacy Policy Page.