… for Apple Motion

Tip #969: New! 3D Objects in Motion

Larry Jordan – LarryJordan.com

3D objects are ideally suited for 3D text and camera moves.

A portion of the 3D objects available in the latest release of Motion – 5.4.6.

Topic $TipTopic

A key group of new features in the 5.4.6 update to Motion are 60 new 3D objects in the Motion Library. Each of these elements can be rotated in any direction, unlike video, which is always 2D.

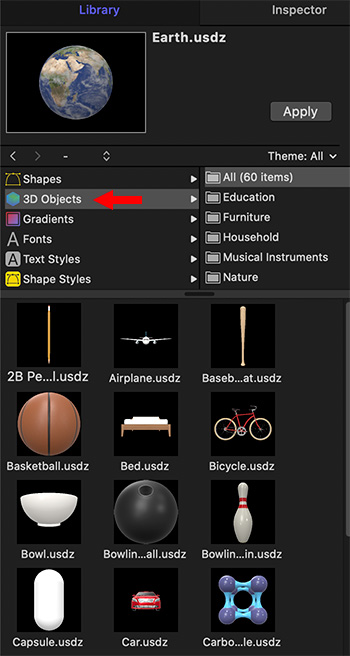
To access these go to Library > 3D Objects. (See screen shot.)

Add them to a project the same as any other object.

The easiest way to rotate or position them is using the 3D Transform tool (Shortcut: Q). If you want more precision, select the object, then go to Inspector > 3D Object and adjust the Orientation settings.

EXTRA CREDIT

These can be scaled over 300% and still retain texture, meaning that flying a camera through one of these objects won’t become pixelated until it gets very large in the frame.


Please rate the helpfulness of this tip.

Click on a star to rate it!

… for Apple Motion

Tip #963: Apple Updates Motion

Larry Jordan – LarryJordan.com

Apple updates Motion to support 3D shapes and a faster way to creates borders.

The 3D Transform tool adjusting on of the new 3D models in Motion 5.4.9.

Topic $TipTopic

Last week, Apple continued the evolutionary growth of Motion – to version 5.4.6 – along with updates for Final Cut Pro X and Compressor. While none of these features are revolutionary, all are useful and include:

  • Support for 3D models, along with 60 new 3D models in the Motion Library
  • Importing 3D models in the USDZ format.
  • A new Stroke filter which quickly outlines objects using an associated alpha channel

These free updates are accessed through the Mac App Store.

EXTRA CREDIT

The 5.4.4 release of Motion also included:

  • Metal-based processing engine to improve playback, rendering, and compositing.
  • Creating 8K motion graphics by harnessing the power of multiple GPUs, up to 28 CPU cores, and Afterburner with Mac Pro (2019).
  • Ability to view stunning HDR titles and effects with Apple Pro Display XDR.

Here’s a link to learn more.


Please rate the helpfulness of this tip.

Click on a star to rate it!

… for Visual Effects

Tip #979: Rotoscope Basics in After Effects

Larry Jordan – LarryJordan.com

Rotoscoping separates the foreground from the background.

(Rotoscoped image courtesy of MotionArray.com.)

Topic $TipTopic

This article first appeared in MotionArray.com. This is a summary.

So what is rotoscoping?

In video editing it’s the process of drawing around an object, character, or other part of your scene so that you can isolate it. Usually people will use this term when they’re talking about tracing something that’s moving and that doesn’t have a simple geometric shape.

A typical example is drawing a mask around a person so that you can separate them from the scene that they’re in. This has a huge amount of application to lots of other processes and tools inside After Effects.

But here’s the problem: When we’ve done this for the frame that we’re currently on, this is a video, and if we play our video, the mask stays exactly where it is and we’re left with a terrible looking effect! The reason a lot of people don’t like rotoscoping is because it needs to account for in every single frame in the video.

That can seem insane to some people, so here are some pointers to make the whole process a lot more manageable.

The video tutorial that accompanies this article illustrates basic rotoscoping techniques, then provides links to learn additional rotoscoping skills.


Please rate the helpfulness of this tip.

Click on a star to rate it!

… for Visual Effects

Tip #978: Better Ways to Create Custom LUTs

Larry Jordan – LarryJordan.com

LUT software allows us to create looks that can’t be achieved any other way.

A red car, re-colored to blue simply by changing the LUT.

Topic $TipTopic

Tip #977 showed how to create LUTs using Photoshop. However, what if you need a radically different look for your media? That requires a 3rd-party LUT utility.

Consider 3D LUT Creator.

3D LUT Creator makes 3D LUTs that can be imported into many programs such as Adobe Photoshop, DaVinci Resolve, Adobe Premiere Pro, Final Cut Pro X, Motion, and Adobe After Effects.

Color correction in 3D LUT Creator is made by bending the grid tied to the color plane containing saturation and hue. The use of this interface allows you, in just a few clicks, to completely change the color scheme of the image or work with the desired color ranges separately.

A free trial version, and more details, are available here.

EXTRA CREDIT

LUTs don’t require rendering, making these the fastest way to change the colors in your clip.


Please rate the helpfulness of this tip.

Click on a star to rate it!

… for Visual Effects

Tip #977: Create a LUT in Photoshop

Larry Jordan – LarryJordan.com

Photoshop can create LUTs that work in Premiere, Resolve or Final Cut Pro X.

Save LUT settings in Photoshop using the CUBE format.

Topic $TipTopic

LUTs are a great way to take log or RAW images and convert them into something pleasing to look at. You can even use this technique for Rec. 709 media, which we use every day in HD projects.

Here’s a technique that creates LUTs that work in Premiere, After Effects, Final Cut, Motion or DaVinci Resolve.

  • In Photoshop, import a still frame from the video that you want to create a LUT for.
  • NOTE: This image needs to retain detail in the highlights. TIFF or PNG are the best export formats to use.

  • Select the layer containing the image and choose Layer > New > Background from Layer. (This change is important.)
  • Add at least one Adjustment layers, then adjust Levels and other settings to the adjustment layer to create the look you want.
  • NOTE: Do not adjust the image, only modify the adjustment layer.

Here’s the magic part – as long as you convert the image into a background and use adjustment layers, you can take your look and convert it into a LUT which can be opened in a variety of applications.

  • In Photoshop, choose File > Export > Color Lookup Tables.
  • Give the file a description that makes sense to you. Then, and this is a KEY step, select the CUBE format. This format is required by all our NLEs.
  • Click OK, give it a name and location, then save it.
  • Switch over to your editing application and import your new custom LUT and apply it to your footage.

Done. This LUT can be used across multiple projects and multiple NLEs.

EXTRA CREDIT

Here’s an article from my website that walks you through all these steps in more detail.


Please rate the helpfulness of this tip.

Click on a star to rate it!

… for Adobe Premiere Pro CC

Tip #972: A Second Secret Marker Tip

Larry Jordan – LarryJordan.com

Unchecking this option locks timeline markers in place, regardless what you do with your clips.

The Ripple Sequence Markers menu option. (I removed the middle of this menu.)

Topic $TipTopic

There’s another marker secret hidden in plain sight in the Markers menu.

Ripple Sequence Markers, which is on by default, means that when you delete a clip, insert a clip, close a gap or trim a clip, if there are timeline markers above the clip you just changed, the markers will be adjusted as well.

In early versions of Premiere, timeline markers were locked into position, regardless of what you did with your clips.

Now, if you find your markers changing position when you don’t want them to, go to the Markers menu and uncheck this option.


Please rate the helpfulness of this tip.

Click on a star to rate it!

… for Adobe Premiere Pro CC

Tip #971: A Secret Tip to Moving Markers

Larry Jordan – LarryJordan.com

Including sequence markers means all your marker data travels with your clips.

The Markers menu, showing Copy Paste Includes Sequence Markers (I removed the middle section.)

Topic $TipTopic

There’s a feature in Premiere that’s turned off by default that you might want to enable if you use markers a lot. Here’s what it does.

At the bottom of the Markers menu is a choice that is disabled by default: Copy Paste Includes Sequence Markers.

If you are someone who adds lots of markers to your sequence, or uses marker names, colors or descriptions, you probably noticed that when you copy a clip from one sequence to another all that timeline marker information is lost when you paste. Sigh…

NOTE: This is not true if the markers are in the clips themselves; clip markers always travel with a clip.

However, when you turn this setting on, whenever you select timeline clips that have timeline markers above them, the markers will copy and paste as well as the clips.

Cool!


Please rate the helpfulness of this tip.

Click on a star to rate it!

… for Codecs & Media

Tip #968: Add Camera & Custom LUTs in Compressor

Larry Jordan – LarryJordan.com

Compressor does not access FCP X LUT locations. Store LUTs where you can easily find them.

The Custom Lut menu in Apple Compressor 4.4.6.

Topic $TipTopic

One of the big new features in the Compressor 4.4.6 update is the ability to add camera and custom LUTs.

NOTE: A LUT is a lookup table that converts the data stored in your computer into something more pleasing for the eye to view.

We could add LUTs for a long time in FCP X, the news now is that LUTs can be added before editing even starts, as part of the DIT process.

NOTE: There is no reason to add a LUT after a project has been color graded.

Keep in mind that LUTs added during transcoding are baked into the video, unlike LUTs added during the editing process, which can always be changed.

To add a LUT:

  • Select the compression setting applied to a job.
  • Scroll to the bottom of the Video Inspector and add a new Video Effect.
  • Choose Custom LUT.
  • Click the Select button to determine which LUT you want add.

EXTRA CREDIT

Compressor does not default to the same LUT storage location that Final Cut uses. So be sure to store any custom LUTs somewhere you can easily find them.

Here’s an tutorial from my website that describes how to create custom LUTs using Photoshop.


Please rate the helpfulness of this tip.

Click on a star to rate it!

… for Codecs & Media

Tip #965: Thoughts on the Mac T2 Chip

Larry Jordan – LarryJordan.com

The Apple T2 chip provides more than simple system security.

The Apple T2 chip

Topic $TipTopic

We first heard about Apple’s T2 chip with the release of the 2017 iMac Pro. Apple’s support pages wrote:

“The Apple T2 Security Chip is Apple’s second-generation, custom silicon for Mac. By redesigning and integrating several controllers found in other Mac computers—such as the System Management Controller, image signal processor, audio controller, and SSD controller—the T2 chip delivers new capabilities to your Mac.

“For example, the T2 chip enables a new level of security by including a secure enclave coprocessor that secures Touch ID data and provides the foundation for new encrypted storage and secure boot capabilities. And the T2 chip’s image signal processor works with the FaceTime HD camera to enable enhanced tone mapping, improved exposure control, and face-detection–based autoexposure and auto white balance.”

But, what you may not know is that the T2 chip also provides hardware-based encoding, such as 8-bit HEVC (i.e. the “Faster” setting) when encoding files using Apple Compressor. For those familiar with hardware-based H.264 encoding using Intel CPUs, Apple’s expectation is to have comparable results regardless of which hardware is used.

The T2 will become even more important to video creators as Apple shifts to Apple silicon-based systems in the coming year.

EXTRA CREDIT

Here’s a Apple KnowledgeBase page from Apple with more details.

Here’s a Wikipedia article to learn more about Apple’s custom chips.


Please rate the helpfulness of this tip.

Click on a star to rate it!

… for Codecs & Media

Tip #964: Apple Updates Compressor

Larry Jordan – LarryJordan.com

Better LUT support is the key feature in this release.

New media conversion options in Apple Compressor.

Topic $TipTopic

Last week, Apple continued the evolutionary growth of Compressor – to version 4.4.7 – along with updates for Motion and Compressor. While none of these features are revolutionary, all are useful and include:

  • Camera Log Conversion. You can now convert from log to SDR or HDR color spaces by apply custom camera LUTs, or using built-in LUTs for Panasonic, Sony, Canon, Blackmagic, Nikon or ARRI log formats.
  • Custom LUT effects. These allow applying third-party creative LUTs to clips for adding a custom look during compression. Compressor supports LUTs in .cube, .mga, and med file formats.

Both of these new features are especially helpful for on-set DIT work, converting camera masters into something more visually pleasing for initial review and rough editing.

NOTE: LUTs applied to media being transcoded are permanently attached to the media.

Compressor 4.4.7 also includes:

  • Improved speed and reliability using distributed processing over SMB.
  • Create ProRes IMF Packages including support for multiple languages.
  • Support for playback of PNG movie files.
  • Fixes an issue in which droplets would not recognize .m4v files.
  • Fixes an issue where a DV codec with a 709 Color Profile fails to transcode.
  • Fixes an issue in which image sequences may export with the incorrect color bit depth.
  • Fixes an issue where a system could run out of memory when the Active tab is open while processing a batch on a MacBook Pro with Touch Bar

These free updates are accessed through the Mac App Store.

EXTRA CREDIT

Here’s a link to learn more.


Please rate the helpfulness of this tip.

Click on a star to rate it!