Replicators create patterns from one or more shapes.
A spiral replicator with the Oak color gradient pattern applied.
A Replicator creates a pattern from a single object or a group of objects. Traditionally, we think of a pattern as a rectangle, but, in Motion, we have a lot more options.
Replicators can be use to repeat a logo to fill the screen as the background for text, or creating interesting patterns, or, well, just about anything, really.
NOTE: A key difference between particles and replicators is that particles have a “life,” the duration that a particular particle is displayed on screen. Replicated objects “live” forever.
Replicators can take different shapes, including:
Point
Line
Rectangle
Circle
Burst
Spiral (see screen shot)
Wave
Or a custom geometric form
Replicators can also change color across the pattern, as this screen shot illustrates.
EXTRA CREDIT
Animate Replicators by applying Behaviors > Replicator > Sequence Replicator
.
Please rate the helpfulness of this tip.
Click on a star to rate it!
https://www.theinsidetips.com/wp-content/uploads/2019/09/Tips-Logo-700x150.jpg00Larry Jordanhttps://www.theinsidetips.com/wp-content/uploads/2019/09/Tips-Logo-700x150.jpgLarry Jordan2020-10-15 01:30:002020-10-09 15:26:37Tip #1085: What’s a Replicator?
Free tutorials from Blackmagic that show how to use Fusion effectively.
(Image courtesy of Pexels.com.)
Built into DaVinci Resolve is a powerful effects system called Fusion.
Fusion is different from many other effects systems in that it is node-based. This requires a different way of planning and executing an effect.
To help you learn it, Blackmagic Design, the developer of DaVinci Resolve, has created a series of video tutorials that span the basics of editing to creating 3D visual effects in Fusion.
Once you have animation you like, be sure to turn it into a template for reuse later.
(Image courtesy of MotionArray.com.)
This article first appeared in MotionArray.com. This is a summary.
If you’ve spent some time editing with DaVinci Resolve, then you may be curious about different ways to create your own animated titles. DaVinci Resolve Fusion titles are a great way to build your own animated title sequence.
In this article, you will understand how to animate your own titles within Davinci Resolve Fusion and turn them into a template that’s easily accessible and adjustable within the edit tab. Plus, you’ll find some useful templates to get you started.
This tutorial covers:
Part 1: What is Fusion?
Part 2: How to Create an Animated Fusion Title
Part 3: Quick Tips & Hacks for Using Fusion
Part 4: 15 Awesome DaVinci Resolve Fusion Resources to Download
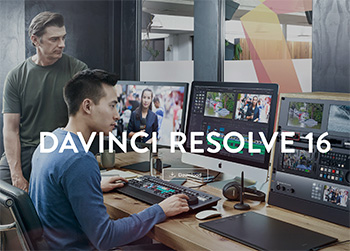
Even the free version of Resolve can create useful, high-quality projects.
Promotional image from the DaVinci Resolve website.
This article first appeared in MotionArray.com. This is a summary.
In recent years, DaVinci Resolve has steadily gained interest from professionals and hobbyists alike. Fueled by a surprisingly capable free version, and the constant addition of new features, the software is now more popular than ever. Not only will you find a complete set of user-friendly video editing tools, but there are also audio mixing and visual effects compositing workspaces!
Whether you are new to video editing or looking to jump ship from other software, this tutorial shows how to use DaVinci Resolve to get up and running fast.
The tutorial linked above covers the basics of editing in Resolve:
Step 1: Create a New Project & Import Media
Step 2: Add Trimmed Clips to the Timeline
Step 3: Add Text & Titles
Step 4: Add Transitions
Step 5: Add Effects
Step 6: Add Music & Audio
Step 7: Color Correction
Step 8: Share Your Project
Please rate the helpfulness of this tip.
Click on a star to rate it!
https://www.theinsidetips.com/wp-content/uploads/2019/09/Tips-Logo-700x150.jpg00Larry Jordanhttps://www.theinsidetips.com/wp-content/uploads/2019/09/Tips-Logo-700x150.jpgLarry Jordan2020-10-14 01:30:002020-10-14 01:30:00Tip #1087: Get Started with DaVinci Resolve 16
ProRes provides lots of choices – all supporting 10-bit, high-quality images.
The Apple ProRes logo.
Apple ProRes comes in a variety of formats. Which one should you pick for your projects? Here’s some advice.
NOTE: Much this tip is taken from the Apple ProRes White Paper (Jan. 2020). (Link)
Apple ProRes is one of the most popular codecs in professional post-production and, as of Oct. 2020, it also won an Engineering Emmy Award for its quality, licensing and innovation. The ProRes family of video codecs has made it both possible and affordable to edit full-frame, 10-bit, 4:2:2 and 4:4:4:4 high-definition (HD), 2K, 4K, 5K, and larger video sources.
ProRes codecs take full advantage of multicore processing and feature fast, reduced-resolution decoding modes. All ProRes codecs support any frame size (including SD, HD, 2K, 4K, 5K, and larger) at full resolution. The data rates vary based on codec type, image content, frame size, and frame rate.
Here are the current formats:
Apple ProRes RAW. Captures data from the camera sensor. Existing media can’t be converted into ProRes RAW.
Apple ProRes 4444 XQ. The highest-quality version of ProRes for 4:4:4:4 image sources (including alpha channels), with a very high data rate to preserve the detail in high-dynamic-range imagery generated by today’s highest-quality digital image sensors.
Apple ProRes 4444. An extremely high-quality version of ProRes for 4:4:4:4 image sources (including alpha channels). This codec features full-resolution, mastering-quality 4:4:4:4 RGBA color and visual
fidelity that is perceptually indistinguishable from the original material.
NOTE: Apple ProRes 4444 XQ and Apple ProRes 4444 are ideal for the exchange of motion graphics media because they are virtually lossless, and are the only ProRes codecs that support alpha channels.
Apple ProRes 422 HQ. A higher-data-rate version of Apple ProRes 422 that preserves visual quality at the same high level as Apple ProRes 4444, but for 4:2:2 image sources.
Apple ProRes 422. A high-quality compressed codec offering nearly all the benefits of Apple ProRes 422 HQ, but at 66 percent of the data rate for even better multistream, real-time editing performance.
Apple ProRes 422 LT. A more highly compressed codec than Apple ProRes 422, with roughly 70 percent of the data rate and 30 percent smaller file sizes. This codec is perfect for environments where storage capacity and data rate are at a premium.
Apple ProRes 422 Proxy. An even more highly compressed codec than Apple ProRes 422 LT, intended for use in offline workflows that require low data rates but full-resolution video.
WHICH TO PICK?
Use ProRes RAW if your camera or external storage can record it from the sensor.
Use ProRes 4444 for images recorded using HDR values, or for media created on the computer. (For example using Motion or After Effects.)
Use ProRes 422 for images recorded using a camera for Rec. 709 (HD) media.
Use ProRes Proxy where image quality is less important than small file size; for example in screening and rough cuts.
Please rate the helpfulness of this tip.
Click on a star to rate it!
https://www.theinsidetips.com/wp-content/uploads/2019/09/Tips-Logo-700x150.jpg00Larry Jordanhttps://www.theinsidetips.com/wp-content/uploads/2019/09/Tips-Logo-700x150.jpgLarry Jordan2020-10-13 01:30:002020-10-09 15:33:12Tip #1083: Pick the Right Version of ProRes
Thunderbolt 4 won’t be any faster, but it will be a lot more flexible.
The Thunderbolt logo.
When Thunderbolt first came out in 2011, it was a niche interface specifically designed for media creators. Why? Because Thunderbolt is optimized for large files, while USB is optimized for smaller files. Since most people using computers are more likely to be browsing the web, word processing or creating spreadsheets, USB was the perfect protocol for them. Plus, it was cheap.
However, Intel and Apple, the two co-creators of Thunderbolt, were not standing still. Currently, all Macs come bundled with Thunderbolt 3. In July, Intel revealed more of what will be in Thunderbolt 4.
As a reminder, Thunderbolt is considered a “universal” solution because it’s capable of delivering fast transfer speeds, charging and video output over a single connection. Thunderbolt 4 is compliant with USB4, DisplayPort and PCIe Express standards, and is compatible with previous-gen Thunderbolt and USB products.
According to LaptopMag.com, “Thunderbolt 4 isn’t any faster than Thunderbolt 3 when it comes to maximum transfer speeds but it brings additional capabilities. Among those is the ability to connect to two 4K monitors or a single 8K monitor as a minimum requirement, an upgrade from the single 4K output offered by Thunderbolt 3.
“Maximum data transfer speeds remain at 40 GBps but can now be achieved using a 2-meter universal cable. For comparison, USB4 matches Thunderbolt at 40 GBps but has a minimum requirement of 20 GBps. Additionally, Thunderbolt 4 will introduce accessories with up to four Thunderbolt ports.
“As well, Intel is requiring one Thunderbolt 4 port to drive power to thin and lightweight laptops that need less than 100 watts to charge. PCs will also need to let you wake them from sleep by touching a mouse or keyboard when they are connected to a Thunderbolt dock.”
Thunderbolt 4 devices should be released before the end of 2020.
EXTRA CREDIT
Sections of this article were taken from LaptopMag.com, written by Philip Tracy.
Please rate the helpfulness of this tip.
Click on a star to rate it!
https://www.theinsidetips.com/wp-content/uploads/2019/09/Tips-Logo-700x150.jpg00Larry Jordanhttps://www.theinsidetips.com/wp-content/uploads/2019/09/Tips-Logo-700x150.jpgLarry Jordan2020-10-13 01:30:002020-10-13 01:30:00Tip #1082: Thunderbolt 4 is Coming!
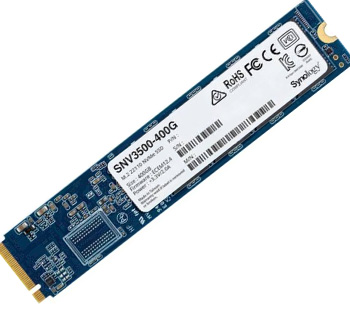
An NVMe SSD cache card can speed file directory operations and make a server more responsive.
The Synology SNV3500-400G NVMe SSD.
I’ve spent a lot of time this week thinking about how to improve the speed and responsiveness of my storage. Here’s a relatively inexpensive way to improve the responsiveness of a server, especially for smaller workgroups. When it comes to storage there are three elements we can adjust:
Storage capacity – measured in gigabytes – is how much the device holds
Bandwidth – the speed it transfers data to and from the computer
Responsiveness – how fast it responds to requests for data
Looking at these in more detail:
Capacity – measured in terabytes – we are all familiar with. From experience, we know that we can’t have too much capacity. It seems that hard disks are either empty or full.
Bandwidth – measured in MB/second – is how fast we can move data from one device to another.
Responsiveness – measured in milliseconds – is how fast a storage device responds to a request for data.
Most older people celebrate a birthday with a nice dinner. Me? I upgraded my server. I have a Synology DS 1517+ that’s around 3 years old. I connect to it using 1 Gb Ethernet from a variety of different computers.
One of the problems with my storage is that, because my network only consists of 2-3 users, the server is not heavily used. Which means that a lot of the time the drives stop spinning, or spin slower, to save energy because there’s nothing happening across the network.
This means that when I access a server volume from my Mac, it takes several seconds for it to wake up and display a file directory or open a file.
Most of the time, while annoying, this isn’t a big problem. But, all my media is stored on the server, when I’m doing a live webinar this delay drives me nuts.
So, I finally decided to do something about it: I added an SSD card as a cache to the server. SSDs are marketed to database users as a way to improve the responsiveness of I/O operations. And I’m sure it does that. But there are also benefits to media creators in terms of making the server feel much more responsive.
NOTE: The specific hardware that I added were a Synology E10M20-1 Ethernet Adapter, which also holds a Synology SNV3500-400G 400 GB NVMe SSD to accelerate the storage cache. (The card uses an m.2 form factor.)
I was amazed at the difference. Folders pop open almost instantly, even though the disks are not yet up to speed. Navigating is almost as fast as the internal SSD on my computer. While I haven’t, yet, connected the 10 Gbps Ethernet port – though that’s coming – just adding SSD makes a big difference. I don’t feel like I’m waiting on my storage anymore.
NOTE: The SSD does not speed file transfers, but it does make moving around and finding things inside the server much faster.
If you feel that your server is a bit “laggy,” look into adding an SSD card as a cache. It will make your system feel much peppier, even if your server, like mine, still uses spinning disks for storage.
Please rate the helpfulness of this tip.
Click on a star to rate it!
https://www.theinsidetips.com/wp-content/uploads/2019/09/Tips-Logo-700x150.jpg00Larry Jordanhttps://www.theinsidetips.com/wp-content/uploads/2019/09/Tips-Logo-700x150.jpgLarry Jordan2020-10-13 01:30:002020-10-10 11:29:06Tip #1081: Improve the Responsiveness of a Server
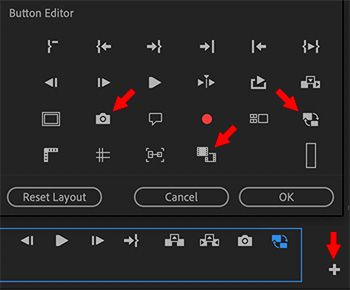
The Button Editor allows you to customize the buttons displayed in the Source or Program Monitors.
The Button editor. Arrows are explained in the text.
Over the years, Adobe has significantly slimmed down the Premiere interface. There are a fraction of the on-screen buttons compared to when the Creative Cloud first premiered. (Um, so to speak.)
One of those changes reduced the number of buttons displayed at the bottom of both the Source and Program Monitors. However, we can get many of these back using the Button Editor (screen shot). This customizes the buttons displayed in the Source or Program Monitors.
To open it, click the Plus icon in the lower right corner of either the Source or Program Monitor panels. (Each panel can have its own customization. The two Button Editors are essentially identical.)
NOTE: The Plus icon is indicated by the bottom arrow in the screen shot.
The screen shot displays most, but not all, of the Button Editor choices. Here are my three favorite additions.
Left arrow. Exports a still frame based on whatever is under the playhead. This feature supports exporting stills using DPX, JPEG, OpenEXR, PNG, Targa or TIFF formats.
Center arrow. Opens Comparison View. (See Tip #253).
Right arrow. Toggles between enabling camera native or proxy media.
I’ve added all three of these to my customized monitor panel.
Please rate the helpfulness of this tip.
Click on a star to rate it!
https://www.theinsidetips.com/wp-content/uploads/2019/09/Tips-Logo-700x150.jpg00Larry Jordanhttps://www.theinsidetips.com/wp-content/uploads/2019/09/Tips-Logo-700x150.jpgLarry Jordan2020-10-13 01:30:002020-10-13 01:30:00Tip #1076: Favorite Icons in the Button Editor
Adobe’s Learn panel is refreshed with new Adobe training.
The top of the Learn panel in Premeire.
Adobe continues to improve its training and tutorial access inside Premiere. If you haven’t seen what’s available lately, here’s where to look.
At the top of the Premiere interface is the Learn workspace; or choose Window > Learn. Click it and a new panel appears on the left side of the screen filled with tutorials.
Click the blue “New Tutorials Available” button to download the latest material. From what Adobe has told me, this section will continue to grow.
Please rate the helpfulness of this tip.
Click on a star to rate it!
https://www.theinsidetips.com/wp-content/uploads/2019/09/Tips-Logo-700x150.jpg00Larry Jordanhttps://www.theinsidetips.com/wp-content/uploads/2019/09/Tips-Logo-700x150.jpgLarry Jordan2020-10-13 01:30:002020-10-09 14:21:44Tip #1075: Adobe Beefs Up Learning
We may request cookies to be set on your device. We use cookies to let us know when you visit our websites, how you interact with us, to enrich your user experience, and to customize your relationship with our website.
Click on the different category headings to find out more. You can also change some of your preferences. Note that blocking some types of cookies may impact your experience on our websites and the services we are able to offer.
Essential Website Cookies
These cookies are strictly necessary to provide you with services available through our website and to use some of its features.
Because these cookies are strictly necessary to deliver the website, refuseing them will have impact how our site functions. You always can block or delete cookies by changing your browser settings and force blocking all cookies on this website. But this will always prompt you to accept/refuse cookies when revisiting our site.
We fully respect if you want to refuse cookies but to avoid asking you again and again kindly allow us to store a cookie for that. You are free to opt out any time or opt in for other cookies to get a better experience. If you refuse cookies we will remove all set cookies in our domain.
We provide you with a list of stored cookies on your computer in our domain so you can check what we stored. Due to security reasons we are not able to show or modify cookies from other domains. You can check these in your browser security settings.
Google Analytics Cookies
These cookies collect information that is used either in aggregate form to help us understand how our website is being used or how effective our marketing campaigns are, or to help us customize our website and application for you in order to enhance your experience.
If you do not want that we track your visit to our site you can disable tracking in your browser here:
Other external services
We also use different external services like Google Webfonts, Google Maps, and external Video providers. Since these providers may collect personal data like your IP address we allow you to block them here. Please be aware that this might heavily reduce the functionality and appearance of our site. Changes will take effect once you reload the page.
Google Webfont Settings:
Google Map Settings:
Google reCaptcha Settings:
Vimeo and Youtube video embeds:
Other cookies
The following cookies are also needed - You can choose if you want to allow them:
Privacy Policy
You can read about our cookies and privacy settings in detail on our Privacy Policy Page.