The Index does not display title content, only the label for that content.
Correcting a spelling mistake for a title clip in the Timeline Index does NOT change the content of the title itself.
I fell into a trap this week, spell-checking titles in Final Cut Pro X. I thought I was correcting spelling, instead I was only correcting a list. Be cautious here! As I was finishing last week’s webinar on An Overview of Adobe Audition, I opened the Timeline index to proof-read markers and text titles.
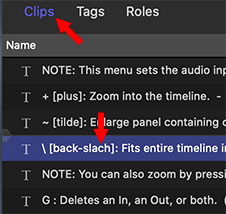
What I discovered is that you CAN use the Timeline Index to correct marker names. But you can NOT use the Timeline Index to correct titles. That’s because the Index displays the name of the title, not the content of the title. (See screen shot.)
So, when I corrected the spelling of “slash” in the Index, it corrected the display in the Index, but NOT the actual text keyed into the video.
So, while I thought I was being efficient in using the Index for spell-checking, in fact, I wasn’t changing anything that the viewer could see.
EXTRA CREDIT
This discovery meant I needed to reopen the show master, manually review each title in the Viewer, correct any mistakes in the Viewer, then reoutput the master file.
A major pain in my timeline.
Please rate the helpfulness of this tip.
Click on a star to rate it!
https://www.theinsidetips.com/wp-content/uploads/2019/09/Tips-Logo-700x150.jpg00Larry Jordanhttps://www.theinsidetips.com/wp-content/uploads/2019/09/Tips-Logo-700x150.jpgLarry Jordan2020-10-05 01:30:002020-10-05 01:30:00Tip #1054: Be Careful of the Spell-Check Trap
These two utilities are essential for moving files into or out of Final Cut
XToCC logo (top) and SendToX logo (bottom).
As long as you can create XML, you can move your data from one media application to another. However, the XML Final Cut Pro X uses is not compatible with many other applications. While some applications – KeyFlow Pro, Kyno and Axle.ai – support the current version of XML used in Final Cut Pro, most others, including Adobe’s Creative Cloud suite, do not.
Because XML is a core language for moving data between applications, there are two essential utilities that solve this compatibility issue:
SendToX. This converts older XML files into a form that FCP X can read.
XtoCC. This converts FCP X XML files into a form that older applications can read.
As with any migration, common elements – such as media and edits – transfer with no problems. However, proprietary functions – such as color grading or effects – may or may not transfer successfully.
As with all things in media, do a test using your own workflow to determine what works best for you.
Demo reels need to evolve with your career. Here’s how to keep them fresh.
(Image courtesy of MotionArray.com)
This article first appeared in MotionArray.com. This is a summary.
Chances are, most people reading this will have some experience in throwing together a demo reel. But as your body of work continues to evolve, so too should the 90-second video compilation you use to represent it.
Here are seven tips to add impact to your demo:
Cut the Fat
Brevity is Key
Play Up Your Niche
Don’t Be Afraid To Show Your Process
Reconsider Your Music
Chase Those Views!
Get a Second Opinion
EXTRA CREDIT
This article has more details and lots of links. And, for additional help, check out these tips which cover the basics of creating a demo reel.
Please rate the helpfulness of this tip.
Click on a star to rate it!
https://www.theinsidetips.com/wp-content/uploads/2019/09/Tips-Logo-700x150.jpg00Larry Jordanhttps://www.theinsidetips.com/wp-content/uploads/2019/09/Tips-Logo-700x150.jpgLarry Jordan2020-10-02 01:30:002020-10-02 01:30:00Tip #1050: 7 Tips to Spice Up a Demo Reel
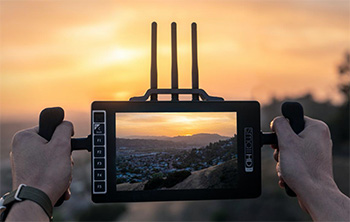
On-set video monitors can save time and improve collaboration.
(Image courtesy of Teradek.com.)
The folks at Teradek, who make wireless video monitors, created a blog illustrating the benefits of wireless video monitors on-set. Not just for the director, but other key production team members as well. Here’s an excerpt.
Wireless monitoring is critical to many roles on set; but let’s face it, not everyone has access to one. In fact, on many productions big and small, priority for monitoring goes to the Director and DP, leaving other critical members to fend for themselves in an overcrowded video village with just a few monitors.
The goal, then, is to find a solution that lets everyone see the shot without having to fight for that premium video village real estate. That’s where personal wireless monitors come in.
The biggest benefit is allowing every member to see the shot so they can adjust their roles accordingly, making for a much more collaborative set. Another is being mobile, allowing the crew to maneuver around set with ease and remove as many obstructions as possible.
The seven roles that could benefit most are:
Director
1st AC
Gaffer
Script Supervisor
Hair & Makeup
Clients & Executives
Boom operators
While only a select few people on set absolutely need zero-delay monitoring, by helping to cut production time, you end up saving tons of money.
Please rate the helpfulness of this tip.
Click on a star to rate it!
https://www.theinsidetips.com/wp-content/uploads/2019/09/Tips-Logo-700x150.jpg00Larry Jordanhttps://www.theinsidetips.com/wp-content/uploads/2019/09/Tips-Logo-700x150.jpgLarry Jordan2020-10-02 01:30:002020-10-02 01:30:00Tip #1037: On-set Wireless Video Monitoring
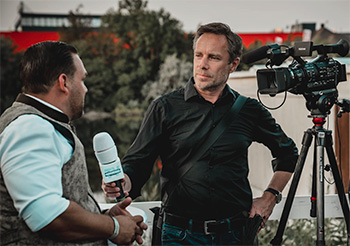
These six steps keep the chaos at bay while editing interviews.
(Interview image courtesy of Pexels.com.)
This article, written by Joe Frederick, first appeared in PremiumBeat.com. This is a summary.
Editors on interview projects face an overwhelming task: reducing hours of footage into just minutes for the final cut. Eliminate that stress with these six steps.
1. Transcription. Getting your interviews transcribed is the best piece of advice I have for anyone cutting these types of videos. There are many, many advantages to getting your interviews transcribed. If the director suddenly wants to find a particular soundbite from a particular interview, you can easily search the transcription for particular key words or phrases. You can also skim through the interviews when away from the edit suite. The benefits are endless.
Before the transcription, it’s worth forming your multicam clips first, if you’ve filmed from multiple angles, so you can drag the multicam clip into your timeline and export the audio from there. That way, the timecode on your transcription will match the timecode of your interview timeline. This is vital if you want to keep your process efficient.
2. Highlighting. Read all the transcripts from beginning to end, highlighting anything and everything that might possibly be used in the edit. I usually open the PDFs in Preview, which allows you to use different colors when highlighting.
3. Create “Good Content.” Back in your NLE, go through all your interviews, cutting out any of your highlighted segments from each interview into a new project/sequence. Essentially you are building an unorganized selects reel. Put a text slide before each clip with the content of the sound bite. By now, you should have a sense of the organizational structure you are aiming for.
4. Create “Good Content Ordered.” Rearrange the selected sound bites into an order that makes sense.
5. Create “Content Cut.” Duplicate your project and rename it “Content Cut.” Because your footage is now in order, you’ll be able to see when you have repetition in what’s being said and can quickly delete it. Then, get busy deleting and whittling down your cut until it’s the length you want your final piece to be.
6. Create “Refined Content Cut.” Duplicate your project file once again and rename it Refined Content Cut. This is where the final finessing takes place.
By taking your project in stages, it helps you feel more in control which allows you to focus more on your story.
Publishing a template is a fast way to reuse settings and media between projects.
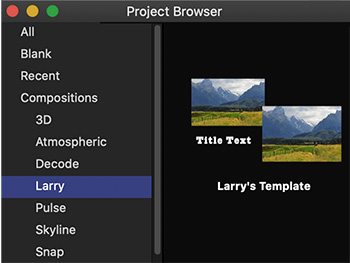
A custom template displayed in Project Browser > Categories.
If you find yourself creating similar projects time after time, creating a custom template can save you time. The trick is to know what to save. Templates can include:
Project settings
Media
Behaviors and filters
Anything else you save in a “normal” Motion project
When you choose File > Publish Template, you can assign it a name, pick a category in which to store it, and, if you want to use it in Final Cut, you can publish it as a Final Cut Generator.
But, if all you want to do is create a file with basic settings and, say, logos or other common graphics:
Choose File > Publish Template
Give it a name and create a category to store your templates. My custom category is named “Larry” – because it is easy for me to remember.
Leave all checkboxes unchecked.
Now, as you can see in the screen shot, the template shows up in Project Browser > Compositions, but does NOT show up in Final Cut.
Creating reusable templates is a great way to save time when you are creating similar projects.
Please rate the helpfulness of this tip.
Click on a star to rate it!
https://www.theinsidetips.com/wp-content/uploads/2019/09/Tips-Logo-700x150.jpg00Larry Jordanhttps://www.theinsidetips.com/wp-content/uploads/2019/09/Tips-Logo-700x150.jpgLarry Jordan2020-10-01 01:30:002020-10-01 01:30:00Tip #1048: What Does Publishing a Template Do?
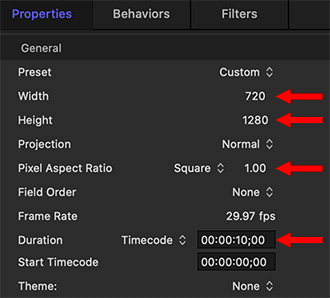
Square and vertical video require custom settings in Project > Properties.
The Inspector > Properties settings you need to change for vertical video.
Since the beginning of television, video used a horizontal aspect ratio. Since the beginning of cell phone photography and video, mobile users shot vertical video.
Sigh…. Drives all us old-school video people nuts!
Still, you gotta change with the times. Here’s how to create a vertical video project in Motion.
Create a new project using the Motion Project Browser. Since Motion always creates images at the highest possible quality, it doesn’t matter which setting you pick.
Once the project opens, select Project in the Layers panel (It’s named “Project.”)
Enter the Width and Height values, in pixels, of the new project. (These will generally be 720 x 1280 or 1080 x 1920.
Make sure Pixel Aspect Ratio is set to Square.
Set the Duration to whatever length you need.
EXTRA CREDIT
We can’t save project presets, so you’ll need to do this for each project. However, you can save the entire project as a template: File > Publish Template.
Please rate the helpfulness of this tip.
Click on a star to rate it!
https://www.theinsidetips.com/wp-content/uploads/2019/09/Tips-Logo-700x150.jpg00Larry Jordanhttps://www.theinsidetips.com/wp-content/uploads/2019/09/Tips-Logo-700x150.jpgLarry Jordan2020-10-01 01:30:002020-09-26 11:00:56Tip #1047: Create a Vertical Video Project
We may request cookies to be set on your device. We use cookies to let us know when you visit our websites, how you interact with us, to enrich your user experience, and to customize your relationship with our website.
Click on the different category headings to find out more. You can also change some of your preferences. Note that blocking some types of cookies may impact your experience on our websites and the services we are able to offer.
Essential Website Cookies
These cookies are strictly necessary to provide you with services available through our website and to use some of its features.
Because these cookies are strictly necessary to deliver the website, refuseing them will have impact how our site functions. You always can block or delete cookies by changing your browser settings and force blocking all cookies on this website. But this will always prompt you to accept/refuse cookies when revisiting our site.
We fully respect if you want to refuse cookies but to avoid asking you again and again kindly allow us to store a cookie for that. You are free to opt out any time or opt in for other cookies to get a better experience. If you refuse cookies we will remove all set cookies in our domain.
We provide you with a list of stored cookies on your computer in our domain so you can check what we stored. Due to security reasons we are not able to show or modify cookies from other domains. You can check these in your browser security settings.
Google Analytics Cookies
These cookies collect information that is used either in aggregate form to help us understand how our website is being used or how effective our marketing campaigns are, or to help us customize our website and application for you in order to enhance your experience.
If you do not want that we track your visit to our site you can disable tracking in your browser here:
Other external services
We also use different external services like Google Webfonts, Google Maps, and external Video providers. Since these providers may collect personal data like your IP address we allow you to block them here. Please be aware that this might heavily reduce the functionality and appearance of our site. Changes will take effect once you reload the page.
Google Webfont Settings:
Google Map Settings:
Google reCaptcha Settings:
Vimeo and Youtube video embeds:
Other cookies
The following cookies are also needed - You can choose if you want to allow them:
Privacy Policy
You can read about our cookies and privacy settings in detail on our Privacy Policy Page.