… for Random Weirdness

Tip #1184: Music Videos, Point Clouds & LiDAR

Larry Jordan – LarryJordan.com

Sometimes, the greater the restrictions, the more inspired the creativity.
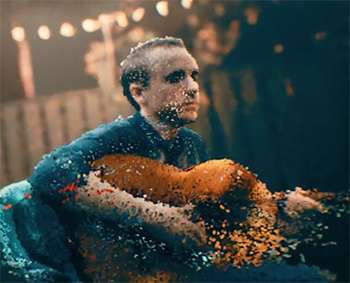
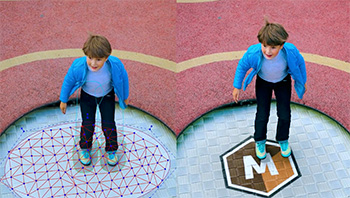
A detail from “Clove Cigarette,” courtesy of NoFilmSchool.com.

Topic $TipTopic

This article, written by Colin Medley, first appeared in PremiumBeat.com. This is a summary.

The video for Andy Shauf’s song “Clove Cigarette” has received a fair amount of attention for its unusual visuals and complex workflow. The creators of an amazing new music video share their complex, imaginative process with Unreal Engine and photogrammetry.

This is the time of COVID-19. Colin Medley (co-diretor) said, “I remember our first meeting, we were sitting in your backyard and I think the first idea came from just being there and thinking, ‘Okay, what can we do safely?'”

Jared Raab (co-director): Tristan Zerafa is a good friend of mine who works as a visual effects supervisor on much higher budget operations. I asked him about the LiDAR scanning part of it and whether or not he would be interested in being involved, and he said, “For sure.” And like I said, you, Luca, were the original reason why I even thought we had a chance at pulling this off because of the amount of Kinect scans that you were doing.

Luca Tarantini (technical director): I’d been experimenting with Kinect scans and animation for a couple of years at that point, so I guess that’s what made you think of point clouds.

Jared: Yeah, but you brought up something much more interesting, which was the ability to use photogrammetry, which is the process of taking overlapping photographs of something and turning them into a 3D model.

See the results in their video “Clove Cigarette” here. And their discussion of how they created it is equally fascinating.


Please rate the helpfulness of this tip.

Click on a star to rate it!

… for Random Weirdness

Tip #1183: Make a Film Using Zoom

Larry Jordan – LarryJordan.com

Remember, Zoom is both a technology and a character in your film.

Image courtesy of Paula Goldberg & PremiumBeat.

Topic $TipTopic

This article, written by Paula Goldberg, first appeared in PremiumBeat.com. This is a summary.

Let’s explore the important elements you’ll need to know to make a successful short film using Zoom technology.

  • Storytelling. The platform might be unusual, but the content demands remain the same. You can’t fix an idea in post. Everything starts with the material. With any short film, you’re looking for a simple plot and complex characters, a compelling conflict, and a surprising, but truthful, resolution. The extra consideration with Zoom is that action will be limited, and your screenplay will be dialogue driven.
  • Casting. Don’t cast your roommate. Good actors want to work on good material. If your script is gripping and your artistic vision clear, chances are you’ll find actors willing to do your project. So much can be forgiven technically, but a bad performance can kill any script.
  • Minimize the Tech. Built-in computer webcams are compact and so are their lenses. This sets a limit on the amount of light that they can capture—a problem especially for low-light conditions. External webcams provide better performance. Some even feature wide-angle lenses. They’ll also give your actor the ability to adjust resolution, frame rate, color, and brightness.
  • Preparation. Time is on your side and a spectacular return on your investment is to spend that time in pre-production. I’d approach it three ways: set/costume, filmmaking, storytelling. The most important part of the preparation is artistic. This is a very unnatural way for actors to work. You may want to suggest that they put a piece of paper over their own image on the screen. This will help them be less self-conscious—in no other medium is the actor able to view themselves while shooting. Once Sasha suggested that, both actors felt much more comfortable playing off each other.
  • Production. A perk about Zoom is that the director can record and watch each take live by muting their audio, disabling their video, and selecting “hide non-video participants.” When the video is processed, there will be no indication that anyone was present except the performers. You can pause between takes and discuss, then hide yourself again and resume another take.
  • Editing. If recording on Zoom, a [close-up] can be quite compelling, especially if the storytelling has numerous reveals and twists. It encourages multiple views to catch moments you didn’t get on the first view. However, don’t be afraid to edit. Most people are used to jump cuts and you have three angles you can use—a split screen two shot and the two singles. What will help the flow is if you cut on action, which can be as simple as a shift in seating position, interaction with a prop, or hand movements.

The article has a variety of technical tips and lots of screen shots, as the author follows her production from first idea through to editing. It is well worth reading.


Please rate the helpfulness of this tip.

Click on a star to rate it!

… for Random Weirdness

Tip #1160: The Secret History of Clapperboards

Larry Jordan – LarryJordan.com

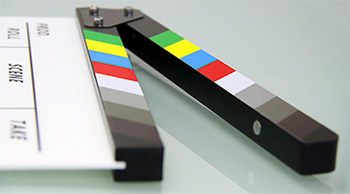
Every shot starts with one, but what do you really know about the clapperboard?

(Image courtesy of Pexels.com.)

Topic $TipTopic

Most of the time, the tips for this Tip Letter focus on production. Mostly. Recently, I came across a fascinating article on the history of clapperboards that fits right in.

This article, written by Jourdan Aldredge, first appeared in PremiumBeat.com. This is a summary.

Every shot starts with one, but what do you really know about the iconic film clapperboard? Let’s take a look.

The clapperboard was not always called a clapperboard, and, in fact, has had many different names over the years:

  • Sound marker
  • Slate
  • Sync slate
  • Dumb slate
  • Time slate
  • Clapboard
  • Clapperboard
  • Cue board
  • Film sticks
  • Sound sticks
  • And many, many more…

The clapperboard was very much an invention of necessity, and variations of the board date back to the earliest days of even silent cinema. A “slate board” could be found on silent film sets as a way to record and identify the type of film stock that was being used for the shoot.

The hinged, clappy part of the clapperboard was the innovation of Australian studio head F. W. Thring. When pioneering sound engineer Leon M. Leon thought to combine Thring’s hinged sticks with the slate board, the clapperboard we now know was born.

As we’ve moved into modern filmmaking, the standard chalkboard and dry-erase style clapperboards have of course transitioned as well. Modern digi-slates can be used to change and display all the relevant information digitally, as well as display SMPTE time code to further help with the pulling of metadata. There are also some other cool breakthroughs with digital slates and apps that are worth checking out.

Ultimately, it comes down to your filmmaking style and the specific needs of your production. A clapperboard will always be a useful tool, a helpful reminder, and a dependable source of information (should any of the digital alternatives fail you at some point).

EXTRA CREDIT

Jourdan’s article also has three interesting videos:

  • The history of clapperboards
  • How to Slate the Camera
  • And a montage of slates from Quentin Torentino’s Inglorious Basterds

Please rate the helpfulness of this tip.

Click on a star to rate it!

… for Apple Motion

Tip #1178: Colorize a Gadget

Larry Jordan – LarryJordan.com

The easiest way to customize an object is using color.

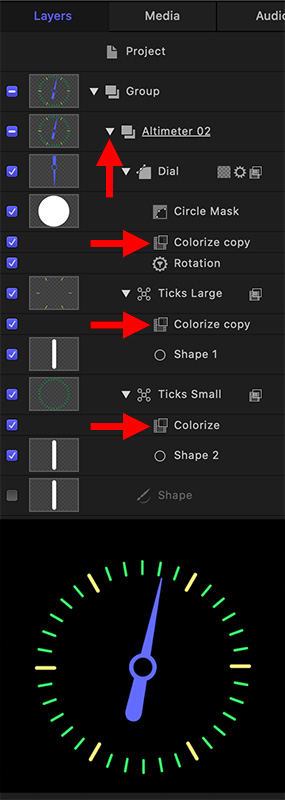
An expanded Altimeter 02 gadget, with custom colors applied.

Topic $TipTopic Many of the elements in the Motion Library can be customized – and the easiest is using color. Here’s a quick tutorial that introduces a part of the Library you may not have explored, and show how to use a very powerful color filter.

  • Drag Library > Content > Gadgets > Altimeter 02 to the viewer.

NOTE: If you haven’t explored Gadgets or Gauges yet, you are missing a variety of fun, animated objects that add movement and visual interest to any Motion project.

  • In the Layers panel, twirl down the small arrow next to the Altimeter name (top arrow in the screen shot).
  • Apply Filters > Color > Colorize to each of the three elements: Ticks small, Ticks large and Dial.

NOTE: A fast way to add multiple copies of a behavior or filter is to add it once, then Option-drag it to create a copy and apply it elsewhere in the Layers panel. (See lower three arrows in the screen shot.) A benefit to Option-dragging is that it retains the settings of the source effect – which you can change, if you want.

  • Adjust the colors for each layer to suit your project. In my example, Ticks small are green, Ticks large are yellow and the Dial is blue.

The entire process makes the gadget a lot more visually interesting and only takes a minute or two.

EXTRA CREDIT

If you want the yellow Ticks large to line up with different smaller ticks, simply select that layer in the Layers panel, then rotate it in the Viewer.


Please rate the helpfulness of this tip.

Click on a star to rate it!

… for Apple Motion

Tip #1177: First Look: The New Motion

Larry Jordan – LarryJordan.com

Everything you know about Motion still applies – but with bugs fixed and Apple silicon support.

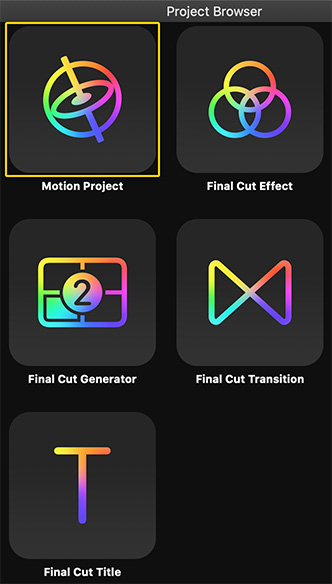
The new icons in the Motion Project Browser.

Topic $TipTopic

The most important note about this update is that it can be installed on macOS Catalina. The operation of Apple Motion remains pretty much the same, aside from supporting Apple silicon and Big Sur – which is quite a lot, actually.

Still, the Project Browser has a new look (see screen shot). As well, here’s what I noticed during a quick look-around the v5.5 interface:

  • Lots of new backgrounds – Goo, Lab Wall, Misty Light – while some of the more egregious backgrounds have disappeared.
  • The number of behaviors and filters seem to be the same.
  • It seems like there are more shape styles, but most of the rest of the content in the Library is the same.

The interface seems pretty much untouched. No new buttons, or major changes to the look of the application that I spotted on this first look.

Everything we already know still applies – except with more speed, Big Sur support and that exciting step into the future: Apple silicon.


Please rate the helpfulness of this tip.

Click on a star to rate it!

… for Apple Motion

Tip #1175: Apple Updates Motion to v5.5

Larry Jordan – LarryJordan.com

Apple updates Motion to support Big Sur and the switch to Apple silicon.

The spiffy new Motion 5.5. logo.

Topic $TipTopic

Last week, Apple updated Motion to version 5.5 to support macOS Big Sur, along with the upcoming switch to Apple silicon.

Even more, the app got a spiffy new icon! (See screen shot.) In addition to support for Apple silicon, the Motion 5.5 update includes:

  • Export HLG high-dynamic-range projects with Dolby Vision 8.4 metadata for optimized playback on Apple devices.
  • Improves stability when clicking in an empty canvas on on a Mac Pro with two AMD Radeon Pro Vega II Duo GPUs and a Blackmagic eGPU Pro.
  • Improves stability when manipulating groups of keyframes selected across multiple parameters.
  • Improves stability using the Stroke filter when selecting a stroke type in the HUD.
  • Fixes an issue in which the Poke filter center is offset from the onscreen control.
  • Improves stability when deleting layers after removing a marker.
  • Includes built-in support for Avid DNxHR® and Avid DNxHD® decoding and playback.

NOTE: Here’s a link to the Motion Release Notes from Apple.


Please rate the helpfulness of this tip.

Click on a star to rate it!

… for Visual Effects

Tip #1186: BorisFX Releases Mocha Pro 2021

Larry Jordan – LarryJordan.com

Mocha Pro: World-class motion tracking.

PowerMesh on the left, image replacement on the right.

Topic $TipTopic

Mocha Pro is the world renowned software for planar tracking, rotoscoping and object removal. Essential to visual effects and post-production workflows, Mocha has been recognized with prestigious Academy and Emmy Awards for contribution to the film and television industry.

Mocha Pro 2021 new features include:

  • PowerMesh: Mocha’s planar tracking engine now handles warped surfaces with speed and accuracy. PowerMesh sub-surface tracking drives warp stabilization, mesh warped roto-splines, and more. Export dense mesh tracking to many hosts with the new Alembic exporter.
  • AdjustTrack 2.0: Improved track editing takes the pain out of correcting the most difficult tracking shots.
  • Python Scripting: Powerful Python Script Editor is now included in the Mocha Pro plugin for flexible development.

Here’s the link to learn more.


Please rate the helpfulness of this tip.

Click on a star to rate it!

… for Visual Effects

Tip #1185: What Does LiDAR in an iPhone 12 Do?

Larry Jordan – LarryJordan.com

LiDAR is a key technology that makes AR believable.

(Image courtesy of Halide.com.)
iPhone LiDAR resolution may be better for mapping rooms, than portraits.

Topic $TipTopic

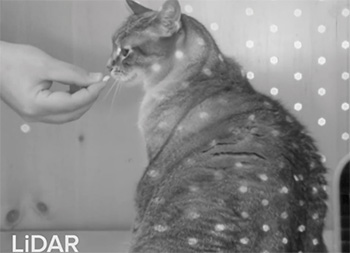
One of the key new features in the iPhone 12 Pro is LiDAR. Lidar stands for light detection and ranging, and has been around since the 1960’s. It uses lasers to ping off objects and return to the source of the laser, measuring distance by timing the travel, or flight, of the light pulse.

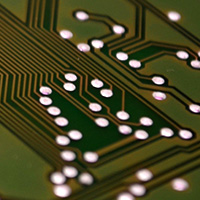
An iPhone sends waves of light pulses out in a spray of infrared dots and can measure each one with its sensor, creating a field of points that map out distances and can “mesh” the dimensions of a space and the objects in it. The light pulses are invisible to the human eye, but you could see them with a night vision camera. It works up to a range of 15 feet (5 meters).

The primary purpose of LiDAR in the iPhone is to improve augmented reality (AR) implementation. It will give apps more useful and accurate information about their surroundings, for smoother, more reliable AR. Even today, there is still a lot this technology can do, not just for augmented reality but games and shopping.

LiDAR actually has many uses across many industries. Archaeologists use it to prepare dig sites and autonomous vehicles rely on it to construct real-time 3D maps of their surroundings. LiDAR has even been used to create highly realistic and accurate maps of race tracks in video games, like Project CARS. Police speed guns also use LiDAR.

There’s an excellent article at halide.com, the developers of Halide, an iPhone camera app, that goes into much more detail showing what LiDAR can do and how it relates to AR and mapping the real world into your camera.

As the Halide authors conclude: “Photography isn’t traditionally taking photos anymore; it’s combining all the data and smarts in our devices into allowing totally new interpretations of what ‘photography’ can mean. And if you’re not excited about that, we’re at a loss!”

EXTRA CREDIT

Here are the references I used for this article:


Please rate the helpfulness of this tip.

Click on a star to rate it!

… for Visual Effects

Tip #1176: New VFX in DaVinci Resolve 17

Larry Jordan – LarryJordan.com

DaVinci Resolve updates the entire app with major new features.

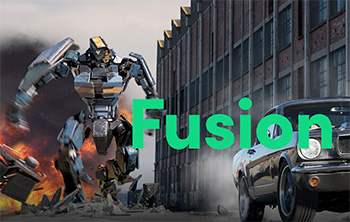
Fusion creates high-quality visual effects.

Topic $TipTopic

DaVinci Resolve 17 is a major new release with over 100 new features and 200 improvements! The color page features new HDR grading tools, redesigned primary controls, AI based magic mask and more.

DaVinci Resolve 17 has three major components: video editing, audio mixing and visual effects creation. The visual effects part is handled by Fusion.

NOTE: All this information is taken from the DaVinci Resolve website.

Here are some of the highlights:

  • Fast Effects Search and Live Preview. Finding the right effect, transition or title is faster and easier than ever! The elegant, new multi column view lets you see more and scroll less. Descriptive icons also help you quickly find what you need. Plus, you can hover scrub the mouse across any item to see a live preview in the viewer.
  • Keying and Compositing. New Resolve FX 3D, HSL and luma keyer plug-ins let you pull keys directly in the timeline on both the edit and cut pages. In addition, alpha channels from Resolve FX and Open FX plug-ins are now supported, as are embedded alpha channels and external matte files giving you even more compositing options.
  • Render in Place. The render in place command lets you generate render files for any portion of the timeline. Once rendered, you can move, edit and trim without having to re-render. Render files can be created in any format and saved wherever you want. Unlike cache files, render files are easy to manage and portable.
  • Compositions you create on the Fusion page can now be saved as a template and used on the edit or cut page. New animation curve modifiers can be used to automatically retime animations when you change their duration in an edit. Audio playback with waveform display makes it easier to create precisely timed animations, there are shared markers with the edit page and more.
  • In addition, 27 GPU accelerated Resolve [effects] have been added to the Fusion page, including the noise reduction and sharpening tools from the color page. New node view bookmarks make it easy to navigate large comps, the toolbar can be customized with your favorite tools, and vertical layouts are supported in the node editor.

Here’s the link to the Resolve 17 webpage to learn more.


Please rate the helpfulness of this tip.

Click on a star to rate it!

… for Adobe Premiere Pro CC

Tip #1182: What Does Clamp Signal Do?

Larry Jordan – LarryJordan.com

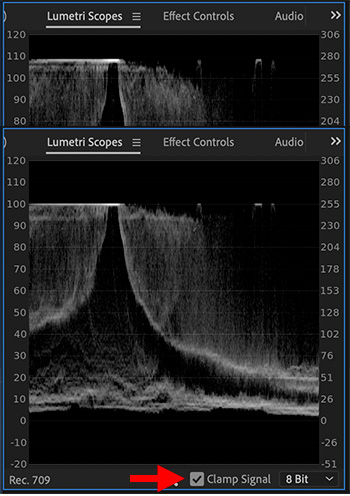
Clamping the signal affects the video scopes, but does NOT affect the video.

Unclamped video (top) vs. clamped video. The red arrow shows the checkbox.

Topic $TipTopic

The Lumetri Scopes have a “Clamp Signal” checkbox. It is checked on by default. What does this do and how does it affect your video?

First introduced in 2017, the Clamp Signal checkbox in the Lumetri Scopes panel limits the scope’s display to the visible spectrum for Rec. 709 media. Selected by default, this setting lets the scopes show values only from 0 through 100. If you want to see how much of the signal is being clipped, deselect the Clamp Signal check box.

The screen shot illustrates a signal which is unclamped, top, and clamped, bottom. Notice how the source clip has white levels that approach 110%. The red arrow indicates the checkbox itself.

The KEY thing you need to know is that checking this has NO effect on the video in the timeline. It only adjusts the scope display.

For web video, levels over 100% for Rec. 709 footage are no big deal – the web can play anything. But for projects destined for broadcast, cable, digital cinema or DVD, white levels must never exceed 100% for Rec. 709 media. (A bit lower is actually preferable.)

While the checkbox is nice, it is a better idea, most of the time, to see accurate video levels, so leave this box unchecked. This is not the default setting.


Please rate the helpfulness of this tip.

Click on a star to rate it!