… for Random Weirdness

Tip #1156: How to Organize Editing a Feature

Larry Jordan – LarryJordan.com

Larry’s Rule: Keep things as simple as possible for as long as possible.

Topic $TipTopic

At a recent webinar, Alan asked:

What’s the best organizational system for editing a scripted feature film?

I told him that every editor ultimately creates their own system, because file naming and media organization is intimately tied up in this, too. However, when thinking about the edit, my suggestion is to keep things as simple as possible for as long as possible.

Start with one scene per timeline. This allows you to focus just on the clips for that scene, without getting intimidated by the vastness of the entire project. One scene per timeline also allows you to edit your scenes out of order and easily shuffle clips or scenes around until they make the most sense for the story you want to tell.

Then, as all the scenes for an act are completed – at least, completed well enough that you want to see them integrated into a larger picture – copy / paste the clips from each scene in order into an Act.

NOTE: You can use nests or compound clips if you want. These keep projects neater. But, at this level, I still like the ability to move/trim individual clips without having to go in and out of the nest.

Finally, as you near the end, create a new project / library and copy each act into it. This means that only the clips you are actually using will be stored in this master file.

Once you have all your clips, scenes and acts built into the right order, do the final color correction and audio mixing in preparation for final output.

This system allows you to focus on what’s important for each phase of the edit: individual clips, scenes, acts to the final complete project.


Please rate the helpfulness of this tip.

Click on a star to rate it!

… for Random Weirdness

Tip #1151: Rescue Your Storage Using Recovery Mode

Larry Jordan – LarryJordan.com

The key is to be sure you are pressing the keys before you restart your system.

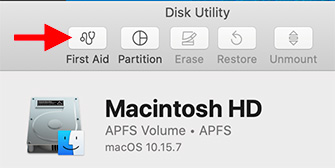
Select the drive you want to repair, then click First Aid in Disk Utility.

Topic $TipTopic

There’s a new way to keep your Mac running smoothly – it’s called “Recovery Mode.” Here’s how it works.

Shut down your Mac. (You can do this from a restart, but the timing of when to press the keys is trickier.)

Before you push the power button, press and hold Cmd + R. Then, turn your system on.

Continue pressing both keys until the startup thermometer gets about half-way across the screen.

What you’ve just done is tell your Mac to boot into a hidden start-up volume called the Recovery disk. You can’t run your normal applications with it, but you CAN:

  • Reinstall the latest version of macOS.
  • Repair your boot disks using Disk Utility
  • And two other options that I, ah, forget

Once boot up finishes, you’ll see a menu with four choices. Click the bottom one: Run Disk Utility.

When it opens, you’ll see two internal drives in the sidebar on the left:

  • Macintosh HD
  • Macintosh HD – Data

Select each one in turn and run First Aid. This fixes any problems with your boot disks; which are the ones most likely to show signs of disk corruption.

NOTE: In the distant past, we would sometimes zap the PRAM or reset the SMC. The vast majority of the time those old stand-bys won’t help today. Recovery Mode will.

When you are done, restart your Mac and get back to work.

NOTE: This is a good utility to run every month or so and is much superior to launching into Safe Boot, which we used to do in the past.


Please rate the helpfulness of this tip.

Click on a star to rate it!

… for Apple Motion

Tip #1163: Fill a 3D Object with Texture

Larry Jordan – LarryJordan.com

To retain texture, especially for white 3D objects, use Stencil Luma.

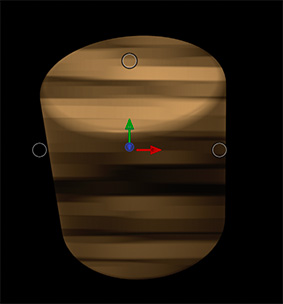
A white cylinder, filled with bamboo, yet retaining the lighting texture.

Topic $TipTopic

One of the new features in Motion 5.4.7 is 3D objects. They are in their own category in the Library. Here’s a better way to give them texture.

In the screen shot, I created a cylinder made out of strips of bamboo. Sorta. Here’s how.

  • Drag Library > 3D Objects > Cylinder into the timeline.
  • Using the 3D controls, position it however you want. Here, I tipped it forward to see the difference between the top and sides.
  • In the same group, drag Library > Content > Backgrounds > Bamboo Weave under the cylinder in the Layers panel.
  • Select the cylinder and change Inspector > Properties > Blend mode to Stencil Luma.

Stencil Luma retains the grayscale texture, while keying the background into the foreground.

NOTE: Stencil Alpha would replace the white, but lose all the depth provided by the lighting.

EXTRA CREDIT

To emphasize the shading created by the lighting, add Filters > Color > Levels to the cylinder, then tweak the Levels settings to emphasize the differences in grayscale.


Please rate the helpfulness of this tip.

Click on a star to rate it!

… for Apple Motion

Tip #1162: Particles Reflect Movement

Larry Jordan – LarryJordan.com

Particle systems change over time, this means they highlight animation applied to them.

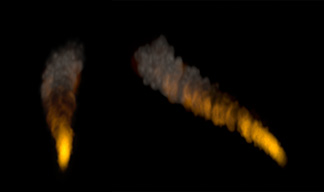
A stationary flame (left), and the flame moving through space.

Topic $TipTopic

Recently, for a webinar, I wanted to create a burning effect. What I discovered is that when you move a particle system using behaviors or keyframes, it amplifies that movement.

Let me illustrate using Library > Particle Emitters > Pyro > Fire Plume.

In the screen shot, the left image is the flame with no motion applied.

However, once I animate the flame using either keyframes or behaviors, notice how the flame trails out, emphasizing the direction of the move. (See the right image in the screen shot.)

This is because the different particles that make up this effect are released at different times. The older particles were released when the object was closer to the left side.

This means that particle systems provide very organic ways to indicate something is moving – sort of like following the position of a steam engine by watching its plume of smoke.

I’d “known” this intuitively about particles, but it hadn’t really sunk in until I saw the results of this movement in a real-live effect.

EXTRA CREDIT

You can easily experiment with this yourself by putting a particle emitter into a project, then, as the playhead plays, simply drag the particle emitter around the screen and watch what happens.


Please rate the helpfulness of this tip.

Click on a star to rate it!

… for Apple Motion

Tip #1161: Create Burn or Scorch Marks

Larry Jordan – LarryJordan.com

Rule #1: The shorter an effects shot, the more effective it is.

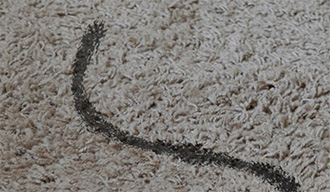
A path, with a dark gray color, charcoal shape style and Multiply blend mode.

Topic $TipTopic

Recently, for a webinar, I needed to create the illusion of a child dragging a light saber across a carpet and setting it on fire. While the entire effect would take longer than a tip to explain, I did want to touch on creating a burn or scorch mark, which was part of this effect.

The number one rule for any effects shot is: The shorter the effects shot, the more effective it is. The longer a shot holds on the screen, the more time the audience has to find something wrong with it.

That being said, the screen shot illustrates this burn effect:

  • Create an irregular curve using the Pen tool
  • Expand the Outline width a lot; here I used 100
  • Apply Shape Style > Traditional > Charcoal 3
  • Apply Properties > Blend Mode > Multiply

The Multiply blend mode combines the darker pixels between the “burn” and the carpet underneath. This makes the burn seem more attached to the carpet itself.

This is a very simple effect that works well.

EXTRA CREDIT

For scorch marks, change the color to more accurately match the background, and, depending on what is doing the scorching, you may need to use geometric shapes.


Please rate the helpfulness of this tip.

Click on a star to rate it!

… for Visual Effects

Tip #1167: Learn Maya on “Maya Monday”

Larry Jordan – LarryJordan.com

Free, short, video tutorials to learn Autodesk Maya 2020.

(Tutorial images courtesy of Toolfarm.com.)

Topic $TipTopic

Toolfarm.com has created a series of video tutorials on using Maya 2020. With a focus on empowering artists throughout the production pipeline, Autodesk Maya 2020 introduces new tools that not only help animators, modelers, riggers, and technical artists work faster and more intuitively. In addition, it makes the creative process more fun.

All tutorials are free.

Here’s the link


Please rate the helpfulness of this tip.

Click on a star to rate it!

… for Visual Effects

Tip #1166: Get Started with Cinema 4D

Larry Jordan – LarryJordan.com

Learning new software is never easy – but this is a good place to start.

(Image courtesy of Cineversity.com.)

Topic $TipTopic

In this series of about 20  video tutorials, instructor EJ Hassenfratz shows how to get up and running in Cinema 4D through this project-based series introducing you to the basic concepts of 3D modeling, animation, and rendering. Each movie in the series is about ten minutes in length.

Episode 1 provides a brief series overview on what you’ll be learning and the aspects of 3D that will be covered.

Here’s the link to Episode 1 on Cineversity.com.


Please rate the helpfulness of this tip.

Click on a star to rate it!

… for Visual Effects

Tip #1165: Different Ways to Use Slow Motion

Larry Jordan – LarryJordan.com

This article focuses on the theory of slow-motion with LOTS of videos for more info.

(Image courtesy of The Slow Mo Guys.)

Topic $TipTopic

This article, written by Jourdan Aldredge, first appeared in PremiumBeat.com. This is a summary.

Let’s face it, slow motion is cool. There’s just something undeniably awesome about the slowing down of time. Whether it’s in a giant action sequence on an IMAX screen, or in the tiny moments of your favorite YouTube series on a smartphone, the effect of slow motion seems to always work and delight audiences of any size.

So, while there are plenty of tips and tricks to read up on for how to shoot slow motion and high frame rate, we’re actually going to dive more into the theory of slow motion and the different ways you might want to utilize it in your film and video projects.

Actually shooting slow motion for action and stunts is perhaps one of the most technically challenging feats on any production and, in part, why we see them more often in the biggest of big-budget films versus indie features and DIY shorts. It’s important to keep in mind both safety and practicality when tackling slow motion for stunts, as you’ll need to be in control of every element of the situation to make sure your camera is properly framed, focused, and recording the exact high frame rate moves that you’ve carefully and meticulously planned.

In many ways, slow motion for cinema-sake has become synonymous with this new style, as digital editing has made techniques like speed ramping easier to use and more precise to control. If you’re looking to add slow motion or fast motion in your projects today, your best bet might just be to get a solid HFR camera, shoot at 120fps (if possible), and then make all your slow motion and speed ramping decisions in the edit once you have everything planned and covered.

EXTRA CREDIT

This article includes videos on

  • Slow Motion for Action and Stunts
  • Slow Motion to Highlight Cinematic Moments
  • Slow Motion to Draw Attention to Details
  • Slow Motion for Sports
  • Ramping Between Slow and Fast Motion
  • A link to The Slow Mo Guys YouTube channel


Please rate the helpfulness of this tip.

Click on a star to rate it!

… for Codecs & Media

Tip #1158: File Size is NOT Image Quality

Larry Jordan – LarryJordan.com

How long is a piece of string? Don’t focus on file size, focus on image quality.

Topic $TipTopic

During a recent webinar, Lane asked:

I’m creating a program of Christmas carols that may run about 30 minutes. I’m concerned about the file size because, when compressed, this program will likely give me a huge file. What should I do to keep file size down?

All too often, editors obsess about the size of their compressed file. This is the wrong thing to worry about.

File size is determined by two factors: bit rate and the duration of the movie. Longer programs will, by definition, have larger file sizes. There’s just more movie than in something shorter.

Instead, we need to focus on image quality. This is a combination of six factors:

  • The codec you are using
  • The frame size of the compressed file
  • The frame rate of the compressed file
  • The amount of movement between frames
  • Whether the movie is for streaming, download or posting to social media
  • The bit rate at which you compressed it

In general, for a 1080p movie, assume a ROUGH compressed file size of 20 MB/running minute. For a UHD file, assuming 60 MB/running minute. Both of these use the H.264 codec, which I recommend instead of HEVC.

These are rough guides, but any longer program is going the create some really large files.


Please rate the helpfulness of this tip.

Click on a star to rate it!

… for Adobe Premiere Pro CC

Tip #1157: Verify Your Audio Meets Spec

Larry Jordan – LarryJordan.com

Running Amplitude Statistics means that I can guarantee that my audio meets spec.

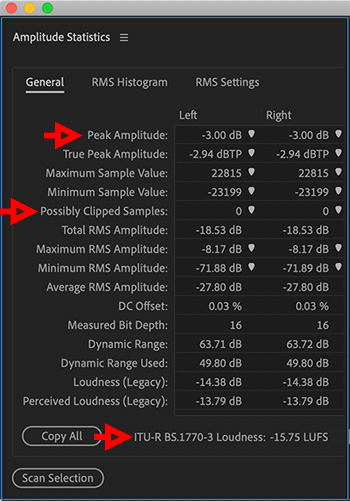
The Amplitude Statistics window, showing a recent webinar audio track.

Topic $TipTopic

One of the reasons I create my audio mixes in Adobe Audition, rather than Premiere or Final Cut, is that Audition has a panel that precisely measures the technical amplitude (loudness) of my finished mix to make sure it meets spec.

NOTE: Most audio is rejected due to not meeting spec. This solves that problem.

To use this:

  • Export your finished master file from Premiere, then open that movie (not the Premiere sequence) into Adobe Audition.
  • Double-click the audio clip to open it in the Waveform Editor.
  • Then, choose Window > Amplitude Statistics and click Scan.
  • After a short time, which varies depending upon the length of your project, the panel shown in the screen shot appears. Every distributor is different and some require very specific settings.

However, for media I’m posting to the web, the three things I look at are:

  • Peaks around -3 dB
  • Clipped samples = 0 (This means there is no distortion.)
  • LUFS around -16, ±0.5

NOTE: LUFS (also called LKFS) are a measure of the average sound level, unlike a peak. Broadcast and cable specs LUFS around -24. For the web, though, I think that’s too soft. I use -16 LUFS.

Every project I create gets analyzed this way. In fact, these numbers are from the audio file for yesterday’s webinar that I posted last night.


Please rate the helpfulness of this tip.

Click on a star to rate it!