… for Codecs & Media

Tip #1155: Rescue Your Legacy Media

Larry Jordan – LarryJordan.com

Access legacy media without using a legacy computer.

The Kyno logo.

Topic $TipTopic

One of the challenges in keeping up with the onrushing changes driven by technology is that older media, often, can no longer be played. This is a major problem when you are trying to repurpose old assets.

NOTE: Here’s an article that discusses codecs that are no longer supported in macOS Catalina or Big Sur.

Recently, I was talking with Robert Krüger, CEO of LessPain Software, the developers of Kyno. Kyno is media asset management and transcoding software. Personally, I like Kyno and have used it a lot.

Larry: I’m getting new questions about converting older 32-bit media AFTER someone has upgraded to Catalina – or, perhaps, Big Sur. As you know, Apple has discontinued support for all 32-bit codecs. I’m looking for ways for us to access older media files (i.e. archives) into the future.

Robert: That shouldn’t be the case as we’re not relying on the OS for decoding 32-bit material at all.

So, if you are having problems accessing older media, Kyno might be the solution.

Website: https://lesspain.software/kyno/
Pricing: $159 (US) or $349 for more NLE integration
A 30-day free trial is available.

NOTE: The free trial is the perfect opportunity to test your media and make sure you can convert it.


Please rate the helpfulness of this tip.

Click on a star to rate it!

… for Adobe Premiere Pro CC

Tip #1154: Options for Converting Frame Rate

Larry Jordan – LarryJordan.com

Try letting Premiere convert frame rates first. If playback is smooth, you’re all set.

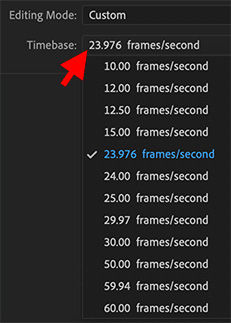
The Timebase menu in Premiere’s Sequence Settings.

Topic $TipTopic

During a recent webinar, Ian asked:

I shoot/edit in the UK at 25/50 fps with images up to 4k. At times I have B-roll either from an iPhone or GoPro 8 shot at 30 fps 4K. Should I retime these to 25/50 fps before importing or let Premiere do the job?

My answer is that, in general, go with the simplest solution first: let Premiere handle the frame rate conversion.

Because all video is just a string of still images, changing the frame rate while still maintaining the same apparent speed during playback requires dropping or duplicating frames.

Whenever you drop or duplicate a frame, there’s the potential for stutter in the video playback. The more drastic the frame rate conversion, the more potential for obvious stuttering.

However, you’ll find that Premiere does a good job dropping frames to convert the frame rate for most movement. (You won’t notice the impact of changing frames on stationary images with a locked down camera.)

If Premiere doesn’t do a good job, try converting your footage using Adobe Media Encoder. This uses a different process for frame rate conversion that may look better to you.

Every movie is different. Experiment with different tools until you get the results you want.


Please rate the helpfulness of this tip.

Click on a star to rate it!

… for Adobe Premiere Pro CC

Tip #1150: Audio Effect Order is Important

Larry Jordan – LarryJordan.com

Audio effects process in a specific order. Make sure the Limiter/Compressor is last.

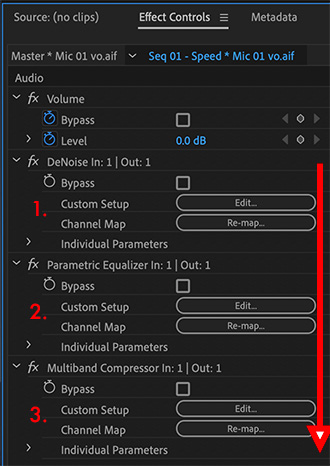
A typical stack with noise reduction (top), EQ (center), and Compression/Limiting at the bottom.

Topic $TipTopic

When adding effects to audio clips in Premiere (or Audition), the order in which those effects are applied makes a difference. Here’s what you need to know.

Audio effects are processed from the top of the Effect Controls panel to the bottom. (See screen shot.)

The first effect to apply – if you need it – is noise reduction. Get rid of what you don’t want before you start shaping the sounds you do. Remember, your goal is to reduce noise, not eliminate it. If you want it gone, re-record in a studio.

NOTE: Noise reduction can often degrade the spoken voice. By processing this early, you can then use effects farther down the “stack” to try to replace what noise reduction took away. This is why we reduce, not remove, noise.

Next, add any EQ or special effects you need to shape the sounds the way you want. Add any reasonable number of filters here.

Finally, at the bottom and ALWAYS last, apply either a compression or limiter filter. This makes sure that audio levels don’t exceed the level you specifiy.

I should mention that you don’t apply both a compression filter AND a limiter filter to the same track. Pick one or the other.

NOTE: For my mixes, I apply the Multiband Compressor to all dialog tracks, with the Limiter filter applied to the master track and set to -3 dB to catch any errant levels before they distort the final mix. I don’t generally use compression on either effects or music.


Please rate the helpfulness of this tip.

Click on a star to rate it!

… for Codecs & Media

Tip #1132: Not All Thunderbolt Cables are High Speed

Larry Jordan – LarryJordan.com

Thunderbolt 3 cables are not the same – and many slow your data down.

(Image courtesy of Intel.)

Topic $TipTopic

One of the most interesting things I learned recently is that not all Thunderbolt cables deliver the same performance. Even Apple’s cables have significant limitations.

I discovered this in an interview with Larry O’Connor, CEO of OWC, a company that specializes in Thunderbolt peripherals.

Here is an excerpt from our interview:

Currently, USB-C cables don’t support Thunderbolt and most don’t even support full USB 10 Gb/s data speeds. For example, the cable that Apple includes with its laptops only carries USB data at USB-2 480 Mb/s speed, not even USB-3 5 Gb/s!

Also, today, Thunderbolt 3 passive cables only provide 40 Gb/s at lengths up to 0.8 M and 20 Gb/s at lengths longer than 1 meter. (I should note that all passive Thunderbolt cables do support full USB-3.2 10 Gb/s speeds)

Sigh… It gets worse. Thunderbolt 3 cables 1 meter or longer are active, which means they have electronics in them to provide the full 40 Gb/s speed. But, while delivering Thunderbolt 40 Gb/s they only deliver USB-2 480 Mb/s speed (that’s a max of 60 MB/s of total data throughput vs. about 600 MB/s with USB-3 5 Gb/s or about 1,200 MB/s with USB-3.2 10 Gb/s)

So, if you are not getting the speed you expect from a Thunderbolt device, or a device connected using a Thunderbolt cable, the first place to look is the cable itself.

Read the full interview here – it is well worth your time.


Please rate the helpfulness of this tip.

Click on a star to rate it!

… for Apple Final Cut Pro X

Tip #1153: A Faster Way to Apply Keywords

Larry Jordan – LarryJordan.com

When importing, keywords can be automatically applied based on folder names.

A composite image: Files organized into folders (left), From Folders checkbox in Media Import, Keywords assigned in Browser (right).

Topic $TipTopic

Keywords are a fast, flexible and powerful way to organize clips in the Browser. However, applying them can be time-consuming. There’s a faster way. Organize those clips that are not copied from a camera card, into folders.

NOTE: For camera card files, rename the folder that contains the camera card files, without renaming the media files themselves.

In the Media Import window, check Keywords > From Folders (see screen shot).

Then, when the clips are imported, keywords are automatically assigned to each clip based on its folder name.

NOTE: If you select a folder that contains other folders (see screen shot) all folder names are assigned as keywords.


Please rate the helpfulness of this tip.

Click on a star to rate it!

… for Apple Final Cut Pro X

Tip #1148: Adjust List View Columns and Layout

Larry Jordan – LarryJordan.com

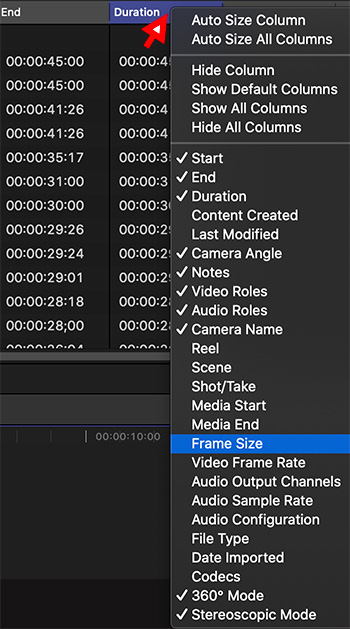
List View displays all kinds of media statistics – you get to pick what you want to see.

Control-click any List view column header to display new columns.

Topic $TipTopic

List view, in the Final Cut Pro X Browser, is the place to look for all kinds of useful statistics about your media. Here are three tricks that make using List view a lot more useful.

TRICK #1

Drag any column header – except the name column – horizontally to change the order in which they display information. (This is similar to Numbers or Excel.)

TRICK #2

Drag the vertical line separating any column header to make it wider or narrower. (Again, like Numbers and Excel.)

TRICK #3

Control-click any column header to select the columns you want to display.

NOTE: The six organizational options at the top of this list may also make your organizing faster and easier.


Please rate the helpfulness of this tip.

Click on a star to rate it!

… for Apple Final Cut Pro X

Tip #1147: A Faster Way to Apply LUTs

Larry Jordan – LarryJordan.com

Adjustment layers are created in Motion and affect all clips below them.

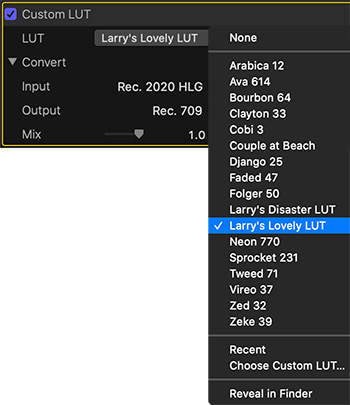
The Custom LUT effect with a custom LUT applied to an adjustment layer.

Topic $TipTopic

Normally, we apply LUTs (color Look-Up Tables) to an individual clip. But, recently, a reader suggested a faster and better option – use an adjustment layer.

You may be familiar with adjustment layers in Photoshop. These are special layers that, when you apply an effect to them, change the look of all the clips below them.

Premiere has adjustment layers, but FCP X doesn’t… officially. However, they are easy to create in Motion.

NOTE: Here’s a tutorial that explains how.

The benefit to adjustment layers is that we can apply a LUT to the adjustment layer to change the look of all the clips under it. This makes it extremely easy to create a look for an entire project and, by tweaking just one setting, affect a whole flock of clips at once.

Apply an adjustment layer above your clips in the timeline, then apply Effects Browser > Color > Custom LUT to the adjustment layer.

Next, in the Inspector, apply the LUT you want. (See screen shot.)

NOTE: This effect won’t allow you to apply camera LUTs, but does allow applying any creative LUT you want.


Please rate the helpfulness of this tip.

Click on a star to rate it!

… for Random Weirdness

Tip #1145: What Every Sound Utility Should Know

Larry Jordan – LarryJordan.com

The sound utility person is an essential piece of the audio puzzle on set.

(Image courtesy of pexels.com.)

Topic $TipTopic

This article, written by Daron James, first appeared in NoFilmSchool.com. This is a summary.

There are dozens of roles and responsibilities on a film set. Whether you’re a camera assistant, a prosthetic makeup artist, a set costumer, or a video assistant, everyone makes up the dynamic team that supports a director’s vision.

A sound utility is one of the puzzle’s most important pieces. Part of the production sound team that generally includes a production sound mixer, a boom operator, and a sound utility, they’re often referred to as 2nd boom, third, or cable person.

As a sound utility, you’re one of the first people on set. You power up the sound equipment, check batteries and wireless frequencies, and you make sure there are enough printed sides of the shooting script. You understand the shooting schedule and when it’s time to move. You double-check the bag rig in case the production sound cart can’t be used. You understand audio playback and the importance of soundproofing sets.

You need to have people skills, understand set politics, and know when to speak up.

One of your most methodical and critical jobs on set will be to wire talent. You’re working with actors, wardrobe and makeup/hair to make sure everyone is on the same page and understands what you’re looking to accomplish. Having to stop production to fix an incorrectly placed lav is something every sound department wants to avoid.

Here are some additional tips:

  • Assist the boom operator, wire the talent, and make sure all equipment is in range
  • Set up loop systems, dampen noise, and make sure everything is charged
  • Organize paperwork, know where your gear is, and make sure the equipment works
  • Remember to wear your IFB, be a cart master, and make sure everything is returned

The article goes into more detail on each of these points with detailed, practical advice.


Please rate the helpfulness of this tip.

Click on a star to rate it!

… for Random Weirdness

Tip #1144: An Excellent Discussion of Plot & Story

Larry Jordan – LarryJordan.com

It all starts with a plot and story. Here’s how to get started right.

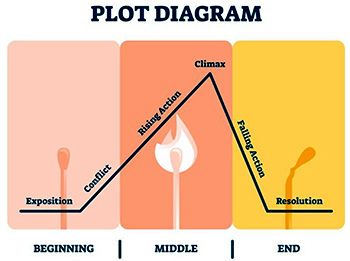
The basic plot diagram in three acts.

Topic $TipTopic

This article, written by Jourdan Aldredge, first appeared in PremiumBeat.com. This is a summary.

Let’s explore the fundamentals of story and plot structure and how filmmakers can use these basics to create their own narratives. In fact, a good script is only as good as the plot — or the story at the center of it all. But, what makes a good story? And, how do you structure the perfect plot for your films and screenplays?

What is a plot? Looking into purely literary terms, a plot is simply: “The plan, scheme, or main story of a literary or dramatic work, as a play, novel, or short story.” Although, for our film purposes, it’s probably best to go with the functional definition: “The sequence of events where each affects the next one.” Basically, this just means the plot is what happens and in what order.

A story, on the other hand, is “an account of imaginary or real people and events told for entertainment,” which is slightly different in that it accounts for the sensational elements of things that may or may not have actually happened and are presented for entertainment purposes.

The article presents a video of Kurt Vonenegut discussing the shape of a story, along with detailing the basics of plot diagrams and structure.

As well, another video discusses Joseph Campbell‘s Hero’s Journey. This plot and story structure is as old as humankind itself. It’s perhaps the most nuanced take on how stories are structured and the individual plot points you need to use (or at least understand) for your projects.

Finally, this article provides examples of plot structure with videos about:

  • Harry Potter
  • Empire Strikes Back
  • Dead Man’s Chest
  • Rick and Morty / Adult Swim

It really becomes up to you — as a screenwriter and/or filmmaker — to take these structures for what they are: building blocks to your story. You can choose which structure or format that’s best for you and your narrative, as well as decide at what point you might want to deviate from the structured norms to create unease or excite wonder in your audience and their formulaic expectations.


Please rate the helpfulness of this tip.

Click on a star to rate it!

… for Random Weirdness

Tip #1143: 5 Tips to Make Video More Cinematic

Larry Jordan – LarryJordan.com

Notice – nowhere in this list does it mention frame rate.

Ah… the movies.

Topic $TipTopic

This article first appeared in MotionArray.com. This is a summary.

One of the most asked questions that come from beginner filmmakers is, “how do I make my films look more cinematic?” Today, we’re going to go over five tips to help you make your next video look and feel more cinematic.

Part 1: What Does Cinematic Footage Mean?

There are a couple of interchangeable terms we can use. Cinematic, professional, high-quality, sharp, etc. Essentially, the highest overall goal is to make your video look like what you see when you watch a feature film in a theater.

Part 2: Tips to Make Cinematic Films & Videos

  1. Create Depth. You might have heard that shooting with a shallow depth of field is an easy way to make your footage look more cinematic fast. That’s because it does! It really helps, and it’s mostly because it’s a very effective shortcut to giving your shot depth.
  2. Get Your Light Right. Lighting is such a huge category that we can’t do it justice in just a quick overview. Instead, this article offers some quick solutions that can help you out in a pinch to get better quality shots out of whatever camera you’re using.
  3. Aspect Ratio. Basically, you can trick your audience into seeing your footage as more cinematic by changing its aspect ratio.
  4. Color Correction. You knew this one was coming. Color correction is a huge piece of this puzzle. This is where you take the image you captured and shape it into the final product in terms of light and color.
  5. It’s All an Illusion. Movie-making is all a magic trick. Because that’s what a movie is — it’s a trick. So the last goal in all of this is to make sure you don’t remind your audience that they’re watching a movie.

EXTRA CREDIT

This article goes into more depth, and multiple steps for each of these points. This is a nice refresher of things you once knew, but, maybe, forgot.


Please rate the helpfulness of this tip.

Click on a star to rate it!