… for Adobe Premiere Pro CC

Tip #1280: Quick Project Panel Tricks

Larry Jordan – LarryJordan.com

List view is similar to a spreadsheet – with the addition of dozens of hidden columns.

Drag and resize columns in List View just like a spreadsheet.

Topic $TipTopic

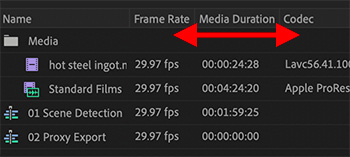
When you switch to List view in the Program panel, clips and sequences are sorted into rows and columns. This gives you lots of different ways to look at the elements of your project.

List View is similar to a spreadsheet:

  • Drag the name of a column header to move it to a new location.
  • Drag the vertical line between column headers to resize the column.
  • Click the column header to sort by that column.
  • Click twice to sort in descending order
  • Shift-click a second column header to sort on a second column (for example, click first on Scene to sort by Scene number, then, shift-click on Log Note to sort by circled takes.)

NOTE: The Name column can not be moved.

To hide or display more columns, Control-click any column EXCEPT the Name column and choose Metadata Display.

While you can display any metadata fields listed there, the one that will be most helpful are the fields inside Premiere Pro Project Metadata.


Please rate the helpfulness of this tip.

Click on a star to rate it!

… for Adobe Premiere Pro CC

Tip #1279: Marker Tips & Tricks

Larry Jordan – LarryJordan.com

Markers are perfect for navigation, or just leaving yourself a note.

The Edit Marker dialog box.

Topic $TipTopic

Markers do so much in Premiere, it is hard to list all the options. But here are some of my favorites:

  • Markers are always placed at the position of the playhead.
  • You can add markers in the Source Monitor or Program Monitor
  • If a clip is selected, markers are added to the clip. If not, they are added to the timeline.
  • Markers can be dragged into a new position.
  • Double-click a marker to open it for editing.
  • Markers can have titles, descriptions/transcripts and/or colors.
  • Comment markers can be exported and added to QuickTime and MP4 movies.
  • The Markers panel displays all sequence markers and enables jumping between them.

EXTRA CREDIT

  • To set a marker, type M
  • To delete a marker, put the playhead at the marker position and type Option + M
  • To delete all markers, type Option + Cmd + M
  • To jump the playhead to the next marker, type Shift + M
  • To jump to a previous marker, type Shift + Cmd + M

Please rate the helpfulness of this tip.

Click on a star to rate it!

… for Adobe Premiere Pro CC

Tip #1278: Jump in Time

Larry Jordan – LarryJordan.com

Typing in timecode is often faster and more precise than dragging the playhead.

Click and enter either absolute or relative timecode values.

Topic $TipTopic

Here’s a quick tip to help you move around Premiere’s timeline more easily.

Double-click the timecode display in the top left corner of the timeline, then enter the timecode position where you want to move the playhead.

NOTE: Unlike earlier versions of Premiere, you only need to enter digits, not punctuation.

  • To jump to an absolute timecode reference, enter the full number (i.e. 00001000 in the screen shot).
  • To jump a relative distance to the right, enter the amount you want to move as a positive number (i.e. +25 jumps 25 frames forward).
  • To jump a relative distance to the left, enter the amount you want to move as a negative number (i.e. -215 jumps 2 seconds, 15 frames back).

NOTE: If you enter 75, Premiere will automatically calculate the number of seconds and frames to move the playhead based on the frame rate of the sequence.

EXTRA CREDIT

In the timecode display, a semi-colon before the frame number indicates drop-frame timecode. All colons means non-drop frame timecode.


Please rate the helpfulness of this tip.

Click on a star to rate it!

… for Apple Final Cut Pro X

Tip #1288: Top Ten Tips of 2020 for Apple Final Cut Pro

Larry Jordan – LarryJordan.com

It is fascinating to see what readers find interesting!

Topic $TipTopic

During this last year, The Inside Tips published 975 tips and techniques covering six subject categories:

  • Adobe Premiere
  • Apple Final Cut Pro
  • Apple Motion
  • Codecs & Media
  • Random Media Weirdness
  • Visual Effects

Here are three “Top Ten Tips Lists:” The first shows the most popular tips covering Apple Final Cut Pro. The second list shows the Top Ten most read tips across all categories. The third list shows the highest rated tips across all categories sorted by votes.

TOP 10 INSIDE TIPS of 2020
FOR APPLE FINAL CUT PRO

  1. Tip #1135: Boost and Smooth Dialog Levels
  2. Tip #715: How to Reset FCP X to Fix Problems
  3. Tip #342: Uses for Emoji in Final Cut Pro X
  4. Tip #778: Delete Render Files to Save Space
  5. Tip #437: Secrets of the Skimmer
  6. Tip #837: A Simply Useful Shortcut
  7. Tip #601: FCP X: Color Wheel Secret Tip
  8. Tip #816: A Baker’s Dozen Better Shortcuts
  9. Tip #870: Change the Look of a Dissolve
  10. Tip #438: Secrets of the Precision Editor

NOTE: Tips are sorted by views, most views listed first.


TOP 10 INSIDE TIPS of 2020
(Sorted by Views)

  1. Tip #479: Copy and Paste Masks in Premiere
  2. Tip #283: AAF vs. EDL vs. OMF Export
  3. Tip #413: Mask Multiple Clips with an Adjustment Layer
  4. Tip #474: DNxHR vs. ProRes
  5. Tip #329: Blurs and Mosaics are No Longer Safe
  6. Tip #592: Make Zooms More Interesting
  7. Tip #957: Apple Supports VP9 in macOS Big Sur
  8. Tip #1135: Boost and Smooth Dialog Levels
  9. Tip #715: How to Reset FCP X to Fix Problems
  10. Tip #342: Uses for Emoji in Final Cut Pro X

NOTE: Tips are sorted by views, most views listed first.


TOP 10 INSIDE TIPS of 2020
(Sorted by Ratings)

  1. Tip #742: The Best Advice to Keep Your Cool
  2. Tip #614: What is the Alpha Channel
  3. Tip #580: The History of Storyboards
  4. Tip #911: The Skin Tone Line is Your Friend
  5. Tip #515: Using the Active Camera Menu
  6. Tip #631: Get Freelance Work From Video Marketplaces
  7. Tip #1056: Move a Mix from Audition to Premiere
  8. Tip #624: Not All Captions Look Alike
  9. Tip #581: Create Colorful Lighting for 3D Text
  10. Tip #398: Use Watch Folders in AME for Automation

NOTE: Each tip was rated 5 out of 5. They are sorted by the number of votes each tip received, with most votes listed first.


Please rate the helpfulness of this tip.

Click on a star to rate it!

… for Apple Final Cut Pro X

Tip #1277: Trim – With More Options

Larry Jordan – LarryJordan.com

“Crop & Feather” is more accurately called “Trim & Feather.”

A cropped & feathered clip, with the settings I used to achieve this effect.

Topic $TipTopic

I create a lot of picture-in-picture effects in my projects. Recently, I discovered a way to make this process faster. Here’s how.

We often trim a clip to hide portions of the image so we can see the image beneath. Trimming (which Photoshop calls “masking”) hides part of the image without changing its size.

NOTE: Cropping on the other hand, removes portions of the image, then changes its size to fill the frame.

The Crop & Feather effect (Effects > Distortion) both trims a clip and adds feathering – either to the inside or out – of the trimmed clip. This means we don’t need to use a separate effect simply to feather the edges of a trimmed image.

In the screen shot, I trimmed the image to focus on the tree, then feathered the edges to the inside.

The screen shot shows the settings I used to achieve this.


Please rate the helpfulness of this tip.

Click on a star to rate it!

… for Apple Final Cut Pro X

Tip #1276: Quickly Reverse or Flip a Clip

Lawrence Sobczak

The Flipped effect is faster, the Transform settings provide more control.

These Transform settings flip a clip vertically.

Topic $TipTopic

Lawrence Sobczak shared a very quick way to flip or invert a clip in Final Cut Pro. He writes:

When you want to mirror image, or invert, a clip in Final Cut, there are two ways to do it:

  • Apply Effects > Distortion > Flipped.
  • Go to Video Inspector > Transform > Scale and enter a negative number for Percent.

NOTE: Enter Scale X = -100 mirror images the clip. Enter Scale Y = -100 flips the image upside down. It’s also possible to scale and flip a clip, by making X a negative number while keeping Y as a positive number.

Cool tips! Thanks.


Please rate the helpfulness of this tip.

Click on a star to rate it!

… for Apple Final Cut Pro X

Tip #1251: Add & Resize Emojis

Larry Jordan – LarryJordan.com

Emojis convey emotions – why not use them in your projects?

The Emoji picker, Smileys category – featuring Mrs. Claus.

Topic $TipTopic

This holiday season, add some emojis to spice your visuals. Here’s how to add, adjust and size them in your next project.

  • All emojis are text. So, start by adding a text clip to the timeline.
  • Place your cursor in the text clip where you want an emoji to appear.
  • Type Control + Cmd + Spacebar.
  • Double-click any emoji icon to add it to your title at the position of the cursor.

Just as with text, select an emoji and adjust its size using the Font Size controls. These will still look good at 400 points!

NOTE: Press and hold any emoji to see variations on that character (see screen shot).

EXTRA CREDIT

Emojis are much more than smiley faces. There are thousands to choose from. Scroll through the different categories to see what’s available.


Please rate the helpfulness of this tip.

Click on a star to rate it!

… for Random Weirdness

Tip #1269: 5 Basic Filmmaking Principles

Larry Jordan – LarryJordan.com

None of these are “magic,” but, sometimes, we forget. Here’s a reminder.

(Image courtesy of Pexels.com.)

Topic $TipTopic

This article first appeared in MotionArray.com. This is a summary.

Editing is powerful, but good editing takes time, patience, and practice. The way you edit can either push your viewers away or draw them in. In this tutorial, we’ll explore five practical film editing principles you can start using immediately.

These include:

  1. Avoid Jump Cuts
  2. Use Relevant B-Roll
  3. Cut on Motion
  4. The 180° Rule
  5. What’s Your Motivation?

Editing is where the real magic happens in filmmaking, and the quality of it can make or break your project. These five basic film editing principles may sound very simple. Still, once you’ve learned them, you’ll be astounded at how much difference they make towards making an edit look smooth, believable, and just far more professional.

EXTRA CREDIT

The linked article has a tutorial video, plus additional description of each of these tips.


Please rate the helpfulness of this tip.

Click on a star to rate it!

… for Random Weirdness

Tip #1268: Revolutionary Sound Design and Mixing

Larry Jordan – LarryJordan.com

Learn about revolutionary sound design technology for audio mixes.

(Image courtesy of Pexels.com.)

Topic $TipTopic

This article, written by Jeffrey Reeser, first appeared in NoFilmSchool.com. This is a summary.

This article highlights two interviews with sound design leaders:

  • Kami Asgar
  • Jessica Parks
  • Walter Murch

As a sound designer (Asgar) and as a post executive (Parks), their collective resume touches on everything from Apocalypto to Grandma’s Boy to Venom.

Parks has recently shifted her focus from supervisor to hands-on sound design, and we talk about how it’s never too late to pivot on your career path and find the thing you love doing wherever you are in life. We also talk about the new revolutionary technology that will democratize the ability to mix sound on a professional level… and why the literal size of your ear matters.

NoFilmSchool also has an interview with sound design master Walter Murch.


Please rate the helpfulness of this tip.

Click on a star to rate it!

… for Random Weirdness

Tip #1267: Top Filmmaking Gear for 2020

Larry Jordan – LarryJordan.com

Every list is subjective, share your favorites in the comments.

The Sony A7S III, without a lens.

Topic $TipTopic

This article, written by Lewis McGregor, first appeared in PremiumBeat.com. This is a summary.

Like most industries, the video gear market was inundated with new gear this year. As a filmmaker who often works either as a lone operator or in a skeleton crew, I’m looking for equipment that condenses tasks and increases my efficiency. The less I carry, the better. The gear I’ve highlighted in this list echoes that ethos. Ranked in no particular order, these include:

  • Sony A7S III – $3,498. The next iteration of the filmmaking variant of the Sony A7 line.
  • DJI RS2 – $849. The DJI RS 2 is the successor to the Ronin-S. It’s lighter by design, weighing just 2.36 pounds, but it can carry up to a ten-pound rig.
  • DaVinci Resolve Speed Editor – $295. Like the 2019 DaVinci Resolve Keyboard, the Speed Editor is a peripheral that gives the editor precise and efficient control of the timeline with dedicated function keys and a multi-operational search dial.
  • NVIDIA RTX 3000 series – $499/$699/$1,499. While it may seem initially perplexing to include a line of new GPUs for an end-of-year filmmaking equipment list, you have to acknowledge that with the increase in camera resolution and RAW recording, 2015 GPUs and CPUs aren’t cutting it anymore.
  • Aputure 600D – $1,890. A single chip LED fixture with a reflector. Like the 120D and 300D, the 600D also packs a punch, but it hits a lot harder.
  • Nova P300C – $1,699. What makes this light specifically unique and highly anticipated is that it’s an RGBWW light. That means it can just about integrate into any ambient light situation, match other light fixtures, or just for creative expression, switch to the millions of colors found with the RGB wheel.
  • Canon EOS C70 – $5,499. This camera is something of a hybrid of the new EOS R line and their cine camera line.
  • Blackmagic URSA Mini Pro 12K – $9,995. In 2020, we were treated to the first 12K camera, with the URSA Mini Pro 12K. The body largely remains the same design as the other readily available models. However, the internal electronics of the 12K have been replaced. There’s a new sensor, a new film curve, new color science, and a whole new host of recording features.
  • Fuji XF 50mm F/1.0 – $1,499. The Fuji F/1.0 is an unprecedented entry from Fuji as it marks the arrival of the fastest autofocus lens for mirrorless cameras.

EXTRA CREDIT

The article, linked at the top, has videos demoing all this gear, as well as more specs and details.


Please rate the helpfulness of this tip.

Click on a star to rate it!