High-end compositing tools exist to solve tricky problems with edges.
(Image courtesy of Pexels.com.)
Both Adobe Premiere Pro and Apple Final Cut Pro X include powerful chroma-keyers. When should you consider using something even stronger?
The challenge with any key is precisely defining an edge. Yes, the background needs to be evenly lit and actors should not wear green in front of a green background. But, by now, most of us understand that.
Most of the time, finding the edge isn’t that hard. But, I can easily think of five situations to use more powerful compositing (keying) software:
Loose or blowing hair and other fuzzy edges
Translucency between foreground and background
Reflections of the composited background with the foreground
Tracking between foreground and background
Working with 3D composites
What software should you consider if your NLE isn’t enough?
https://www.theinsidetips.com/wp-content/uploads/2019/09/Tips-Logo-700x150.jpg00Larry Jordanhttps://www.theinsidetips.com/wp-content/uploads/2019/09/Tips-Logo-700x150.jpgLarry Jordan2020-12-09 01:30:002020-12-05 11:24:44Tip #1234: When to Use a More Powerful Chroma-Keyer
DaVinci Resolve continues to set the pace for color control and creativity.
(Image courtesy of BlackmagicDesign.com.)
DaVinci Resolve has long been respected for its color grading tools. In the Version 17 release, these were improved even more. Here’s a quick summary of the new features, taken from the DaVinci Resolve website.
Next Generation HDR Grading Tools. The HDR grading palette lets you create new color wheels with custom roll off for specific tonal ranges, giving you more creative control to make fine adjustments. The wheels include exposure and saturation controls for each zone. They’re color space aware so you get perceptually uniform results.
Color Warper for Refined Grading. The mesh based warping tool lets you adjust two color parameters at once. You can adjust both hue and saturation or chroma and luma. Adjustments are made by dragging control points, with smooth falloff for clean, natural looking adjustments. It’s an entirely new way to transform color in your images!
Targeted Grading with Magic Mask. Selecting and tracking people for targeted correction has never been easier! Magic mask uses the DaVinci Neural Engine to automatically create masks for an entire person or specific features such as face or arms. You get matte finesse tools, the ability to add and remove strokes and automatic tracking!
Advanced Color Management. DaVinci Resolve color management adds features to simplify your workflow and improve image quality. You get wide gamut image processing, new input and output tone mapping and color space aware tools that provide for a more consistent response while grading and greatly improved image quality!
DaVinci Wide Gamut Color Space. DaVinci wide gamut and DaVinci intermediate are timeline color space and gamma settings that provide a universal internal working color space. It’s larger than what cameras can capture, or BT.2020, ARRI wide gamut and even ACES AP1. You’ll never lose image data, no matter where it comes from!
Updated 3D Professional Scopes. You can now open multiple versions of the same scope, set customizable waveform scales, create 3×3 layouts and open a separate scope window on a second display. You could open 3 vectorscopes, set to different tonal and zoom ranges, allowing you to simultaneously see shadows, midtones, and highlights.
Additional LUT Support. DaVinci Resolve 17 lets you generate 17 point 3D LUTs directly from the timeline, which are great for monitoring on set. There’s also support for video range LUT metadata, as well as the ability to set your own custom LUT paths either on local or to a network volume for sharing LUTs in a facility.
New Viewer Wipe Modes. New diagonal, venetian blind and checkerboard wipes provide additional flexibility for comparing images in different ways. A new split screen mode for comparing up to four playheads from the timeline is useful for comparing multiple clips or for comparing different frames within the same clip.
Please rate the helpfulness of this tip.
Click on a star to rate it!
https://www.theinsidetips.com/wp-content/uploads/2019/09/Tips-Logo-700x150.jpg00Larry Jordanhttps://www.theinsidetips.com/wp-content/uploads/2019/09/Tips-Logo-700x150.jpgLarry Jordan2020-12-09 01:30:002020-12-05 11:19:58Tip #1233: New Color Tools in DaVinci Resolve 17
Alpha channels are the magic that make compositing and most effects possible.
Viewing the alpha channel: White is opaque, black is transparent & gray is translucent.
The process of adding an alpha channel to an image – as a developer – is highly complex. Fortunately, we don’t need to understand how the channel is added to take advantage of it.
Just as the red, blue and green channels describe the amount of red, blue or green in each pixel, the alpha channel describes the amount of transparency in each pixel. An alpha channel provides a way to store images and their transparency information in a single file without disturbing the color channels.
Many file formats can include an alpha channel, including Adobe Photoshop, ElectricImage, TGA, TIFF, EPS, PDF, and Adobe Illustrator. ProRes, AVI and QuickTime (saved at a bit depth of Millions Of Colors+), also can contain alpha channels, depending upon the codecs used to generate these file types.
Alpha channels store transparency information in files in one of two ways: straight or premultiplied. Although the alpha channels are the same, the color channels differ.
With straight (or unmatted) channels, transparency information is stored only in the alpha channel, not in any of the visible color channels. With straight channels, the effects of transparency aren’t visible until the image is displayed in an application that supports straight channels.
With premultiplied (or matted) channels, transparency information is stored in the alpha channel and also in the visible RGB channels, which are multiplied with a background color. The colors of semitransparent areas, such as feathered edges, are shifted toward the background color in proportion to their degree of transparency.
Some software lets you specify the background color with which the channels are premultiplied; otherwise, the background color is usually black or white.
Straight channels retain more accurate color information than premultiplied channels. While premultiplied channels are compatible with a wider range of programs, such as Apple QuickTime Player.
Often, the choice of whether to use images with straight or premultiplied channels has been made before you receive the assets to edit and composite. Premiere Pro and After Effects recognize both straight and premultiplied channels, but only the first alpha channel they encounter in a file containing multiple alpha channels.
Use ProRes 4444 when you need to create or transfer clips with alpha channels.
Alpha channels are supported in all NLEs, and there are dozens of articles on the web detailing how to work with them to create a variety of different effects.
Please rate the helpfulness of this tip.
Click on a star to rate it!
https://www.theinsidetips.com/wp-content/uploads/2019/09/Tips-Logo-700x150.jpg00Larry Jordanhttps://www.theinsidetips.com/wp-content/uploads/2019/09/Tips-Logo-700x150.jpgLarry Jordan2020-12-08 01:30:002020-12-05 11:01:40Tip #1238: An Overview of Alpha Channels
One of the long-standing intermediate codecs for Adobe Premiere Pro is GoPro Cineform.
As Adobe writes: The GoPro CineForm codec is a cross-platform intermediate codec designed for editing high-resolution footage.
An intermediate codec can be best described as a video encoding format designed for professional video editing. You typically use an intermediate codec to pass media files from one application to another in a post-production workflow.
The GoPro CineForm codec is optimized for encoding video content with 4K and higher resolution, including support for smart rendering. You can also render and transcode files in mixed formats into a single GoPro CineForm codec to archive, or share with other teams and systems.
A distinct advantage of using the GoPro CineForm codec is the minimal loss in quality even after multiple encodes.
As GoPro writes: CineForm, first developed in 2001, was the first of its type to focus on speed, while supporting higher bit depths for image quality. More recent examples would be Avid DNxHD and Apple ProRes, although both divide the image into blocks using DCT. The full frame wavelet has a subjective quality advantage over DCTs, so you can compress more without classic ringing or block artifact issues.
It supports compression ratios between 10:1 and 4:1, greater ranges are possible. CineForm is a constant quality design, bit-rates will vary as needed for the scene.
This link – though it looks intimdating at the start – contains a useful description of the codec, along with it’s history and what makes it different from DNx or ProRes. Scroll down, past the developer information at the top.
Please rate the helpfulness of this tip.
Click on a star to rate it!
https://www.theinsidetips.com/wp-content/uploads/2019/09/Tips-Logo-700x150.jpg00Larry Jordanhttps://www.theinsidetips.com/wp-content/uploads/2019/09/Tips-Logo-700x150.jpgLarry Jordan2020-12-08 01:30:002020-12-08 01:30:00Tip #1237: An Overview of GoPro Cineform
I got into a discussion recently about the differences between ProRes 422 and ProRes 422 HQ. After that, I did some research and here’s what I learned.
Apple ProRes 422 HQ: A higher-data-rate version of Apple ProRes 422 that preserves visual quality at the same high level as Apple ProRes 4444, but for 4:2:2 image sources. With widespread adoption across the video post-production industry, Apple ProRes 422 HQ offers visually lossless preservation of the highest-quality professional HD video that a single-link HD-SDI signal can carry. This codec supports full-width, 4:2:2 video sources at 10-bit pixel depths, while remaining visually lossless through many generations of decoding and re-encoding. The target data rate of Apple ProRes 422 HQ is approximately 220 Mbps at 1920 x 1080 and 29.97 fps.
Apple ProRes 422: A high-quality compressed codec offering nearly all the benefits of Apple ProRes 422 HQ, but at 66 percent of the data rate for even better multistream, real-time editing performance. The target data rate of Apple ProRes 422 is approximately 147 Mbps at 1920 x 1080 and 29.97 fps.
Apple ProRes 422 LT: A more highly compressed codec than Apple ProRes 422, with roughly 70 percent of the data rate and 30 percent smaller file sizes. This codec is perfect for environments where storage capacity and data rate are at a premium. The target data rate of Apple ProRes 422 LT is approximately 102 Mbps at 1920 x 1080 and 29.97 fps.
Which would I use personally?
ProRes 422 HQ. Only if the camera recorded source footage in this format.
ProRes 422. Anything shot by a non-HDR camera.
ProRes 422 LT. All review copies sent to clients or collaborators to decrease file size.
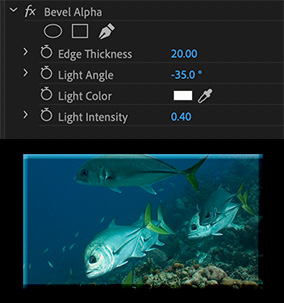
This is a fast way to add dimensionality to a 2D video.
Effect Controls settings (top) and the finished effect.
There’s a little known effect in Premiere that can turn any video into a 3D button. While you wouldn’t use this in a background video, it can create interesting foreground effects. Here’s how it works.
Select a clip – ideally, scale it to less than full screen.
Apply Effects > Perspective > Bevel Alpha.
The default settings aren’t bad, but you can tweak them in Effect Controls. In this example, I increased the Edge Thickness a lot.
Please rate the helpfulness of this tip.
Click on a star to rate it!
https://www.theinsidetips.com/wp-content/uploads/2019/09/Tips-Logo-700x150.jpg00Larry Jordanhttps://www.theinsidetips.com/wp-content/uploads/2019/09/Tips-Logo-700x150.jpgLarry Jordan2020-12-08 01:30:002020-12-05 11:13:24Tip #1226: Make Video Look Like a Button
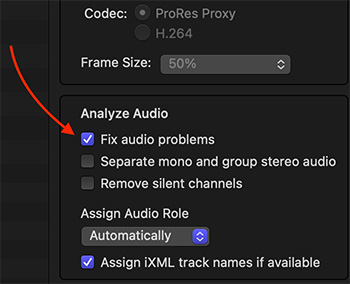
UNCHECK “Fix Audio Problems” to minimize audio artifacts during import.
Phil Cutting suggested this tip.
For years I suffered strange audio artifacts on music tracks imported for FCP. I assumed it was a damaged file until I noticed I had Fix Audio Problems checked in the Import Media window.
As soon as I unchecked it, the problem went away!
Larry adds:
Good to know. As a general rule, I DO check both Separate Mono… and Remove Silent Channels. I find these simplify importing dual-channel mono audio.
Please rate the helpfulness of this tip.
Click on a star to rate it!
https://www.theinsidetips.com/wp-content/uploads/2019/09/Tips-Logo-700x150.jpg00Larry Jordanhttps://www.theinsidetips.com/wp-content/uploads/2019/09/Tips-Logo-700x150.jpgLarry Jordan2020-12-07 01:30:002020-12-05 10:47:12Tip #1222: Fix a Warbling Music Track
We may request cookies to be set on your device. We use cookies to let us know when you visit our websites, how you interact with us, to enrich your user experience, and to customize your relationship with our website.
Click on the different category headings to find out more. You can also change some of your preferences. Note that blocking some types of cookies may impact your experience on our websites and the services we are able to offer.
Essential Website Cookies
These cookies are strictly necessary to provide you with services available through our website and to use some of its features.
Because these cookies are strictly necessary to deliver the website, refuseing them will have impact how our site functions. You always can block or delete cookies by changing your browser settings and force blocking all cookies on this website. But this will always prompt you to accept/refuse cookies when revisiting our site.
We fully respect if you want to refuse cookies but to avoid asking you again and again kindly allow us to store a cookie for that. You are free to opt out any time or opt in for other cookies to get a better experience. If you refuse cookies we will remove all set cookies in our domain.
We provide you with a list of stored cookies on your computer in our domain so you can check what we stored. Due to security reasons we are not able to show or modify cookies from other domains. You can check these in your browser security settings.
Google Analytics Cookies
These cookies collect information that is used either in aggregate form to help us understand how our website is being used or how effective our marketing campaigns are, or to help us customize our website and application for you in order to enhance your experience.
If you do not want that we track your visit to our site you can disable tracking in your browser here:
Other external services
We also use different external services like Google Webfonts, Google Maps, and external Video providers. Since these providers may collect personal data like your IP address we allow you to block them here. Please be aware that this might heavily reduce the functionality and appearance of our site. Changes will take effect once you reload the page.
Google Webfont Settings:
Google Map Settings:
Google reCaptcha Settings:
Vimeo and Youtube video embeds:
Other cookies
The following cookies are also needed - You can choose if you want to allow them:
Privacy Policy
You can read about our cookies and privacy settings in detail on our Privacy Policy Page.