… for Adobe Premiere Pro CC

Tip #1358: Save & Manage Timeline Presets

Larry Jordan – LarryJordan.com

Track height presets only change the height of tracks, which can also be assigned keyboard shortcuts.

The Manage Presets window. Accessed using the timeline Wrench icon.

Topic $TipTopic

One of the challenges in any large edit is seeing what you’ve got across all the tracks you are working with. Track Height presets make this easy. Here’s how.

There are a variety of ways to change the height of tracks:

  • Type Shift + [plus] to maximize all track heights
  • Type Shift + [minus] to minimize all track heights
  • Type Cmd + [plus]/[minus] to change video track heights
  • Type Option + [plus]/[minus] to change audio track heights
  • Drag the horizontal line between tracks in the track header up or down

CREATE A PRESET

Let’s say that you like minimizing all tracks EXCEPT V1, A1 & A2, which you want taller for dialog editing.

  • Configure the track heights as you wish.
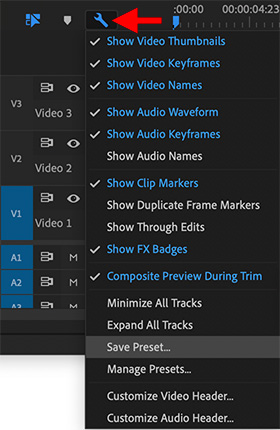
  • Then, click the Wrench icon in the top left corner of the timeline and choose Save Preset.
  • Give the Preset a name and click OK.

You can assign keyboard shortcuts to these by searching for “Height” in the Keyboard Shortcuts window.

NOTE: Saved presets appear in the timeline Wrench menu.

MANAGE PRESETS

Go to the timeline wrench menu and choose Manage Presets (see screen shot).

Here you can reassign keyboard shortcuts, as well as delete any presets you no longer need.


Please rate the helpfulness of this tip.

Click on a star to rate it!

… for Adobe Premiere Pro CC

Tip #1357: Customize the Timeline

Larry Jordan – LarryJordan.com

The Wrench icon – in any panel – is the key to customization.

The timeline customization menu. Blue indicates active elements.

Topic $TipTopic

The Timeline Wrench icon provides many ways to customize the timeline in Premiere. Located in the top left corner of the timeline (see screen shot), blue elements are active.

Those labeled “Show” affect the display of elements in the Timeline.

The two “Customize” options determine which icons are displayed for video and audio tracks. (By default, all icons are visible.)

Tip #1358 discusses the Save and Manage Preset options.

EXTRA CREDIT

The easiest way to see what the “Show” options do is to uncheck them and watch what happens. Changing these has no effect on your media, edit or project; they only affect the display of objects in the timeline.


Please rate the helpfulness of this tip.

Click on a star to rate it!

… for Codecs & Media

Tip #1356: Fixing Unix Executable Files

Larry Jordan – LarryJordan.com

Most of the time, simply adding the correct file extension fixes this problem.

An example of files on a server missing file extensions.

Topic $TipTopic

Most of the time, your images, media and documents open when you need them on a Mac. However, if you discover your files are suddenly unopenable “Unix executables,” here’s how to fix it.

In most cases, a Unix executable is a file stored on a server without a file extension. Most of the time, simply adding the correct file extension fixes this problem.

NOTE: Files stored on a Mac use other indicators to track which application created the file. However, file servers don’t use the Mac operating system and require file extensions to properly store and access files.

The trick is figuring out what’s the right extension. Generally, I try to find a similar file created around the same time. Select the file that works and type CMD + I. In the Get Info window that appears, look in the Name & Extension field to determine the correct extension to use.

For example, most of my early (1995 – 2010) digital videos were saved as QuickTime movies. Simply adding .MOV as a file extension solved the problem.

EXTRA CREDIT

I’ve also run into problems with older image files and word processing documents. Adding file extensions fixed the problem with these, too.


Please rate the helpfulness of this tip.

Click on a star to rate it!

… for Codecs & Media

Tip #1355: Create a Poster Frame for iPhone Video

Larry Jordan – LarryJordan.com

The iPhone displays the first frame of your video as the poster frame.

Topic $TipTopic

This tip was suggested by Darcy Peters, who discovered a very cool way to add poster frames for iPhone movies.

Larry, you’ve explained how to add poster frames to video (link). However, this doesn’t translate to storing said videos on your iPhone, for example. Those files arbitrarily show the first frame of the video.

However, I discovered a very cool workaround:

Export a single frame of the video that I want to appear as the image icon on my iPhone. Then insert that frame as the first frame (single frame) of the video. Because it’s a single frame at the start of the video, the viewer will never notice it, but it works!


Please rate the helpfulness of this tip.

Click on a star to rate it!

… for Codecs & Media

Tip #1351: Creating 64-bit Media

Larry Jordan – LarryJordan.com

Older software can create media files for current gear.

Topic $TipTopic

Al asks:

“I have an older Mac tower running 10.8.5 and have the Adobe CS6 suite. Can I use Adobe Media Encoder to convert my video to 64-bit so it’s usable on the newer Macs? I also have Compressor 3.0.5.”

Larry answers.

Yes. The codec, not the compression software, determines the bit-depth of the media file. As well, not all older media needs to be converted. Most files will work fine as is.

The easiest way to test file compatibility is to compress a file, then send it to a friend running either Catalina or Big Sur. If the media file plays, you’re all set.

64-bit is different from the 8-, 10-, 12-bit depth of the media we shoot. 32- or 64-bit refers to a media file’s compatibility with the CPUs and RAM on your computer. The bit-depth of the media refers to the range of grayscale or color values it can display.

macOS Catalina and Big Sur require 64-bit compatible media. Earlier versions of the macOS support both 32-bit and 64-bit.

64-bit compatible media includes:

  • QuickTime or MPEG-4 containers using:
  • ProRes
  • DNx
  • GoPro Cineform
  • H.264
  • HEVC

Early versions of both Adobe Media Encoder and Apple Compressor can create most, if not all, of these files. However, compressing HEVC on your hardware will take a LLLOOOONNNGGGGGG time!


Please rate the helpfulness of this tip.

Click on a star to rate it!

… for Apple Final Cut Pro X

Tip #1354: Adjust a Speed Transition

Larry Jordan – LarryJordan.com

Just as you can trim the edges of a clip, you can trim the edges of a speed transition.

Drag the edge of a speed transition to change timing.

Topic $TipTopic

By default, when you change the speed of a portion of a clip (Tip #1352), Final Cut inserts a speed transition to smoothly blend the speed change across several frames.

However, just as you can trim the edges of a clip, you can also trim the edges of a speed transition.

Here’s how:

  • Put the timeline playhead on the frame who’s speed you want to adjust.
  • Choose Modify > Retime > Blade Speed (Shortcut: Shift + B)
  • Change the speed of either the upstream or downstream clip segment by dragging the black, vertical “thumb” in the Retiming bar. This also adds a speed transition.
  • Grab the edge of the speed transition in the Retiming bar and drag it. This changes how the speed transition allocates frames from one speed to another.

EXTRA CREDIT

Tip #1353 shows how to disable a speed transition.


Please rate the helpfulness of this tip.

Click on a star to rate it!

… for Apple Final Cut Pro X

Tip #1353: Disable Speed Transitions

Larry Jordan – LarryJordan.com

Speed transitions ease into a speed change.

Double-click a gray speed transition to enable making a gradual speed change.

Topic $TipTopic

When you change the speed of a clip segment, Final Cut adds speed transitions to smooth the speed change. You can create the speed changes using the Blade Speed tool (Tip #1352) or a speed ramp. (Both are available in the Modify > Retiming menu.

When a speed change is made Final Cut automatically displays the Retiming bar, which is either green, orange or blue.

At the point of the speed change, a black, vertical timing thumb appears (see screen shot) surrounded by a gray area; that part of a clip that eases into the new speed rather than a hard cut.

This gray area is the speed transition. Double-click the gray area – not the black thumb itself – and the speed transition dialog opens (see screen shot).

This allows to you turn off the transition, thereby cutting from one speed to the next, as well as edit the frame where the speed change occurs by clicking Edit, then dragging the retiming thumb to a new location.

EXTRA CREDIT

To reset the speed of a clip, select it and type Shift + N.


Please rate the helpfulness of this tip.

Click on a star to rate it!

… for Apple Final Cut Pro X

Tip #1352: Change Clip Speed with “Blade Speed”

Larry Jordan – LarryJordan.com

“Blade Speed” puts timing edit points into a clip simplifying clip speed changes.

Retiming icon (top) and a slomo segment in a clip. Drag a black bar to adjust speed.

Topic $TipTopic

When you want to change the speed of a clip, the Blade Speed option is a really good place to start.

If all you want to do is slow the entire clip, select the clip, type Cmd + R and adjust the speed to suit from the popup menu in the center of the Retiming bar.

But, if you want to change the speed during a clip:

  • Put the playhead on the frame where you want the speed change to start.
  • From either the Retiming menu or Viewer icon (illustrated in the screen shot), select Blade Speed (Shortcut: Shift + B).
  • This opens the Retiming bar and puts a timing edit at the point of the playhead. This edit doesn’t cut the clip, but does allow changing the speed of the downstream segment.
  • Drag the black, vertical thumb in the green, orange or blue Retiming bar left (faster) or right (slower) to change the speed of the segment.

The Retiming bar colors are significant:

  • Green: 100% speed
  • Blue: Fast (time-lapse) motion
  • Yellow: Slow motion
  • Red: Still frame

Final Cut automatically enters speed transitions going into and out of the speed change.

Add as many speed change segments as you want, keeping in mind that you are adjusting how quickly the frames in a clip play back. The total number of frames in a clip will limit how much you can adjust speed.

EXTRA CREDIT

To reset the speed of a clip, select it and type Shift + N.


Please rate the helpfulness of this tip.

Click on a star to rate it!

… for Random Weirdness

Tip #1346: 11 Pre-Production Essentials

Larry Jordan – LarryJordan.com

Everything starts with a plan. Here’s how to start.

(Image courtesy of Pexels.com.)

Topic $TipTopic

This article first appeared in MotionArray.com. This is a summary.

Got a big shoot coming up? Not sure how to prepare? Don’t panic. Here’s the ultimate pre-production checklist at your service!

  • Familiarize Yourself with Your Set
  • Create an Equipment Checklist
  • Get Those Lines DOWN!
  • Brush Up on Those Filmmaking Hacks!
  • Create a Shooting Schedule
  • Account for Extra Time
  • Account for Flakers
  • Charge and Check EVERYTHING
  • Bring Extra Copies of the Script!
  • Make a Plan B
  • Let. Them. Eat.

Murphy’s Law loves the film industry. Name anything that could go wrong, and there’s a 75% chance it will go wrong. This article includes more details and links to decrease your stress and improve your productions.


Please rate the helpfulness of this tip.

Click on a star to rate it!

… for Random Weirdness

Tip #1345: Creating an Improv Web Series in 7 Days

Larry Jordan – LarryJordan.com

They said it couldn’t be done in a week. We did it anyway. 

L to R: The creators and co-stars of The Basics: Chloe Troast, Jamie Linn Watson, Mahayla Laurence, Liz Demmon, and Rachel Horwitz

Topic $TipTopic

This article first appeared in NoFilmSchool.com. This is a summary.

This might come as a surprise, but we shot a six-episode improv comedy web series in seven days. We are Jamie Linn Watson, Rachel Horwitz, Mahayla Laurence, Chloe Troast, and Liz Demmon.

After we got in touch with fellow NYU comedians MC Plaschke and Ryan Beggs to direct and produce, Liz took on the role of executive producer. The five of us, with MC and Ryan’s guidance, each wrote an episode centering around our characters, co-wrote the finale, renamed it The Basics, and we were off!

After assembling our team, we put together a budget that would allow us to properly pay our crew, rent equipment, and keep everyone fed and hydrated. Our budget was $13,000, and we raised the entirety of it (in 2019) on Kickstarter.

“Stylistically, we wanted to get away from the idea that comedy has to be either ‘vertical Twitter comedy video’ or ‘Wes Anderson style overload.’ There is so much in between! We think there is a huge range of visual things you can do with comedy that are rarely explored. For The Basics, we relied a lot on improvised performance as well as improvised zooms/camera moves which made everything feel fresh and in-the-moment. The one danger of doing a series about improv is that on-camera improvisation… isn’t that funny. The magic is often lost when you don’t have the stakes of it being live. To get the feeling of spontaneity, much like you would at a live show, we used snap zooms and jump cuts, as well as slow-motion effects and music overlays over the actual improv. We wanted the goofy, improvised nature of the comedy to juxtapose with a very professional look in our cinematography. For these characters, improv is life and death, and we wanted the style to reflect that, pulling from comedic shows like Search Party and Glee.”

The article details how they put this series together in planning and production, and how they promoted it afterward.


Please rate the helpfulness of this tip.

Click on a star to rate it!