… for Apple Motion

Tip #1316: Change the Color of a Single Object

Larry Jordan – LarryJordan.com

Secondary color changes are a common tool to create colors that better tell our story.

Source image (top) , color-changed chalk using a secondary correction (bottom).

Topic $TipTopic

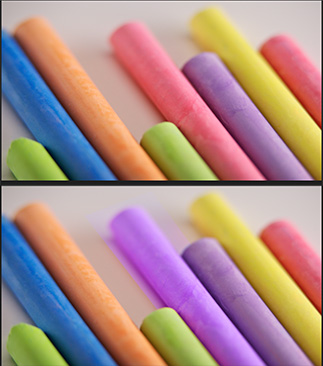
Look closely at this screen shot. What’s the difference between these two images…? Yup, the pink chalk at the top changed color. Here’s how.

A “secondary color correction” is one where a portion of the frame changes color, without affecting the rest of the image.

NOTE: Unlike chroma-key, which makes a color transparent, color replacement keeps all the image grayscale for texture and only alters the color.

  • Select the element containing the object whose color you want to change.
  • Apply Filters > Hue/Saturation Curves.
  • Click the gray eyedropper for Hue vs. Hue. (A blue eyedropper means it is active.) This creates three dots on the color line. The left and right dot indicate the range of the selection.
  • Drag the center dot up or down until you are happy with the color on screen. (For example, in the screen shot, both the chalk and its shadow/reflection are altered.)

Done.

EXTRA CREDIT

Many times, these color changes will spill to other parts of the image. To prevent that, duplicate the image, remove any filters, then draw a Bezier mask loosely around the object in the top-most layer.

This is what I did for the image in the screen shot.


Please rate the helpfulness of this tip.

Click on a star to rate it!

… for Apple Motion

Tip #1315: Maximize Image Gray-scale

Larry Jordan – LarryJordan.com

Even without scopes, we can safely adjust images using Levels.

The Levels Histogram, with red arrows showing the edges where the black and white sliders can be dragged.

Topic $TipTopic

One of the missing features in Motion that bothers me the most is a lack of video scopes. Granted, many effects don’t require them, but, far too often, we need to know whether the images we are creating are “broadcast legal” or not.

Still, we can still maximize the quality of our images without relying on scopes using Levels.

  • Select the image you want to adjust.
  • Apply Filters > Color > Levels.
  • Display the Levels settings in Inspector > Filters.

That “humpy” thing in the gray box represents the gray-scale values of every pixel in the image to which the Levels filter is applied. Black on the left, white on the right and gray in the middle.

There are five sliders below that histogram. The three we care the most about are on top.

To maximize the gray-scale values in an image, drag the left (black) slider to the right until it just touches where the histogram ramps up. Then, drag the right slider (white) until it just touches where the histogram ramps down.

NOTE: What this does is stretch the grayscale values of the image across the full grayscale range. This tends to make images look richer with a brighter “pop” in the highlights. The KEY is to not drag the sliders into the “humpy” part. Dragging in too far causes lost detail in either the shadows or highlights.

Finally, drag the middle slider (mid-tones) until the image looks “right” to you. Most of the time, I tend to darken mid-tones.

EXTRA CREDIT

Even without scopes, as long as the black and white sliders stay at the edge of the “humpy” part of the histogram, you’ll retain all image detail while still providing a rich, vibrant image.

I should also point out that, sometimes, you don’t want richness. For example, a foggy day has no highlights or shadows – just midtones.


Please rate the helpfulness of this tip.

Click on a star to rate it!

… for Visual Effects

Tip #1331: Fast Answers to Hard Questions

Larry Jordan – LarryJordan.com

Fast Answers to Hard Questions

(Image courtesy of ToolFarm.com)

Topic $TipTopic

Toolfarm has published 45 “Burning Questions” tutorials covering a range of products and techniques.

Topics include:

  • Burning Question: How to Make The Super Moon in Post
  • Burning Question: How Do I Quickly Give My Project a Letterbox Look?
  • Burning Question: How Do I Edit and Export with My NLE for TikTok?
  • Burning Question: What is a Cinemagraph and How Do I Create One?
  • Burning Question: What is Reverse Stabilization?
  • Burning Question: Is there a smooth, easy way to wipe my hard drive and start fresh?
  • Burning Question: How Do I Remove Flicker from my Footage?

All tutorials are free on the Toolfarm website – linked above.


Please rate the helpfulness of this tip.

Click on a star to rate it!

… for Visual Effects

Tip #1330: How to Start a VFX Studio

Larry Jordan – LarryJordan.com

Start with experience, grow organically and pay attention to your pipeline.

Outpost VFX UK (Courtesy of Outpost VFX.)

Topic $TipTopic

This article, written by Ian Failes, first appeared in VFXVoice.com. This is a summary.

Like any business, getting a new visual effects studio off the ground can be a monumental effort. The tasks of hiring talent, setting up pipelines, bidding for work, and managing the intricacies of VFX production are not trivial ones. That said, the wider availability of accessible VFX software and collaboration tools have perhaps made the task of getting started as a studio and delivering shots somewhat easier than ever before.

VFX Voice asked the founders of four relatively new visual effects studios – CVD VFX, Mavericks VFX, Outpost VFX and Future Associate – how they began as independent operations, how they took up often unexpected opportunities, what hurdles they had to overcome to get their studio going, and what advice they had for others who might be looking to start their own VFX company.

The one constant among the studios VFX Voice spoke to is that they all began as startups by visual effects supervisors who had already gained experience elsewhere. Brendan Taylor, for example, started Mavericks VFX in Toronto in 2011 after working for several years with MR. X.

“When we were just compositing, it was fine,” states Taylor. “The real challenge came when we introduced 3D. Any inefficiencies we had with 30 artists were going to be doubled with 60 artists. And one of my senior artists shared with me that experienced VFX artists are very concerned about the pipeline of the company they go to. If it is an inefficient pipeline, and they have to work harder at doing small tasks, they can’t spend as much time working on their craft, and they hate it.”

Asked what his main piece of advice would be to others thinking of starting a VFX studio, Taylor identifies advice he received from another visual effects industry member – that he should straight away engage a great team of lawyers. “When you get into the legal and business affairs of DreamWorks and Disney,” says Taylor, “it can be daunting and scary. We could have saved a bit of money to go with a smaller law firm, but there’s something to be said for the letterhead. ”

The article provides in-depth interviews, images and links.


Please rate the helpfulness of this tip.

Click on a star to rate it!

… for Visual Effects

Tip #1327: Filmworkz Launches New Site & Pricing

Larry Jordan – LarryJordan.com

From image repair to image enhancement, Filmworkz can help.

Logos for the six DVO tools from Filmworkz.

Topic $TipTopic

Filmworkz.com announced a new website along with six new color grading tools. While their descriptions are a bit pretentious and somewhat obtuse, if you are interested in color grading, this site is worth visiting.

They have created six DVO’s (Digital Video Optics). These tools work with DaVinci Resolve, Mistika Boutique, Scratch and Nucoda running on Mac, Windows and Linux platforms. These tools are available singly for $15 (US) per month, or $59 US per month for all six.

And, as part of the launch of their new website – https://Filmworkz.com – they are offering 7-day free trials.


Please rate the helpfulness of this tip.

Click on a star to rate it!

… for Codecs & Media

Tip #1325: Why Is an Audio Fade Called +3 dB?

Larry Jordan – LarryJordan.com

Audio is a Strange Beast

Four different fade shapes available in Apple Final Cut Pro.

Topic $TipTopic

Unlike video, audio levels are logarithmic. For example, whenever the audio level increases (or decreases) around 10 dB, the perceived volume is doubled (or cut in half). These log values also have an impact in cross-fading between clips.

A +3 dB transition adds a 3 dB increase in volume to both clips in the middle of a cross-fade. If the software did not add this “bump,” the cross-fade would sound fainter in the middle of a transition, then louder at each end.

When fading to or from black, a straight-line (linear) transition is best. When cross-fading between two clips, both of which have continuous audio, a +3 dB transition will sound better.

EXTRA CREDIT

Some software allows you to change the shape of the curve manually. These rules still apply, but manual adjustments allow much greater control over how the transition sounds.

Still, the general rule of audio is: Whatever sounds the best to you IS most likely the best.


Please rate the helpfulness of this tip.

Click on a star to rate it!

… for Codecs & Media

Tip #1324: Test Compressed Image Quality – FAST!

Larry Jordan – LarryJordan.com

The Difference blend mode is a fast way to see how much your compression settings are damaging your images.

Two frames – one compressed and the source – compared using the Difference blend mode.

Topic $TipTopic

The most important concept you need to understand about video compression is that the process of compressing a file ALWAYS removes data during compression. Always. This means that the more you compress a file to reduce it’s file size, the more data is removed.

Once removed, you can’t put this data back. This is the reason you don’t want to re-compress an already compressed file. Another important note is that different movies, codecs and bit rates yield different results.

There’s a very fast way to compare the quality of a source file with the compressed image.

The process is simple: Using Photoshop, Final Cut Pro, or Premiere Pro, compare a frame from the source file with a frame from the compressed file using the Difference blend mode.

Perfectly matched frames are solid black. Frames with lots of differences – such as the screen shot – show lots of ghosting, especially around edges. This technique is a good way to test different compression technology and see which one works the best for your projects.

Here’s an article the explains this technique in detail and provides illustrations of the results from a variety of compression settings and software.


Please rate the helpfulness of this tip.

Click on a star to rate it!

… for Codecs & Media

Tip #1322: What is Hardware-Accelerated Encoding?

Larry Jordan – LarryJordan.com

Hardware compression sets the standard for both speed and quality.

The Effects panel in After Effects, showing which effects are accelerated.

Topic $TipTopic

In the past, when we needed to render or export a file, the software in the NLE did all the work. This worked fine, but took a long time. As video production became more of a mass market, there was incentive for hardware developers to incorporate video compression circuits onto the CPU.

This was MUCH faster than software compression, but, for video pros, still not fast enough.

Now, video compression is moving from the CPU to the GPU. For example, according to Adobe, Adobe Premiere Pro and Adobe Media Encoder can take advantage of available GPUs on your system to distribute the processing load between the CPU and the GPU to get better performance. Currently, most of the processing is done by CPU and GPU assists in processing certain tasks and features.

The Mercury Playback Engine (GPU Accelerated) renderer is used to render GPU accelerated effects and features.
Here is the list of GPU accelerated effects in Adobe Premiere Pro. To identify the GPU accelerated effects, navigate to the Effects panel and look for the Accelerated Effects icon.

Apart from processing these effects, the Mercury Playback Engine (GPU Accelerated) is used for image processing, resizes, color space conversions, recoloring and more. It is also used for timeline playback/scrubbing and full-screen playback using Mercury Transmit.

EXTRA CREDIT

A wild card in hardware acceleration is the new Apple silicon chips. In the past, hardware acceleration for both H.264 and HEVC was handled by the T-2 chip.
With the move to Apple silicon, all compression is now done using the M1 chip.

From a quality point of view, my studies show that for most compression, hardware acceleration looks the same as software compression, yet processes files much more quickly.


Please rate the helpfulness of this tip.

Click on a star to rate it!

… for Adobe Premiere Pro CC

Tip #1320: What Does “Ganging Monitors” Do?

Larry Jordan – LarryJordan.com

Ganging plays two clips in sync to help figure out the best place to place an edit.

Set ganging using the menu under the Wrench icon in the Program Monitor.

Topic $TipTopic

When you display the Wrench icon menu in either the Source or Program monitors, the first choice is “Gang Source and Program.” What does this do?

Ganging plays two clips in sync – one in the Source panel and the other in the Program Monitor – to help you figure out the best place to place an edit.

To set this up, open a clip into the Source monitor.

Then, place the playheads in both the Source panel and timeline on the frame where you want each clip to start.

Click the Wrench icon in the Program Monitor and select Gang Source & Program from the popup menu.

Now, as you drag the playhead in the timeline, the Source monitor will follow along; perfectly in sync.


Please rate the helpfulness of this tip.

Click on a star to rate it!

… for Adobe Premiere Pro CC

Tip #1319: Customize a Zoom Cut

Larry Jordan – LarryJordan.com

The key to making this transition invisible is to find matching colors in the two shots.

The small white circles indicate the targets for a zoom cut.

Topic $TipTopic

A Zoom cut zooms into the middle of a clip, cuts to a second shot, then zooms back out. What you may not know is that this transition can be customized to make it even more effective.

  • Apply Effects > Video Transitions > Zoom > Cross Zoom to a transition in the timeline.

NOTE: Any transition needs “handles,” extra media before the In and after the Out, in order to exist.

  • Select the transition in the timeline.
  • Open the Effect Controls panel and check Show Actual Sources.
  • In addition to showing images of the actual timeline clips, these small thumbnails also show two white circles (indicated by red arrows in the screen shot). These white circles define the target of each zoom.
  • Drag these “zoom targets” so that they both are on top of reasonably matching colors.

Now, when you zoom, the cut will occur when both shots display similar colors, making the actual transition harder to see and, therefore, more convincing.


Please rate the helpfulness of this tip.

Click on a star to rate it!