The most popular VFX freebies and tutorials – all in one place.
{Image courtesy of Toolfarm.com.)
Announced on News Year’s Eve, here are the “Toolfarm Top Ten Freebies & Tutorials” – the Top 10 most popular, fan-favorite freebies from 2020 at Toolfarm.
Tour four different studios and learn how they create their projects.
The Path to Mograph logo
The School of Motion recently released a free course called “The Path to Mograph.”
“In this short 10-day course you’ll get an in-depth look at what it takes to be a Motion Designer. Along the way, you’ll learn about the software, principles, and techniques used in the field through in-depth case-studies and tons of bonus material.” (School of Motion website)
The course instructor is Joey Korenman. Prior to starting School of Motion, Joey was the Creative Director and Lead Animator at Toil in Boston, MA. There he lead projects for clients like Subway, McDonalds, Progressive, Saucony, and many other high-profile brands.
The course also includes example projects and over six hours of video and audio instruction. Click the link above to learn more.
Please rate the helpfulness of this tip.
Click on a star to rate it!
https://www.theinsidetips.com/wp-content/uploads/2019/09/Tips-Logo-700x150.jpg00Larry Jordanhttps://www.theinsidetips.com/wp-content/uploads/2019/09/Tips-Logo-700x150.jpgLarry Jordan2021-01-06 01:30:002021-01-06 01:30:00Tip #1310: The Path to Mograph – Free Course
Deep fake face swapping is both boon and bane – depending upon how it is used.
(Image courtesy of Pexels.com.)
This article, Deep Fakes – A Creative Perspective, from VFXVoice, looks at the impact of emerging face-swapping technology on visual effects. This is a summary.
New ‘deep fake’ face-swapping videos seem to go viral on the internet with increasing regularity. Perhaps that’s because artists, and the machine learning algorithms they use for deep fakes, are increasingly getting so much better at them. Many have pondered, therefore, whether deep fakes will soon make their mark – or are already doing so – in traditional filmed entertainment.
The deep fakes you tend to see in online videos, where a speaking person’s face is typically replaced with that of another (often famous) person, rely on deep learning algorithms and training data. This data is usually video footage or photographs of the other person used to craft a convincing model for face swapping.
Some of the most popular deep fakes made by ctrl shift face include actors doing impressions of other actors, with their faces swapped. Those, in particular, have an extra level of appeal since the voice is already part-way there. “I make videos that I want to see and make me laugh,” ctrl shift face advises, in relation to deep fake video project choices. “Some ideas fail because the technology is not there yet, but most often they fail because of YouTube policies and copyrights.”
“As far as using deep fakes in VFX goes, they’re still very much in their infancy, but they do offer creatives an exciting new range of storytelling possibilities,” outlines Framestore Executive Creative Director William Bartlett. “We used it for example on a very small part of our work on Pokémon: Detective Pikachu where the film required Bill Nighy’s character to appear younger in an ‘old’ news reel. It required some fixes, but deep fakes suited this need because of the nature of what would ultimately be presented on screen.”
The full article presents interviews, videos and more details regarding this process.
EXTRA CREDIT
From my perspective, this article reminds me of the adage: “Just because we can, does not mean we should.” The problem is the deep fake genie is out of the bottle – now what do we do with it? These may solve a creative problem, but there still seems a major societal price to pay.
What happens when we can’t trust anything we see?
Please rate the helpfulness of this tip.
Click on a star to rate it!
https://www.theinsidetips.com/wp-content/uploads/2019/09/Tips-Logo-700x150.jpg00Larry Jordanhttps://www.theinsidetips.com/wp-content/uploads/2019/09/Tips-Logo-700x150.jpgLarry Jordan2021-01-06 01:30:002021-01-01 17:05:57Tip #1309: Deep Fakes – A Creative Perspective
Be careful – preview files may not match your source file resolution.
Render file resolution can vary, depending upon two hidden settings. Here’s what you need to know to avoid problems.
According to the Help files for Adobe Premiere:
If your previews are rendered at a resolution below the sequence resolution, the playback resolution is actually a fraction of the preview resolution.
For example, you can set your preview files to render at 1/2 the sequence frame size (1/2 resolution) and your playback resolution to 1/2 resolution. The rendered previews play back at 1/4 of original resolution (assuming that the resolution of the original media matched the sequence resolution).
NOTE: You can set keyboard shortcuts to change the playback resolution.
Not all resolutions are available for all sequence types. For Standard Definition sequences, such as DV, only Full and 1/2 are available. For many HD sequences up to 1080 frame size, Full, 1/2, and 1/4 are available. For sequences with frame sizes larger than 1080, such as RED, more fractional resolutions are available.
EXTRA CREDIT
This possible resolution difference is why I never use existing preview files when exporting. I always want to be sure exports are at the highest resolution.
Here’s the link to Adobe’s Help for more information.
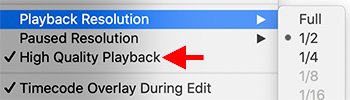
High-quality compensates for the visual difference when playing or pausing a clip.
Premiere allows control over playback quality and resolution. By default High Quality Playback is turned off. When should you turn it on?
Here’s the answer, from Adobe Help.
NOTE: Click the Wrench icon in either the Source or Program Monitors to see these menu options.
Playback vs. Paused Resolution
Some formats are difficult to display in full-motion playback, due to their high compression or high data rate. A lower resolution permits faster motion playback, but at the expense of display image quality. This tradeoff is most visible when viewing AVCHD and other H.264 -codec based media. Below full resolution, these formats have error correction turned off, and artifacts are common during playback. These artifacts, however, do not show up in exported media.
Providing separate playback and pause resolutions gives you more control over your monitoring experience. With high-resolution footage, you can set playback resolution to a lower value (for example, 1/4) for smooth playback, and set the pause resolution to Full. These settings allow you to check the quality of focus or edge details when playback is paused. Scrubbing puts the monitor in playback resolution, not pause resolution.
Not all resolutions are available for all sequence types. For Standard Definition sequences, such as DV, only Full and 1/2 are available. For many HD sequences up to 1080 frame size, Full, 1/2, and 1/4 are available. For sequences with frame sizes larger than 1080, such as RED, more fractional resolutions are available.
High Quality Playback
To optimize playback performance, playback quality at any of the monitor’s playback resolutions (Full, ½, and ¼) is lower than it is when pausing the video. Due to the difference in quality, users may notice a slight “bump” in image quality between playback and pause. Frames can have a slightly softer look during playback versus pause at the default settings, even when both are set to full resolution. With High-Quality Playback toggled on, the quality of playback frames will match paused frames when they’re set to the same resolution and eliminate the quality “bump” when starting and stopping playback. However, turning High-Quality Playback on can decrease playback performance, including causing dropped frames.
EXTRA CREDIT
For my projects, I set:
Playback resolution to 1/2
Paused Resolution to Full
And turn High Quality Playback off
When I get a newer/faster system, I’ll turn High Quality on.
Please rate the helpfulness of this tip.
Click on a star to rate it!
https://www.theinsidetips.com/wp-content/uploads/2019/09/Tips-Logo-700x150.jpg00Larry Jordanhttps://www.theinsidetips.com/wp-content/uploads/2019/09/Tips-Logo-700x150.jpgLarry Jordan2021-01-05 01:30:002021-01-01 15:15:44Tip #1301: Enable High Quality Playback
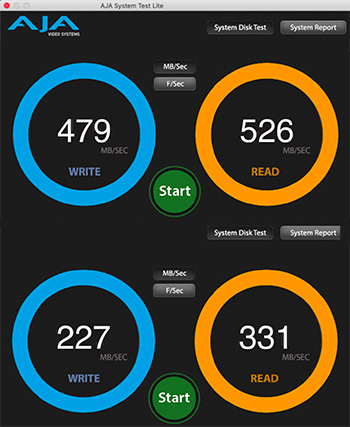
SSDs don’t have seek times or latency. This means MUCH faster storage speeds for multiple apps accessing storage at once.
Samsung T-5 SSD speed in isolation (top) and with BMD and AJA both running (bottom).
OK, I admit, I was playing. But I discovered something very intriguing about SSDs. Watch.
As we’ve learned over the last several tips, the speed of spinning hard drives are limited by seek times and latency (Tip #1287)
The speed of a network is limited by how the devices are connected to it (i.e. 100 Mb vs. 1 Gb vs. 10 Gb Ethernet), the number of users and the connected speed of the server.
But, direct-connected SSDs don’t have these limitations. Instead, speeds are controlled based upon the construction and connection protocol of the SSD (PCIe vs. NVMe – and – USB vs. Thunderbolt).
I plan to do this test in more detail in a few weeks, when I get a chance to play with a brand-new, high-performance NVMe SSD.
But, for this quick check, I connected a Samsung T-5 SSD to a 2019 Mac mini running Thunderbolt 3. While the Thunderbolt 3 protocol maxes out around 2500 MB/sec, the T-5 pegged the meter at 479 MB/s write and 526 MB/s read (see the top values in the screen shot).
HOWEVER, when I ran BOTH AJA System Test and Blackmagic Disk Speed Test at the same time, while the speed for each application dropped, the aggregate speed was FASTER than the speed for the isolated test.
NOTE: In my example, the single app read speed was about 525 MB/s. When both apps were running, the aggregate speed was about 660 MB/s!
What this means is that if you have multiple applications reading or writing to SSD storage at the same time – which is typical for many media apps – SSDs provide far less of a slow-down than spinning media because we can access all that storage directly, without waiting for platters to spin and heads to jump into place.
These tests are just preliminary – I’ll have more on this in a few weeks. But I think this is very, VERY interesting!
I use these tips all the time when I need to tweak a clip into better position.
Select a connected clip, then type comma or period to move it left or right.
While clips in the Primary Storyline are magnetically “connected” to each other, that is not true for any connected clip. Here’s a quick tip that allows you to move connected clips or storylines using only the keyboard.
Select the connected clip(s) you want to move.
Type comma to move the selected clips left one frame.
Type Shift + comma to move the selected clips left ten frames.
Type period to move the selected clips right one frame.
Type Shift + period to move the selected clips right ten frames.
NOTE: This keyboard shortcut won’t work on clips in the Primary Storyline.
EXTRA CREDIT
This same keyboard shortcut also works for selected edit points.
Please rate the helpfulness of this tip.
Click on a star to rate it!
https://www.theinsidetips.com/wp-content/uploads/2019/09/Tips-Logo-700x150.jpg00Larry Jordanhttps://www.theinsidetips.com/wp-content/uploads/2019/09/Tips-Logo-700x150.jpgLarry Jordan2021-01-04 01:30:002021-01-01 14:46:13Tip #1298: Shortcuts to Move Clips
Pacing is the sum of all the different parts of a movie.
(Image courtesy of Pexels.com)
This article, written by Jourdan Aldredge, first appeared in PremiumBeat.com. This is a summary.
Pacing is something that can be hard to put your finger on. What makes one film feel fast and fun, and another slow and laborious? It’s more than simply the number of cuts or the time between them. Pacing is something practical, as well as something intangible, that informs how audiences view a film and keep up with the story on the screen.
The question is: How do you define pacing and control it in your projects? Let’s explore the five secrets to pacing and how you can keep your projects from getting stale.
Script and Storyboard. Pacing really and truly starts well before you start to put together your edit. The pace of a project is defined in the earliest stages of your outline and script. You have the power to begin to define your pace in pre-production as you plan out your shoot and edit workflow. Different projects are meant to have different pacing.
Shoot with Intentionality. Good filmmaking isn’t just about skills or composition. It’s really about intentionality. Just how much thought and focus can you bring to every scene and every shot? Pacing develops through an intricate balance of all the elements of filmmaking combined together.
Create Momentum Through Movement. One of the best tools for defining the overall pace of a project is movement. Movement—either with your characters, subjects, or the camera itself—can create momentum from shot to shot and scene to scene.
Don’t Just Edit Sequence by Sequence. Just because you have one well-paced action sequence that’s visually stunning and delivered in a satisfactory manner, doesn’t mean that it’ll always match up well with the emotional relationship sequence in the next scene. Pacing is all about consistency and finding the right balance between different styles and speeds.
Add Graphics, Effects, and Motion. Finally, as a last step, one great way to tinker and tailor with your project’s pace comes in the final stages of your edit when you add graphics, effects, and digital motion.
EXTRA CREDIT
The article, linked above, has videos that illustrate each of these points.
Please rate the helpfulness of this tip.
Click on a star to rate it!
https://www.theinsidetips.com/wp-content/uploads/2019/09/Tips-Logo-700x150.jpg00Larry Jordanhttps://www.theinsidetips.com/wp-content/uploads/2019/09/Tips-Logo-700x150.jpgLarry Jordan2021-01-01 01:30:002020-12-26 20:04:59Tip #1294: 5 Secrets to Film Pacing
It is fascinating to see what readers find interesting!
During this last year, The Inside Tips published 975 tips and techniques covering six subject categories:
Adobe Premiere
Apple Final Cut Pro
Apple Motion
Codecs & Media
Random Media Weirdness
Visual Effects
Here are three “Top Ten Tips Lists:” The first shows the most popular tips covering Random Weirdness. The second list shows the Top Ten most read tips across all categories. The third list shows the highest rated tips across all categories sorted by votes.
TOP 10 INSIDE TIPS FOR 2020
FOR RANDOM PRODUCTION WEIRDNESS
NOTE: Each tip was rated 5 out of 5. They are sorted by the number of votes each tip received, with most votes listed first.
Please rate the helpfulness of this tip.
Click on a star to rate it!
https://www.theinsidetips.com/wp-content/uploads/2019/09/Tips-Logo-700x150.jpg00Larry Jordanhttps://www.theinsidetips.com/wp-content/uploads/2019/09/Tips-Logo-700x150.jpgLarry Jordan2021-01-01 01:30:002020-12-27 10:31:20Tip #1293: Top Ten Tips of 2020 for Random Weirdness
We may request cookies to be set on your device. We use cookies to let us know when you visit our websites, how you interact with us, to enrich your user experience, and to customize your relationship with our website.
Click on the different category headings to find out more. You can also change some of your preferences. Note that blocking some types of cookies may impact your experience on our websites and the services we are able to offer.
Essential Website Cookies
These cookies are strictly necessary to provide you with services available through our website and to use some of its features.
Because these cookies are strictly necessary to deliver the website, refuseing them will have impact how our site functions. You always can block or delete cookies by changing your browser settings and force blocking all cookies on this website. But this will always prompt you to accept/refuse cookies when revisiting our site.
We fully respect if you want to refuse cookies but to avoid asking you again and again kindly allow us to store a cookie for that. You are free to opt out any time or opt in for other cookies to get a better experience. If you refuse cookies we will remove all set cookies in our domain.
We provide you with a list of stored cookies on your computer in our domain so you can check what we stored. Due to security reasons we are not able to show or modify cookies from other domains. You can check these in your browser security settings.
Google Analytics Cookies
These cookies collect information that is used either in aggregate form to help us understand how our website is being used or how effective our marketing campaigns are, or to help us customize our website and application for you in order to enhance your experience.
If you do not want that we track your visit to our site you can disable tracking in your browser here:
Other external services
We also use different external services like Google Webfonts, Google Maps, and external Video providers. Since these providers may collect personal data like your IP address we allow you to block them here. Please be aware that this might heavily reduce the functionality and appearance of our site. Changes will take effect once you reload the page.
Google Webfont Settings:
Google Map Settings:
Google reCaptcha Settings:
Vimeo and Youtube video embeds:
Other cookies
The following cookies are also needed - You can choose if you want to allow them:
Privacy Policy
You can read about our cookies and privacy settings in detail on our Privacy Policy Page.

 Announced on News Year’s Eve, here are the “Toolfarm Top Ten Freebies & Tutorials” – the Top 10 most popular, fan-favorite freebies from 2020 at Toolfarm.